Chapter 10. Data Persistence
- 10.0 Preview
- 10.1 Getting Directory
- 10.2 Saving Files
- 10.3 Property List Serialization
- 10.4 Persistence with Property List
- 10.5 Archiving
- 10.6 NSCoding
- 10.7 Archiving Persistence
- 10.8 SQLite3
- 10.9 SQLite3 Persistence
- 10.10 Core Data
In this chapter, we will look at four different ways for persisting data to the iPhone's file system:
- property lists
- object archives
- iPhone's embedded relational database, SQLite3
- Core Data
All of the four ways of data persistence mechanism share an important common element. That's our application's "/Documents" folder. Every application has its own "/Documents" directory.
How do we retrieve the full path to the Documents directory which seems to have random name? The C function NSSearchPathForDirectoriesInDomains() will locate various directories for us.
Here's some code to retrieve the path to the Documents directory:
NSArray *path = NSSearchPathForDirectoriesInDomains(NSDocumentDirectory,
                NSUserDomainMask, YES);
NSString *documentsDirectory = [paths objectAtIndex:0];
The constant NSDocumentDirectory tells we are looking for the path to the Documents directory. The second constant, NSUserDomainMask, says we want to restrict our search to our application's sandbox.
Though an array of matching paths is returned, we can count on our Documents directory residing at index 0 in the array. We can create a filename, for reading and writing purposes, by appending another string at the end of the stringByAppendingPathComponent:, for example:
NSString *filename = [documentsDirectory
           stringByAppendingPathComponent:@"myFile.txt"];
After this call, filename would contain the full to a file, myFile.txt in our application's Documents directory, and we can use filename to create, read, and write from that file.
Getting a reference to our application's temporary directory is even easier than getting a reference to te Documents directory. The foundation function, NSTemporaryDirectory() will return a string containing the full path to our application's temporary didrectory. To create a filename for a file that will get stored in the temporary directory, first, we find the temporary directory:
NSString *tempPath = NSTemporaryDirectory();
After that, we create a path to a file in that directory by appending a filename to that path:
NSString *tempFile = [tempPath
            stringByAppendingPathComponent:@"tempFile.txt"];
iPhone has four different mechanisms of data persistence for it's file system.
For SQLite3, we'll create a single SQLite3 database file and let SQLite3 take care of storing and retrieving our data. In its simplest form, Core Data handles of all the file system management for us. The other two mechanisms, property lists and archiving, we need to put some thought into whether we're going to store our data in a single file or in multiple file.
Using asingle file is the easiest, and with many applications, it is a perfectly acceptable. We start off by creating a root object, an NSArray or NSDictionary, though our root object can also be based on a custom class when using archiving. Then, we populate our root object with all the program data that needs to be persisted. Whenever we need to save, our code rewrites the entire contents of that root object to a single file. When our application launches, it reads the entire contents of that file into memory, and when it quits, it writes out the entire contents. This is the approach we'll use in this chapter.
The downside of using a single file is that we have to load all of our application's data into memory, and we have to write all of it to the file system for even the smallest changes. If our application isn't likely to manage more that a few megabytes of data, this approach is probably fine.
The multiple file approach is definitely more complicated. We might write an email application that stored each email message in its own file. There are obvious advantages to this method. It allows the application to load only data that the user has requested, and when the user makes a change, only the files that changed have to be saved. This method also gives us the opportunity to free up memory when we receive a low memory notification, since any memory that is being used to store data that the user is not currently looking at can be flushed and simply reloaded from the file system he next time it's needed. The downside of multiple file persistence is that it adds a fair amount of complexity to our application.
Property lists are convenient, because they can be edited manually using Xcode or the Property List Editor application, and both NSDictionary and NSArray instances can be written to and created from property lists as long as the dictionary or the array has only serializable objects. A serialized object has been converted into a stream of bytes so that it can be stored in a file or transferred over a network. Though any object can be made serializable, only certain objects can be placed into a collection class such as an NSDictionary or NSArray. And then stored to a property list using the collection classes' writeToFile:atomically: method. The Objective-C classes that can be serialized this way are:
- NSArray
- NSMutableArray
- NSMutableDictionary
- NSData
- NSMutableData
- NSString
- NSMutableString
- NSNumber
- NSDate
If we can build our data model from these objects, we can use property lists to easily save and load our data. If we're going to use property lists to persist our application data, we'll use either an NSArray or an NSDictionary. If al of the objects that we put into the NSArray and NSDictionary are serializable objects from the preceding list, we can write a property list by calling the writeToFile:atomically: method on the dictionary or array instance. For example:
[myArray writeToFile:@"/path/to/file/location/output.plist"
     atomically:YES];
One problem with the property list approach is that custom objects can't be serialized into property list. We also can't use other delivered class from Cocoa Touch that aren't specified in the previous list of serializable objects, which means that class like NSURL, UIImage, and UIColor cannot be used directly.
Not being able to serialize these object also means that we can't easily create derived or calculated properties, and some of our code that really should be contained in model classes has to be moved to our controller classes. Again, these restrictions are OK for simple data models and simple applications. Most of the time, however, our application will be much easier to maintain if we create dedicated model classes.
However, simple property lists can still be useful in complex applications. They are a great way to include static data in our application. For example, when our application includes a picker, often the best way to include the list of items to go in our picker is to create a property list file and include it in our project's Resources folder, which will cause it to get compiled into our application.
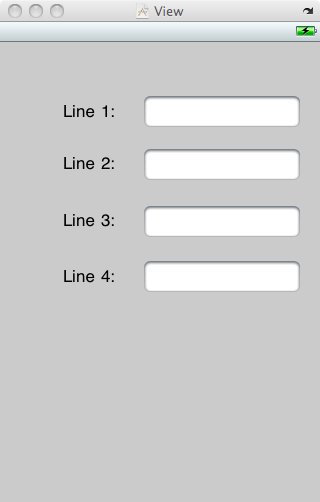
In this section, we're going to write a program that lets the user enter data into four text field, and then saves those fields to a property list file when the application end. Next time the application launches, it reloads the data back from that property list file.
Let's create a new project using the view-based application template, and save the project with the name Plist Persistence.
Here is the interface file, "Plist_PersistenceViewController.h"
#import <UIKit/UIKit.h>


#define kFilename        @"data.plist"

@interface Plist_PersistenceViewController : UIViewController {
    UITextField *field1;
    UITextField *field2;
    UITextField *field3;
    UITextField *field4;
}
@property (nonatomic, retain) IBOutlet UITextField *field1;
@property (nonatomic, retain) IBOutlet UITextField *field2;
@property (nonatomic, retain) IBOutlet UITextField *field3;
@property (nonatomic, retain) IBOutlet UITextField *field4;
- (NSString *)dataFilePath;
- (void)applicationWillTerminate:(NSNotification *)notification;
@end
We've defined a constant for the filename as well as four text field outlets. We also defined two additional methods. The first method, dataFilePath, will create and return the full pathname to our data file. It concatenates kFilename onto the path for the Documents directory. The other method, applicationWillTerminate:, will be called when our application quits. It will save data to the property list file.
Save the file and move on to Interfaced Builder.
Double-click Plist_PersistenceViewController.xib after expanding the Resources folder,
then put four Text Fields and four Labels as in the picture. One way of making the
four text fields is to copying them. So, hold down the option key,
and drag the text field. This will create a copy of it.
Now, let's connect the text fields to the outlets. Control-drag from the File's Owner icon to each of the four text fields. Connect the topmost text field to the outlet, field1, and then to field2, an so on.

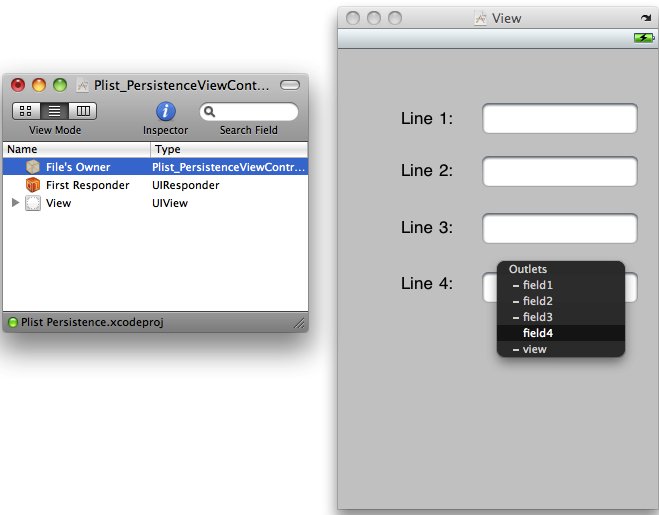
Save nib and back to Xcode.
Time to write implementation file, "Plist_PersistenceViewController.m"
#import "Plist_PersistenceViewController.h"

@implementation Plist_PersistenceViewController

@synthesize field1;
@synthesize field2;
@synthesize field3;
@synthesize field4;

- (NSString *)dataFilePath {
    NSArray *paths = NSSearchPathForDirectoriesInDomains(
                            NSDocumentDirectory, NSUserDomainMask, YES);
    NSString *documentsDirectory = [paths objectAtIndex:0];
    return [documentsDirectory stringByAppendingPathComponent:kFilename];
}

- (void)applicationWillTerminate:(NSNotification *)notification {
    NSMutableArray *array = [[NSMutableArray alloc] init];
    [array addObject:field1.text];
    [array addObject:field2.text];
    [array addObject:field3.text];
    [array addObject:field4.text];
    [array writeToFile:[self dataFilePath] atomically:YES];
    [array release];
}

#pragma mark -
- (void)viewDidLoad {
    NSString *filePath = [self dataFilePath];
    if ([[NSFileManager defaultManager] fileExistsAtPath:filePath]) {
        NSArray *array = [[NSArray alloc] initWithContentsOfFile:filePath];
        field1.text = [array objectAtIndex:0];
        field2.text = [array objectAtIndex:1];
        field3.text = [array objectAtIndex:2];
        field4.text = [array objectAtIndex:3];
        [array release];
    }

    UIApplication *app = [UIApplication sharedApplication];
    [[NSNotificationCenter defaultCenter]
                            addObserver:self
                            selector:@selector(applicationWillTerminate:)
                            name:UIApplicationWillTerminateNotification
                            object:app];
    [super viewDidLoad];
}

- (void)viewDidUnload {
	// Release any retained subviews of the main view.
	// e.g. self.myOutlet = nil;
    self.field1 = nil;
    self.field2 = nil;
    self.field3 = nil;
    self.field4 = nil;
    [super viewDidUnload];
}

- (void)dealloc {
    [field1 release];
    [field2 release];
    [field3 release];
    [field4 release];
    [super dealloc];
}
@end
The method, dataFilePath, returns the full pathname of our data file by finding the Documents directory and appending kFilename to it. This method will be called from any code that needs to load or save data.
- (NSString *)dataFilePath {
    NSArray *paths = NSSearchPathForDirectoriesInDomains(
                        NSDocumentDirectory, NSUserDomainMask, YES);
    NSString *documentsDirectory = [paths objectAtIndex:0];
    return [documentsDirectory stringByAppendingPathComponent:kFilename];
}
The next method, applicationWillTerminate:, takes a pointer to an NSNotification as an argument. applicationWillTerminate: is a notification method, and all notifications take a single NSNotification instance as their argument.
A notification is a lightweight mechanism that objects can use to communicate with each other. Any object can define one or more notifications that it will publish to the application's notification center, which is a singleton object that exists only to pass these notifications between objects. Notifications are usually indications that some event occurred, and objects that publish notifications include a list of notifications in their documentation.
The purpose of most notifications is usually pretty obvious from their names,
but the documentation contains further information. If we find one whose purpose
is unclear. Our application needs to save its data before the application
quits. So, we are interested in the notification called
UIApplicationWillTerminateNotification. When we write our viewDidLoad method,
we will subscribe to that notification and tell the notification center
to call this method when that notification happens:
- (void)applicationWillTerminate:(NSNotification *)notification {
    NSMutableArray *array = [[NSMutableArray alloc] init];
    [array addObject:field1.text];
    [array addObject:field2.text];
    [array addObject:field3.text];
    [array addObject:field4.text];
    [array writeToFile:[self dataFilePath] atomically:YES];
    [array release];
}
In the method, we create a mutable array, add the text from each of the four fields to the array. Then, write the contents of that array to a property list file.
In the viewDidLoad method, we check to see if a data file already exists. If there isn't one, we don't want to bother trying to load it. If the file does exists, we instantiate an array with the contents of that file and then copy the objects from that array to our four text fields. Because arrays are ordered lists, by copying them in the same order as we saved them, we are always sure to get the right value in the right fields.
- (void)viewDidLoad {
    NSString *filePath = [self dataFilePath];
    if ([[NSFileManager defaultManager] fileExistsAtPath:filePath]) {
        NSArray *array = [[NSArray alloc] initWithContentsOfFile:filePath];
        field1.text = [array objectAtIndex:0];
        field2.text = [array objectAtIndex:1];
        field3.text = [array objectAtIndex:2];
        field4.text = [array objectAtIndex:3];
        [array release];
    }
After loading the data form the property list, we get a reference to
our application instance and use that to subscribe to the
UIApplicationWillTerminateNotification, using the default NSNotificationCenter
instance and a method, addObserver: selector: name: object:. We pass an
observer of self, which means that our PersistenceViewController is the
object that needs to be notified. For selector, we pass a selector to the
applicationWillTerminate: method we wrote, telling the notification center
to call that method when the notification is published. The third parameter,
name:, is the name of the notification that we're interested in receiving,
and the final parameter, object:, is the object we're interested in getting
the notification from. If we pass nil for the final parameter, we would
then get notified any time any method posted the UIApplicationWillTerminateNotification.
    UIApplication *app = [UIApplication sharedApplication];
    [[NSNotificationCenter defaultCenter]
                            addObserver:self
                            selector:@selector(applicationWillTerminate:)
                            name:UIApplicationWillTerminateNotification
                            object:app];
After subscribing to the notification, we just give our superclass a chance to respond to viewDidLoad.
[super viewDidLoad];
Let's summarize what we've done.
When our main view is finished loading, we look for a property list file.
If it exists, we copy data from it into our text fields. Then, we register to
be notified when the application quits. When the application does terminate, we
gather up the values from our four text fields, stick them in a mutable array,
and write the mutable array out to a property list.
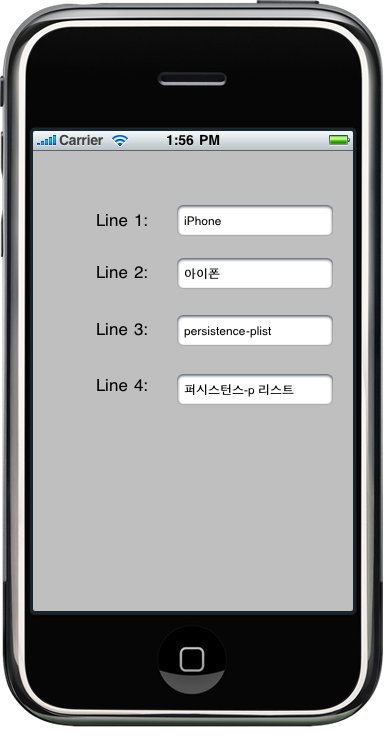
Build and Run. Type in something and press the home button. By pressing the home button, we will receive the notification that the application is terminating, and our data will be saved. Check if it's saved by relaunching our application.
The term "archiving" refers to another form of serialization, but it's a more generic type that any object can implement. Any object specifically written to hold data, model object, should support archiving. The technique of archiving model objects lets you write complex objects to a file and ten read them back in. As long as every property we implement in our class is either a scalar or else is an instance of a class that conforms to the NSCoding protocol, we can archive our objects completely. Since most Foundation and Cocoa Touch classes capable of storing data do conform to NSCoding archiving is relatively easy to implement for most classes.
Although not strictly required to make archiving work, another protocol should be implemented along with NSCoding-the NSCopying protocol, which is a protocol that allows our object to be copied. Being able to copy an object gives us a lot more flexibility when using data model objects.
The NSCoding protocol declares two method, both required. One encodes our object into an archive, the other one creates a new object by decoding an archive. Both methods are passed an instance of NSCoder. We can encode and decode both objects and native datatype.
Conforming to NSCopying is a very good idea for any data model objects as well. NSCopying has one method, called copyWithZone:, and it allows object to be copied. To implement NSCopying we just need to create a new instance of the same class and then set all of that new instance's properties to the same values as this objects properties. Here is what a copyZone: method look like:
- (id)copyWithZone:(NSZone *)zone (
    MyClass *copy = [[self class] allocWithZone:zone] init];
    copy.foo = [self.foo copyWithZone:zone];
    copy.bar = [self.bar copyWithZone:zone];
    copy.someInt = self.someInt;
    copy.someFloat = self.someFloat;
    return copy;
}
Next Sections.