Chapter 8. Navigation Controllers
- 8.0 Preview
- 8.1 Navigation Controllers
- 8.2 Disclosure Button View - First Subcontroller
- 8.3 Checklist - Second Subcontroller
- 8.4 Table Rows Control - Third Subcontroller
- 8.5 Moveable - Fourth Subcontroller
- 8.6 Deletable Rows - Fifth Subcontroller
- 8.7 Editable Detail Pane - Sixth Subcontroller
Navigation controllers and table views work hand in hand. Actually,
a navigation controller doesn't need a table view in order to do its job.
But in practice, however, when we implement a navigation controller,
we almost always implement at least one table.
We will get the navigation controller working. Then we will start
adding more controllers and more layers to the hierarchy.
UINavigationController is the main tool to build
hierarchical applications.
It is similar to UITabBarController
in that it manages, and swaps in and out, multiple content views.
The major
difference between these two is that UINavigationController is implemented
as a stack. This makes it well suited to working with hierarchies.
A navigation controller maintains a stack of view controllers. When we design our navigation controller, we need to specify the very first view. That view is the bottommost view in the view hierarchy and its controller is called the root view controller. The root view controller is the very first view controller pushed onto the controller stack. When the user selects the next view, a new view controller is pushed onto the stack, and the view it controls is shown to the user. This new view controller is a subcontroller. Our application, Navigation, is made up of a navigation controller and six subcontrollers. Each controller only needs to know about its child controllers so it can push the appropriate new controller object onto the stack when the user makes a selection.
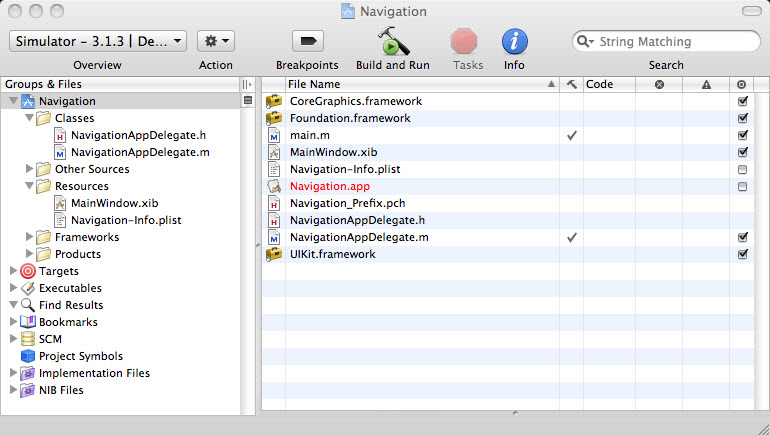
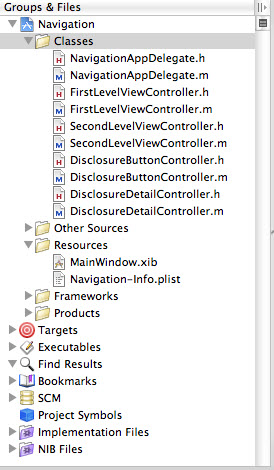
Create a new project using Window-Based Application template, and name it Navigation. This template gives us an application delegate and a MainWindow.xib.
We will add a navigation controller to MainWindow.xib. This will become our application's root controller. We also need to create root view controller because all navigation controllers should have their own root view controller.
For our table views, we are going to use subclass of UITableViewControll instead of UIViewController. When we are subclassing UITableViewController, we inherit some functionality from that class which will create a table view with no need for a nib file. UITableViewController will create a table view automatically. In other words, when all we need for a specific controller is a table, subclassing UITableViewController is the way to go.
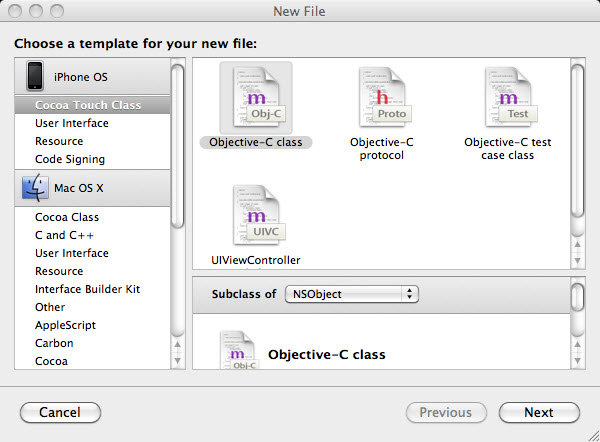
Let's move on and make some files needed for our application. Create a "FirstLevelViewController.m" from the new file assistant window by selecting Cocoa Touch Class and Objective-C class as a subclass of NSObject.
Let's look at the interface file, "FirstLevelViewController.h".
#import <Foundation/Foundation.h>

@interface FirstLevelViewController : UITableViewController {
}
@end
Let's make some convention related to the name of root view controller. In our project, the navigation controller's root view controller is the multi-row view from which we can select a table view.
- navController
As an our application's root view controller, it will swap in and out all the other views that make up our hierarchy of views. - FirstLevelController
It is the first level in the visual hierarchy presented to the user and it is the navController's root view controller.
We need to add an outlet for our application;s root view controller, navController, in "NavigationAppDelegate.h".
#import <UIKit/UIKit.h>

@interface NavigationAppDelegate : NSObject <UIApplicationDelegate> {
    UIWindow *window;
    UINavigationController *navController;
}

@property (nonatomic, retain) IBOutlet UIWindow *window;
@property (nonatomic, retain) IBOutlet UINavigationController *navController;
@end
We also need to add the the @synthesize statement for navController to the implementation file. We will also add navController's view as a subview of our application's window so that it gets shown to the user. Here is the implementation file, "NavigationAppDelegate.m"
#import "NavigationAppDelegate.h"

@implementation NavigationAppDelegate
@synthesize window;
@synthesize navController;

- (void)applicationDidFinishLaunching:(UIApplication *)application {

    // Override point for customization after application launch
    [window addSubview: navController.view];
    [window makeKeyAndVisible];
}

- (void)dealloc {
    [window release];
    [navController release];
    [super dealloc];
}
@end
We are going to create a navigation controller, connect it to the navController outlet, and then let the navigation controller know what to use as its root controller.
Open up Interface Builder, drag Navigation Controller from the library and put into the MainWindow.xib.
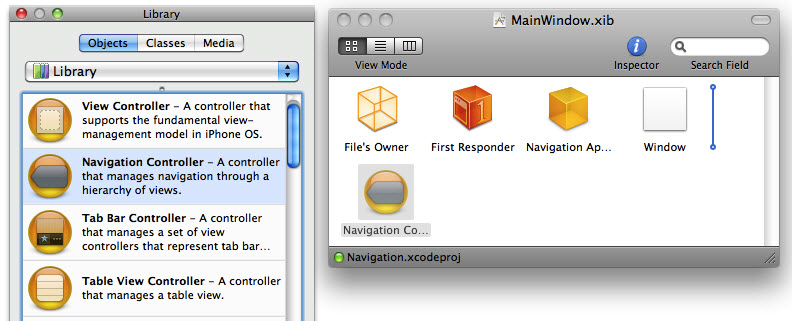
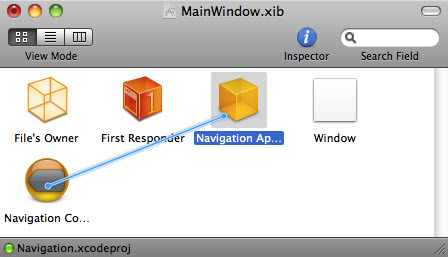
Control-drag NavigationAppDelegate icon to the new Navigation Controller icon, and select the navController outlet.
Next, we need to tell the navigation controller where to find its root view controller. So, let's change the nib's main window into list mode using the middle View Mode button in the toolbar of that window.
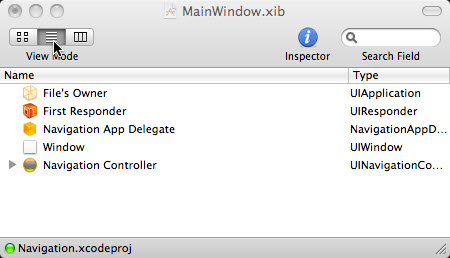
Expand the Navigation Controller from the list by clicking the little disclosure triangle. Then, we see two items, Navigation Bar and View Controller (Root View Controller).
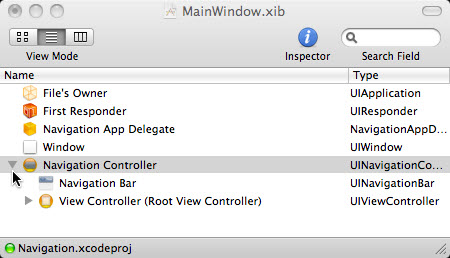
Bring up the identity inspector for the View Controller (Root View
Controller).
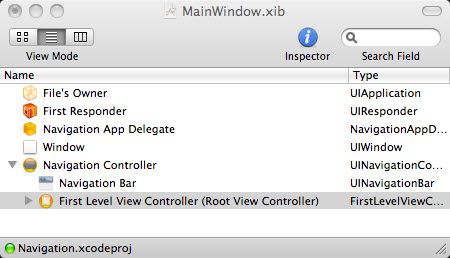
Change the class to FirstLevelViewController.
Now, it's time for a list for our root view to display. In our application the first level view controller will manage a list of its subcontrollers. Tapping any row will trigger an instance of the selected view controller to get pushed onto the navigation controller's stack. We may want to display an icon next to each row. So, instead of adding a UIImage property to every subcontroller, we will create a subclass of UITableViewController which has a UIImage property to hold the row icon. Then, we will subclass this new class instead of subclassing UITableViewController directly. As a result, all of our subclasses will inherit that UIImage property.
Let's create a new file "SecondLevelViewController.m" in the same way
we created the "FirstLevelViewController.m".
Then make some changes to "SecondLevelViewController.h".
#import <Foundation/Foundation.h>

@interface SecondLevelViewController : UITableViewController {
    UIImage    *rowImage;
}
@property (nonatomic, retain) UIImage *rowImage;
@end
Here is a new implementation file, "SecondLevelViewController.m".
#import "SecondLevelViewController.h"

@implementation SecondLevelViewController
@synthesize rowImage;
@end
Any controller that the user can navigate directly to from the first table shown in our application should be a subclass of SecondLevelViewController instead of UITableViewController. In other words, any controller class that we want to implement as a second-level controller should be a subclass of SecondLevelViewController. Because we are subclassing SecondLevelViewController, all of those classes will have a property they can use to store a row image. So, we can write our code in FirstLevelViewController before we've actually written any concrete second-level controller classes by using SecondLevelViewController as a placeholder.
To do that, we should declare an array in "FirstLevelViewController.h":
#import <Foundation/Foundation.h>


@interface FirstLevelViewController : UITableViewController {
    NSArray *controllers;
}
@property (nonatomic, retain) NSArray *controllers;
@end
The array "*controllers" will hold the instances of the second-level view
controllers. It will be used to feed data to our table.
Then, "FirstLevelViewController.m":
#import "FirstLevelViewController.h"
#import "SecondLevelViewController.h"
@implementation FirstLevelViewController
@synthesize controllers;
- (void)viewDidLoad {
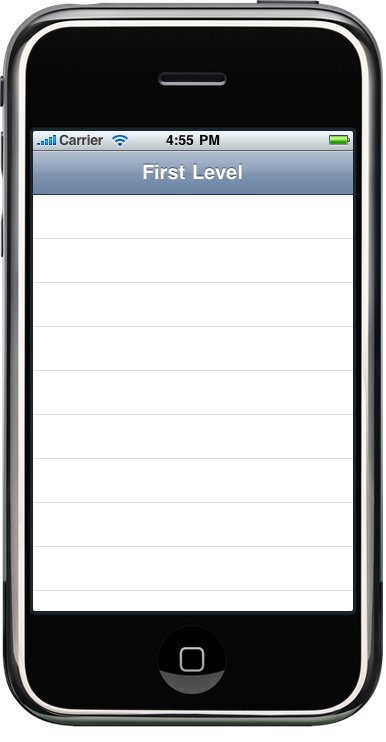
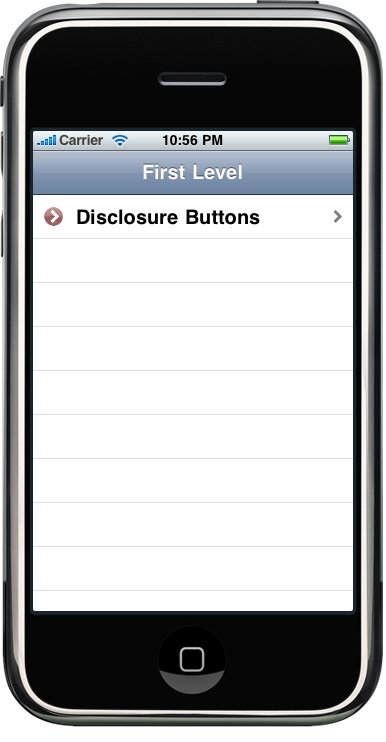
self.title = @"First Level";
NSMutableArray *array = [[NSMutableArray alloc] init];
self.controllers = array;
[array release];
[super viewDidLoad];
}
- (void)viewDidUnload {
self.controllers = nil;
[super viewDidUnload];
}
- (void)dealloc {
[controllers release];
[super dealloc];
}
#pragma mark -
#pragma mark Table Data Source Methods
- (NSInteger)tableView:(UITableView *)tableView
numberOfRowsInSection:(NSInteger)section {
return [self.controllers count];
}
- (UITableViewCell *)tableView:(UITableView *)tableView
cellForRowAtIndexPath:(NSIndexPath *)indexPath {
static NSString *FirstLevelCell= @"FirstLevelCell";
UITableViewCell *cell = [tableView dequeueReusableCellWithIdentifier:
FirstLevelCell];
if (cell == nil) {
cell = [[[UITableViewCell alloc] initWithStyle:UITableViewCellStyleDefault
reuseIdentifier: FirstLevelCell] autorelease];
}
// Configure the cell
NSUInteger row = [indexPath row];
SecondLevelViewController *controller =
[controllers objectAtIndex:row];
cell.textLabel.text = controller.title;
cell.imageView.image = controller.rowImage;
cell.accessoryType = UITableViewCellAccessoryDisclosureIndicator;
return cell;
}
#pragma mark -
#pragma mark Table View Delegate Methods
- (void)tableView:(UITableView *)tableView
didSelectRowAtIndexPath:(NSIndexPath *)indexPath {
NSUInteger row = [indexPath row];
SecondLevelViewController *nextController = [self.controllers
objectAtIndex:row];
[self.navigationController pushViewController:nextController animated:YES];
}
@end
Let's check what we've done in the implementation file.
- By importing the "SecondLevelViewController.h", we can use the SecondLevelViewController class and the compiler will know about the rowImage property.
- viewDidLoad method -
self.title
sets the title for all controller instances in a navigation-based application. So, the user knows where they are at all times. The line[super viewDidLoad];
lets our parent class does something in its own viewDidLoad method. - tableView: numberOfRowsInSection: method -
It simply returns the count from our array of controllers. - tableView: sellForRowAtIndexPath: method -
It gets a dequeued cell, or creates a new one if there aren't any, and then grabs the controller object from the array corresponding to the row being asked about. It then sets the cell's textLabel and image properties using the title and rowImage from that controller. - We are assuming the object retrieved from the array is an instance of SecondLevelViewController and are assigning the controller's rowImage property to a UIImage.
- tableView: didSelectRowAtIndexPath: method -
This is the one that is called after a user taps a row. If tapping a row needs to trigger a drill down, this is how we do it. First, we get the row from indexPath:NSUInteger row = [indexPath row];
Then, we get the correct controller from our array for that row:SecondLevelViewController *nextController = [self.controllers objectAtIndex:row];Finally, we use our navigationController property to push the next controller, the one we pulled from our array, onto navigation controller's stack:[self.navigationController pushViewController:nextController animated:YES];
Time to check our work.
Build and Run.
It's time to implement the first of our second-level window controllers. As we discussed before, we need to create a subclass of SecondLevelViewController.
Make a new class with Cocoa Touch Class and Objective_C class and NSObject for Subclass of. Name it "DisclosureButtonController.m". This class will manage the table of countries that will be displayed when the use clicks the Disclosure Buttons item from the top-level view.
When the user clicks an country title, the application will drill down into another view that will report which row was selected. So, we will need a detail view for the user to drill down into, so repeat the steps to create another file, and name it "DisclosureDetailController.m".
The detail view will be a very simple view with just a single label that we can set. Because this controller will not be responsible for a table view, we also need a nib to go along with the controller class. Before making the nib, let's add the outlet for the label. Here is the "DisclosureDetailController.h".
#import <Foundation/Foundation.h>

@interface DisclosureDetailController : UIViewController {
    UILabel    *label;
    NSString    *message;

}
@property (nonatomic, retain) IBOutlet UILabel *label;
@property (nonatomic, retain) NSString *message;
@end
And the implementation file, "DisclosureDetailController.m".
#import "DisclosureDetailController.h"

@implementation DisclosureDetailController
@synthesize label;
@synthesize message;

- (void)viewWillAppear:(BOOL)animated {
    label.text = message;
    [super viewWillAppear:animated];
}

- (void)viewDidUnload {
    self.label = nil;
    self.message = nil;
}

- (void)dealloc {
    [label release];
    [message release];
    [super dealloc];
}
@end
Label won't load until it actually displayed, we can't count on there being a label to set when we create a controller. So, we will set message to the value we want, and in the viewWillAppear: method, we will set the label based on the value in message. Since viewWillAppear: is called whenever a view is about to be drawn, we use it for our updating.
Now it's time for nib.
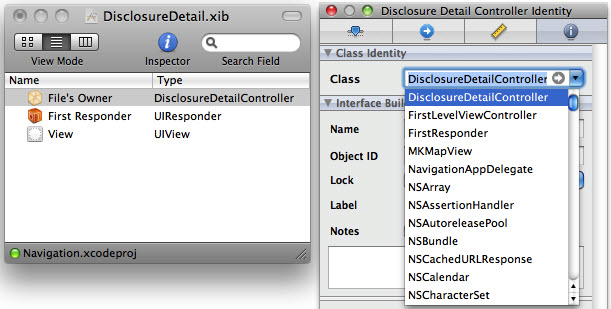
Let's create a new nib file. From the Resources folder, select new file with User Interface and View XIB. Name it DisclosureDetail.xib.
Open Interface Builder, change the underlying class to DisclosureDetailController from the identity inspector.
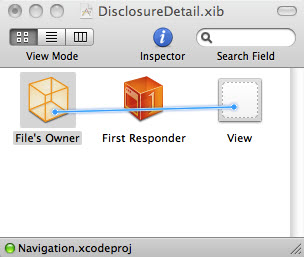
Control-drag from the File's Owner icon to the View icon, and select the view outlet. This is to reestablish the link from the controller to its view that was broken when we changed its class.
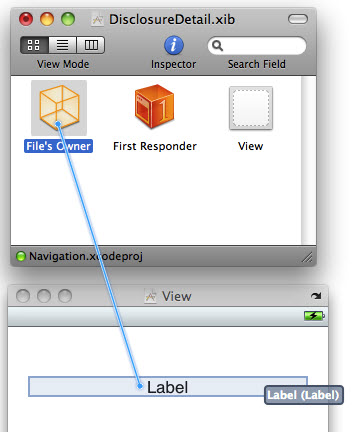
Place a Label on the View window and set label outlet.
Save nib and back to Xcode.
Our list is going to show a number of rows from an array. So, we will
declare an NSArray named list. We also should declare an instance variable
for one instance of our child controller, which is pointing to an instance
of the DisclosureDetailController class.
So, here is a new "DisclosureButtonController.h".
#import <UIKit/UIKit>
#import "SecondLevelViewController.h"

@class DisclosureDetailController;

@interface DisclosureButtonController : SecondLevelViewController {
    NSArray *list;
    DisclosureDetailController *childController;
}
@property (nonatomic, retain) NSArray *list;
@end
"DisclosureButtonController.m".
#import "DisclosureButtonController.h"
#import "NavigationAppDelegate.h"
#import "DisclosureDetailController.h"
@implementation DisclosureButtonController
@synthesize list;
- (void)viewDidLoad {
NSArray *array = [[NSArray alloc] initWithObjects:
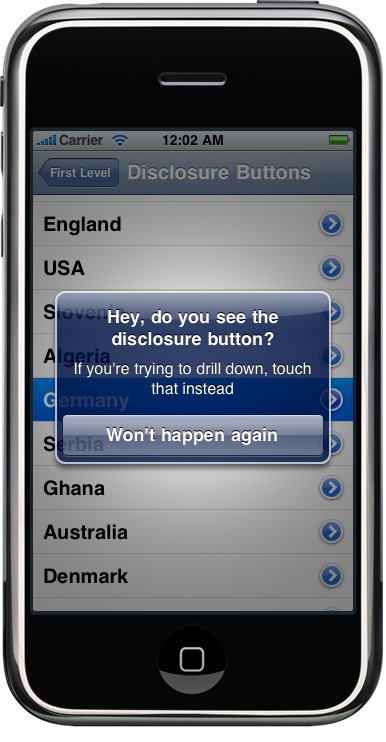
@"France", @"Mexico", @"Uruguay", @"South Africa",
@"Argentina", @"Greece", @"Nigeria", @"South Korea",
@"England", @"USA", @"Slovenia",@"Algeria",
@"Germany", @"Serbia", @"Ghana", @"Australia",
@"Denmark", @"Netherlands", @"Cameroon", @"Japan",
@"Italy", @"Slovakia", @"Paraguay",@"New Zealand",
@"Brazil", @"Portugal", @"Ivory Coast",@"North Korea",
@"Spain", @"Chile", @"Switzerland", @"Hunduras",nil ];
self.list = array;
[array release];
[super viewDidLoad];
}
- (void)viewDidUnload {
self.list = nil;
[childController release];
childController = nil;
}
- (void)dealloc {
[list release];
[childController release];
[super dealloc];
}
#pragma mark -
#pragma mark Table Data Source Methods
- (NSInteger)tableView:(UITableView *)tableView
numberOfRowsInSection:(NSInteger)section {
return [list count];
}
- (UITableViewCell *)tableView:(UITableView *)tableView
cellForRowAtIndexPath:(NSIndexPath *)indexPath {
static NSString * DisclosureButtonCellIdentifier =
@"DisclosureButtonCellIdentifier";
UITableViewCell *cell = [tableView dequeueReusableCellWithIdentifier:
DisclosureButtonCellIdentifier];
if (cell == nil) {
cell = [[[UITableViewCell alloc] initWithStyle:UITableViewCellStyleDefault
reuseIdentifier: DisclosureButtonCellIdentifier]
autorelease];
}
NSUInteger row = [indexPath row];
NSString *rowString = [list objectAtIndex:row];
cell.textLabel.text = rowString;
cell.accessoryType = UITableViewCellAccessoryDetailDisclosureButton;
[rowString release];
return cell;
}
#pragma mark -
#pragma mark Table Delegate Methods
- (void)tableView:(UITableView *)tableView
didSelectRowAtIndexPath:(NSIndexPath *)indexPath {
UIAlertView *alert = [[UIAlertView alloc] initWithTitle:
@"Hey, do you see the disclosure button?"
message:@"If you're trying to drill down, touch that instead"
delegate:nil
cancelButtonTitle:@"Won't happen again"
otherButtonTitles:nil];
[alert show];
[alert release];
}
- (void)tableView:(UITableView *)tableView
accessoryButtonTappedForRowWithIndexPath:(NSIndexPath *)indexPath
{
if (childController == nil)
childController = [[DisclosureDetailController alloc]
initWithNibName:@"DisclosureDetail" bundle:nil];
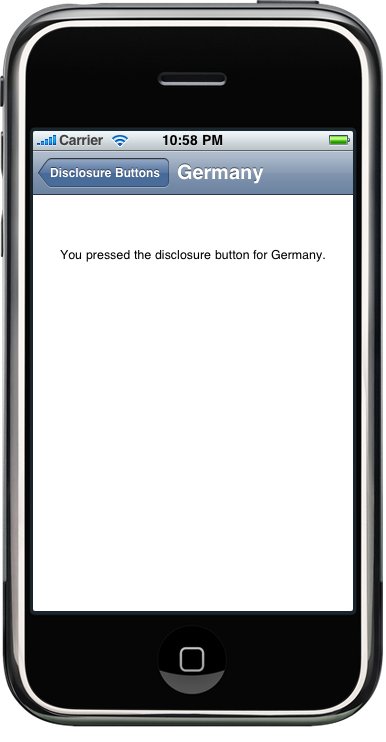
childController.title = @"Disclosure Button Pressed";
NSUInteger row = [indexPath row];
NSString *selectedCountry = [list objectAtIndex:row];
NSString *detailMessage = [[NSString alloc]
initWithFormat:@"You pressed the disclosure button for %@.",
selectedCountry];
childController.message = detailMessage;
childController.title = selectedCountry;
[detailMessage release];
[self.navigationController
pushViewController:childController animated:YES];
}
@end
The method tableView: didSelectRowAtIndexPath: is called when the row
is selected. It puts up an alert telling the user to tap the disclosure
button instead of selecting the row. If the user actually taps the detail
button, the last of our new delegate methods,
tableView: accessoryButtonTappedForRowWithIndexPath: is called.
First thing we are doing here is to check the childController instance
variable to see if it's nil. If it is nil, we have not yet allocated and
initialized a new instance of DetailDisclosure Controller.
So, we are doing it next.
 if (childController == nil)
        childController = [[DisclosureDetailController alloc]
                    initWithNibName:@"DisclosureDetail" bundle:nil];
This gives us a new controller than can be pushed onto the navigation stack. But before it is pushed onto the stack, we need to give it some text to display.
childController.title = @"Disclosure Button Pressed";
In this case, we set message to reflect the row whose disclosure button was pressed. We also set the new view's title based on the selected row.
    NSUInteger row = [indexPath row];

    NSString *selectedCountry = [list objectAtIndex:row];
    NSString *detailMessage  = [[NSString alloc]
                            initWithFormat:@"You pressed the disclosure button for %@.",
                            selectedCountry];
    childController.message = detailMessage;
    childController.title = selectedCountry;
    [detailMessage release];
We are now creating an instance of our second level controller and add it to FirstLevelViewController's controllers.
Here is a modified version of "FirstLevelViewController.m".
- (void)viewDidLoad {
    self.title = @"First Level";
    NSMutableArray *array = [[NSMutableArray alloc] init];

    // Disclosure Button
    DisclosureButtonController *disclosureButtonController =
    [[DisclosureButtonController alloc]
     initWithStyle:UITableViewStylePlain];
    disclosureButtonController.title = @"Disclosure Buttons";
    disclosureButtonController.rowImage = [UIImage
                        imageNamed:@"disclosureButtonControllerIcon.png"];
    [array addObject:disclosureButtonController];
    [disclosureButtonController release];

    self.controllers = array;
    [array release];
    [super viewDidLoad];
}
What are we doing here?
We are creating a new instance of DisclosureButtonController. We specify
UITableViewStylePlain to indicate that we want an indexed table, not
a grouped table. Then, we set the title and the image, and we add
the controller to the array, and release the controller.
Don't forget inserting following import statement into the file, "FirstLevelViewController.m".
#import "DisclosureButtonController.h"
Build, Run, and Play.

Next Sections.
- 8.3 Checklist - Second Subcontroller
- 8.4 Table Rows Control - Third Subcontroller
- 8.5 Moveable - Fourth Subcontroller
- 8.6 Deletable Rows - Fifth Subcontroller
- 8.7 Editable Detail Pane - Sixth Subcontroller