Chapter 9. Application Settings
- 9.0 Preview
- 9.1 Utility Application
- 9.2 Settings Bundle
- 9.3 Settings Up Property List
- 9.4 Text Field Setting
- 9.5 Secure Text Field Setting
- 9.6 Multivalue Field
- 9.7 Toggle Switch Setting
- 9.8 Slider Setting
- 9.9 Child Setting View
- 9.10 Reading Settings
- 9.11 Changing Defaults
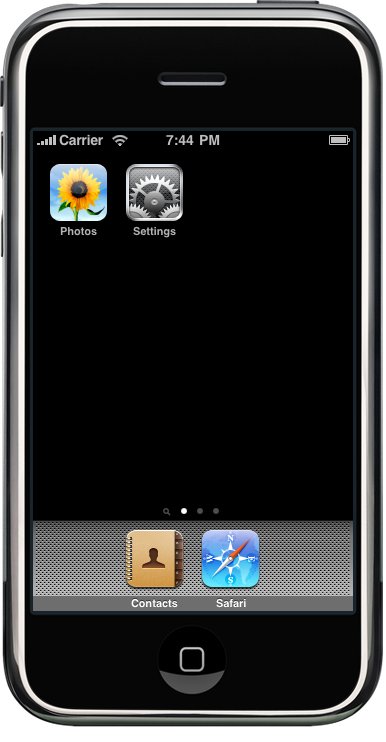
Settings is one of the iPhone's dedicated applications. In this chapter, we will learn how to add settings for our application to the Settings application. And we'll see how to access those settings from within our application.
The Settings application lets the user enter and change preferences for any application that has a settings bundle. A settings bundle is a group of files build into an application that tells the Settings application what preferences the application wants to collect from the user.
User Defaults is the part of Application Preferences that stores and retrieves preferences. The Settings application acts as a common user interface for the iPhone's User Defaults. User Defaults is implemented by NSUserDefaults class.
We're going to create an application, add and configure a settings bundle. Then we'll access and edit those preferences from within our application.
To make Settings application, we don't have to design a user interface for the preferences. We just create a property list defining our application's available settings. The Settings application creates the interface for us. There are limits, however, to what we can do with the Settings application. Any preference that the user might need to change while our application is running should not be limited to the Setting application.
Immersive applications, like games, generally should provide their own preferences view so that the user doesn't have to quit in order to make some changes.
From the File menu, select New Project...When the new project assistant opens up, select Application with iPhone heading and click Utility Application icon, and then click the Choose... button.
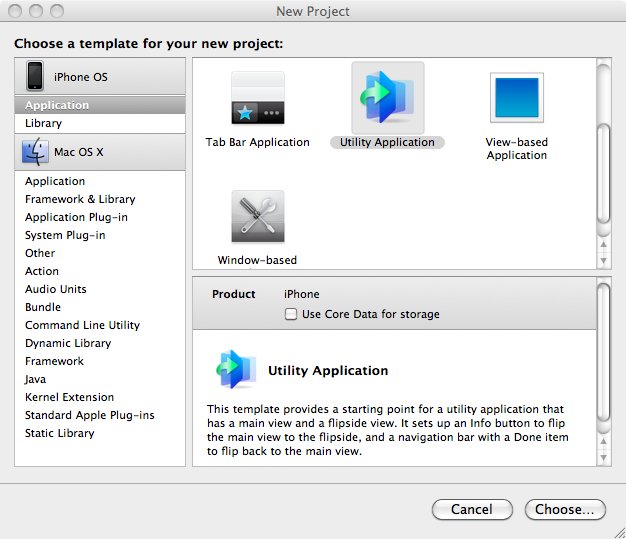
Name it AppSettings.
This project template produces a main view and a secondary view called the flipside view. Tapping the information button on the main view guide you to the flipside view, and tapping the Done button on the flipside view guide you back to the main view.
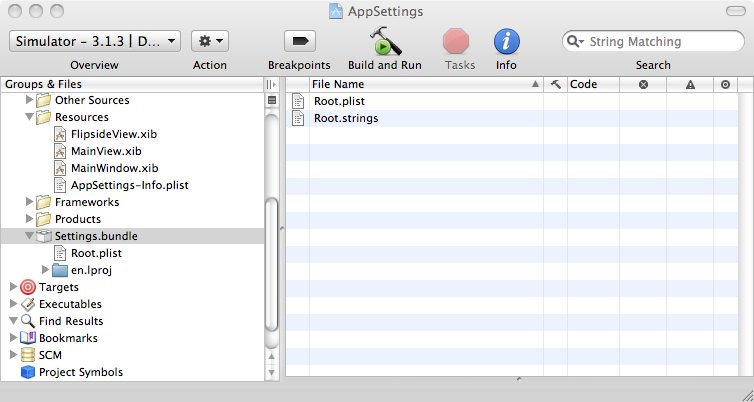
When look into our Xcode project, strangely we do not have Classes folder. Because it takes several files to implement this type of application, the template organizes the files in groups for us. Check the picture below. All the familiar files are really grouped together!
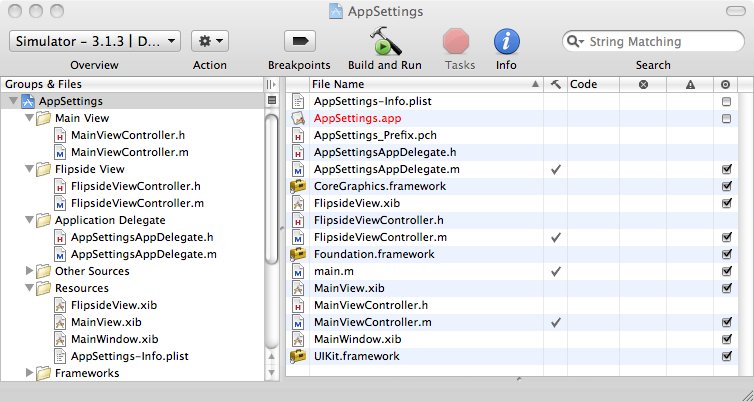
All the classes that make up the main view, including a subclass of UIView and the view controller, are included in the Main View folder. All source code files needed to implement the flipside view are contained in the FlipSide View folder. And the application delegate is contained in a Application Delegate folder.
This template has given us with a custom subclass of UIView for main and flipside views. We won't need to subclass UIView, though.
Let's add a settings bundle to our project.
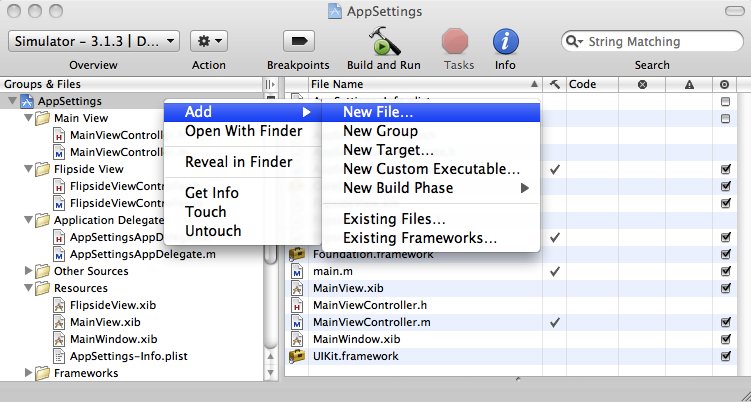
In the Groups & Files pane, click the root object, AppSettings,
and select New File....
In the left pane, select Resource under the iPhone OS heading. Then, select the Settings Bundle.
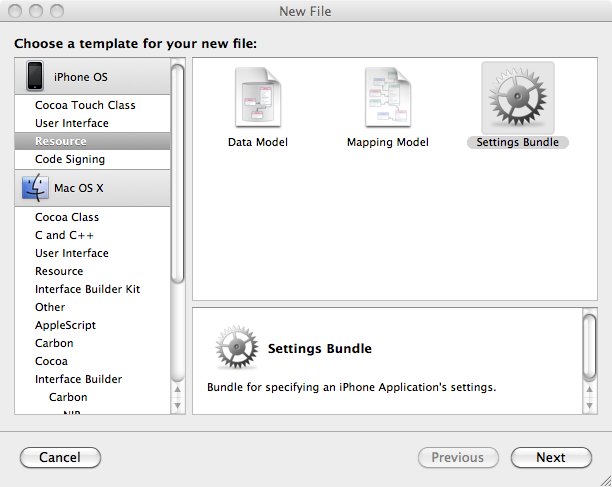
Click the Next button, and choose the default name of Settings.bundle. Then, check the new item in Xcode's Groups & File pane.
It's Settings.bundle. We should see two items after expanding the Settings.bundle. The items are Root.plist and a folder, en.lproj. The latter one will be used when we localizing our application. Here, our main focus is on the Root.plist.
Let's look at the property list either using Xcode's property list editor or Property List Editor application.
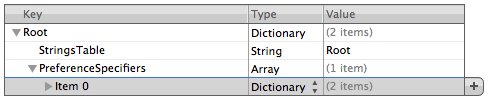
Property lists all have a root node which is a Dictionary node type. All of the children of Dictionary node need to have both a key and a value.
There are several different types of nodes: Dictionary nodes, Array nodes. These are the only property list node types that can contain other nodes. There are also a data node types such as Boolean, Data, Date, Number, and String.
When creating a setting property list, we should follow a defined format. The one we've just made, Root.plist, is a properly formatted property list.
Let's expand the PreferenceSpecifiers node which is in the Root.plist editor pane.

The node, PreferenceSpecifiers, is an array. This array node is designed to hold a set of dictionary nodes. Each of node represents a single preference that the user can enter or a single child view that the user can drill down into. Though Xcode gave us 4 nodes, we do not need all of them. So, delete items from 1 to 3.
Expand Item 0, and notice that the button changes to a different icon. This icon indicates that clicking that button now will add a child node.
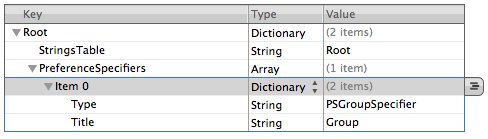
The first row under Item 0 has a key of Type, and every property list
node in the PreferenceSpecifiers array must have an entry with this key.
Let's take a look at the Type field under Item 0. The value of this Type
field, PSGroupSpecifier, is used to indicate that this item represents
the start of a new group. Each item that follows will be part of this group,
until the next item with a Type of PSGroupSpecifier. The only other entry
in Item 0 has a key of Title, and this is used to set an optional
header just above the group that's being started.
Let's make some changes here.
Change the title value "Group" to "General Info".
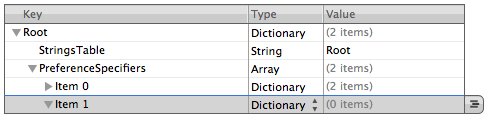
Now it's time to add the first actual preference field. Let's add a second item in this array. Click the button to add a child after selecting the PreferenceSpecifiers. The new row will be inserted at the beginning of the list, which is not what we want. We want to add a row at the end of the array. To do that, click the disclosure triangle to the left of item 0 to close it, and sibling row after the current row.
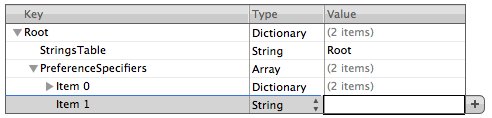
The new row has a String node type. So, we should change it to Dictionary because each item in the PreferenceSpecifiers array has to be a dictionary. Now, click the disclosure triangle next to Item 1 to expand it. But it doesn't actually contain anything yet. The only differences we see are that the disclosure triangle will point down and the button to add sibling nones will change to let you add child nodes.
Click the add child node button to add our first entry to this dictionary. A new row will come up and default to a String type, which is what we want. The new row's key value will default to New item. Change it to Type, and double-click the Value column, and enter PSTextFieldSpecifier, which is the type value used to tell the Settings application that we want the user to edit this setting in a text field.
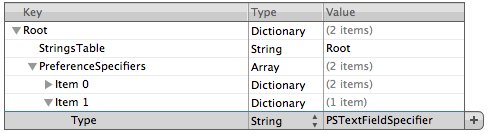
PSTextFieldSpecifier is the type of a specific preference field. When you see Type in the Key column, we're defining the type of field that will be used to edit the preference.
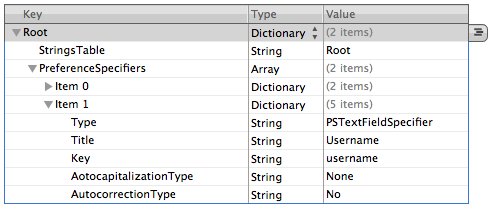
Click the button with the plus icon to the right of the Type row to add another item to our dictionary. The next row will specify the label that will be displayed next to the text field. Change the key from New item to Title. Press the tab key. Set the Value to Username. Then press the plus button at the end of the Title row to add yet another item to our dictionary.
Change the key to Key and username for Value. Add another item to our dictionary give AutocapitalizationType for a Key and None for a Value. For the last row, give AutocorrectionType and No.
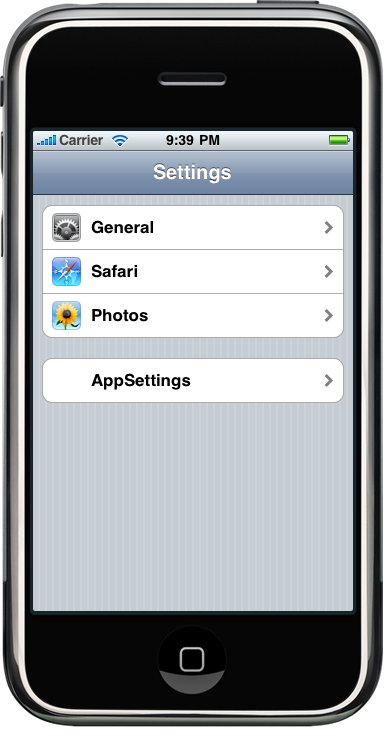
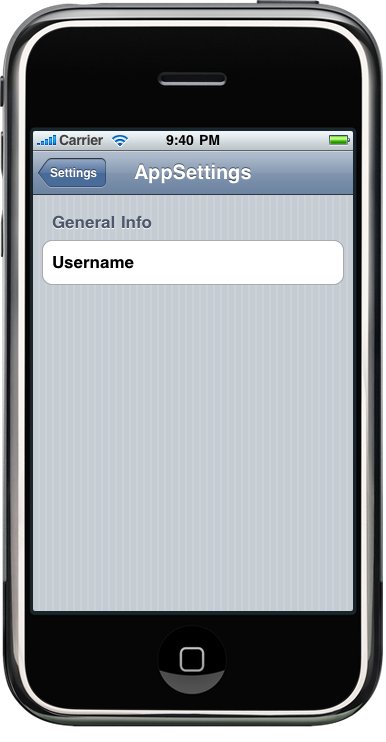
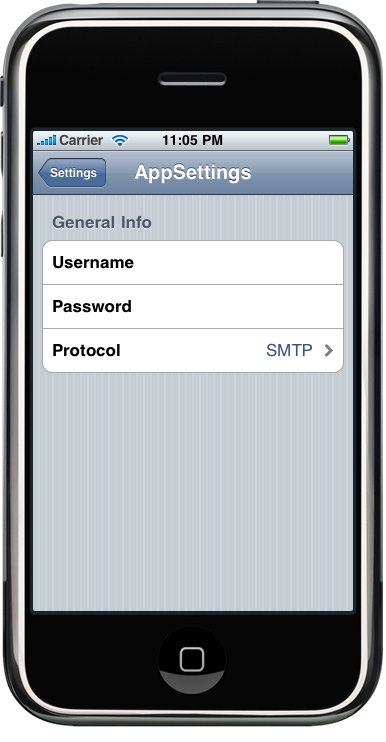
Save the property file, and Play time.
Build and Run.
Let's add the rest of the fields for our root settings view. The first one we're going to add is a secure text field for the user's password.
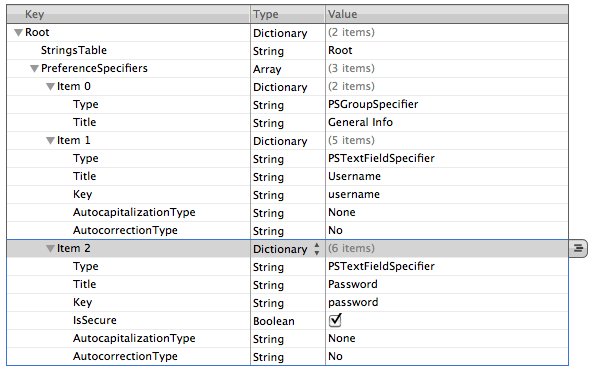
Another way of adding node. Copy Item 1 and Paste it at the same row 1. Then, we will have a new item, Item 2. Set the Title to Password and the Key to password.
Add one more child to the new item below the Key item. Give the new item a Key of IsSecure, and change the Type to Boolean. Once we do that, the space where we normally type in a value will change to a checkbox. Click it to check the box. This tells the Settings application that this field needs to be a password field rather than just an ordinary text field.
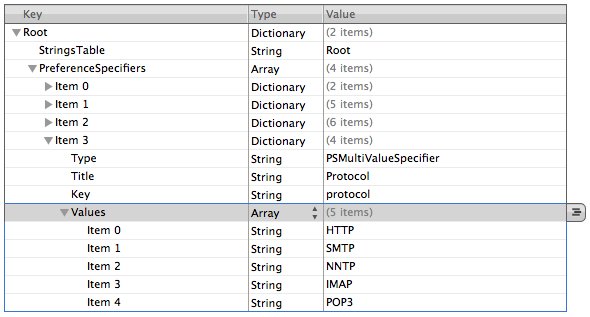
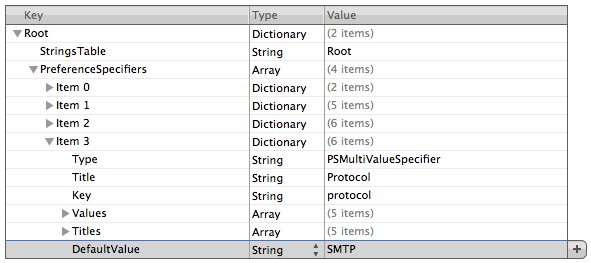
This type of field will automatically generate a row with a disclosure indicator. If we click it, it will take us down to another table where we can select one of the rows. Let's collapse Item 2. Add Item 3. Change the Type to Dictionary. Then, expand Item 3.
Set Type for a key and PSMultiValueSpecifier for a value. Add a second row with a key of Title and value of Protocol. For a third row, set a key of key and a value of protocol.
We will add two more children to Item 3. But they are going to be an Array type nodes, not String type nodes. One, called Titles, is going to hold a list of the values that the user can select from. The other, called Values, is going to hold a list of the values that actually get stored in the User Defaults. So, if the user selects the first item in the list, which corresponds to the first item in the Titles array, the Settings application will actually store the first value from the Values array. This pairing of Titles and Values lets us present user-friendly text to the user but actually store something else, like a number, a data, or a different string. Both of these arrays are required. If we want them both to be the same, we can create one array, copy it, paste it back in, and change the key so that we have two arrays with the same content but stored under different keys. We'll do just that.
Add a new child to Item 3. Change its kew to Values and set its type to Array. Add 5 child nodes. All five nodes should be String type nodes and should contain the following values: HTTP, SMTP, NNTP, IMAP, and POP3 as in the picture below.
Collapse Values. Copy and Paste will give us Values -2.
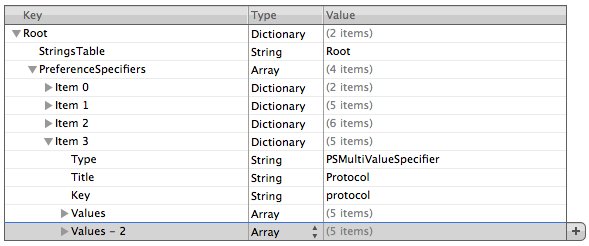
Change Values -2 to Titles. We have on more required value in the dictionary. That is the default value. Multivalue fields must have one and only one row selected, so we have to specify the default value to be used, and it needs to correspond to one of the items in the Values array. So, let's add another child to Item 3. Give it a key of DefaultValue and a value of SMTP.
Save the property list.
Build and Run.
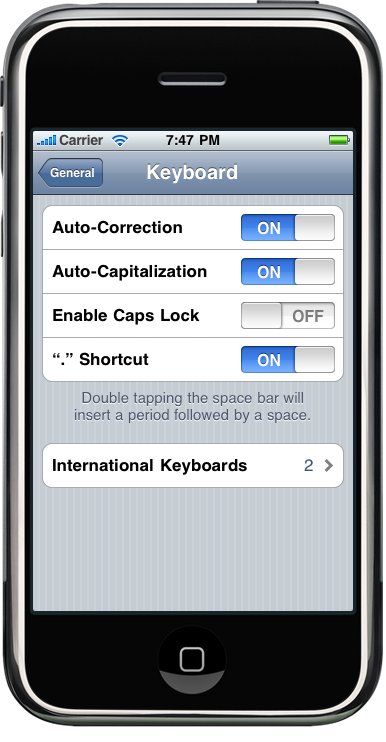
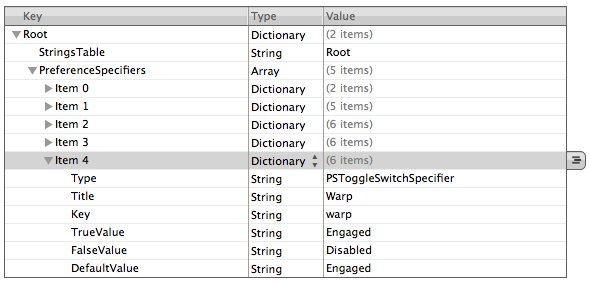
The next item we need to get from the user is a Boolean value that indicates whether the warp engines are turned on. To capture a Boolean value in our preferences, we will tell the Settings application to use a UISwitch by adding another item to our PreferenceSpecifiers array with a type of PSToggleSwitchSpecifier.
Create Item 4. Change its type to Dictionary, and then expand it.
Add a child row, give it a kew of Type and a value of PSToggleSwitchSpecifier.
Add another child with a key of Title and a value of Warp Drive.
Then, add a third child with a key of Key and a value of warp.
By default, a toggle switch will cause a Boolean YES or NO to get saved into the user defaults. If we would prefer to assign a different value to the on and off positions, we can to that by specifying the optional keys TrueValue and FalseValue. We can assign strings, dates or numbers to either the on position(TrueValue) or the off position(FalseValue) so that the Settings application will store the string we specify instead of just storing YES or NO. Let's set the on position to save the string Engaged and the off position to store Disabled.
We do this by adding two more children to Item 4, one with a key of TrueValue and a value of Engages, and the second one with a key of FalseValue and a value of Disabled.
Still, we have one more required item in this dictionary. That is the default value. If we had not supplied the option FalseValue and TrueValue items, we would create a new row with a kew of DefaultValue and change the type from String to Boolean. However, because we did add those two items, the value we put in DefaultValue has to match either the value passed in TrueValue or the one passed in FalseValue.
So, let's make our warp engines on by default, so create one last child to Item 4, give it a key of DefaultValue and a value of Engaged. Note that the string "Engaged" is what will be stored in the user default, not what will appear on the screen.
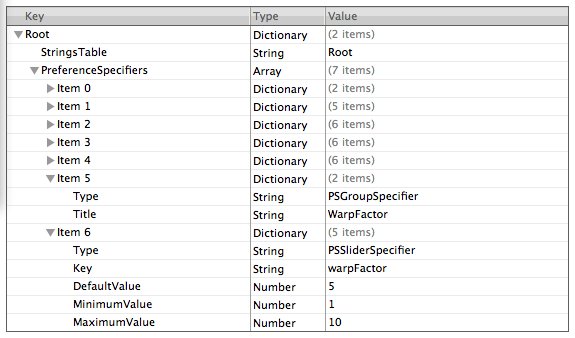
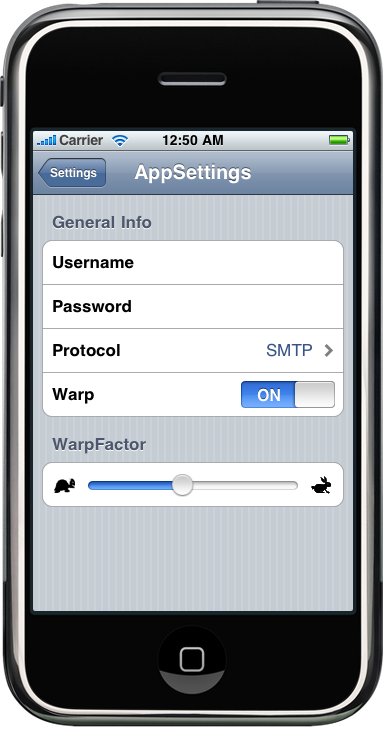
In the Settings application, a slider can have a small image at each end, but it can't have a label. Let's put the slider in its own group with a header so that the user will know what the slide does.
Copy Item 0 and paste on Item 4. Since Item 0 was a group specifier, the item we just pasted in as the new Item 5 is also a group specifier and will tell the Settings application to start a new group at this location.
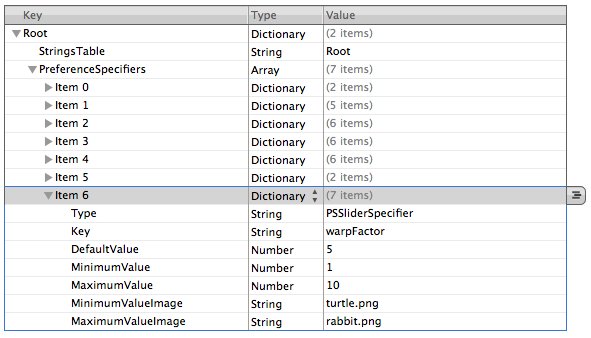
Change the value of Title under Item 5 to Warp Factor. Then, add a new row as a sibling of Item 6. Change the Type of the new row, Item 6, from String to Dictionary and expand the row. Add a child row, and give it a key of Type and a value of PSSliderSpecifier. This indicates to the Settings application that it should use a UISlider to get this information from the user. Add another child with a key of Key and a value of warpFactor so that the Settings application knows what key to use when storing this value.
We will allow the user to enter a value from one to ten, and we'll set the default to warp t. Sliders need to have a minimum value, a maximum value, and a starting value, and all of these need to be stored as numbers, not strings, in your property list. To do this, add three more child rows to Item 6, setting the Type of all three rows from String to Number. Give the first one a key of DefaultValue and a value of 5. Give the second one a key of MinimumValue and a value of 1, and give the third one a key of MaximumValue and a value of 10.
Sliders allow placement of a small 21x21 image at each end of the slider. Let's provide little icons to indicate that moving the slider to the left slows us down, while moving it to the right speeds us up. So, we need to add rabbit.png and turtle.png to our settings bundles. Because these images need to be used by the Settings application, we can't just put them to our Resources folder, we need to put them in the settings bundle so the Settings application can get them. To do that, go to the where the Xcode project is. In the same folder, we can find an icon named Settings.bundle. Bundles look like files, but they are folders. Right click the bundle's icon and select Show Package Contents. This will open a new window, and we should see the same two items that we see in Settings.bundle in Xcode. Copy the two icon files, rabbit.png and turtle.png, and put them into Settings.bundle folder.
Now, let's tell the slider ti use these two images. Go back to Root.plist and add two more child rows under Item 6. Give one a key of MinimumValueImage and a value of turtle.png. Give the other a key of MaximumValueImage and a value of rabbit.png.
Save our property list. Then, Build and Run.
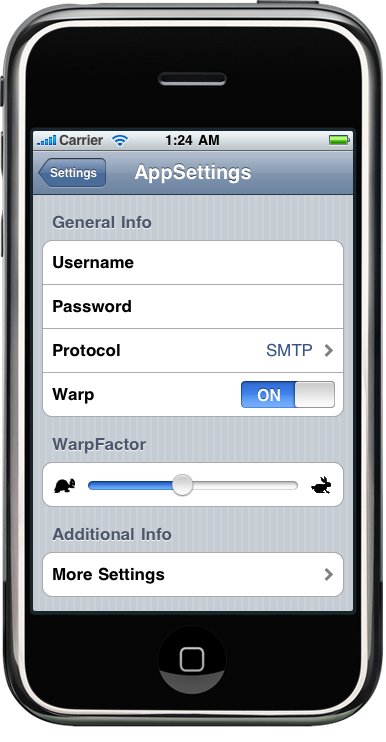
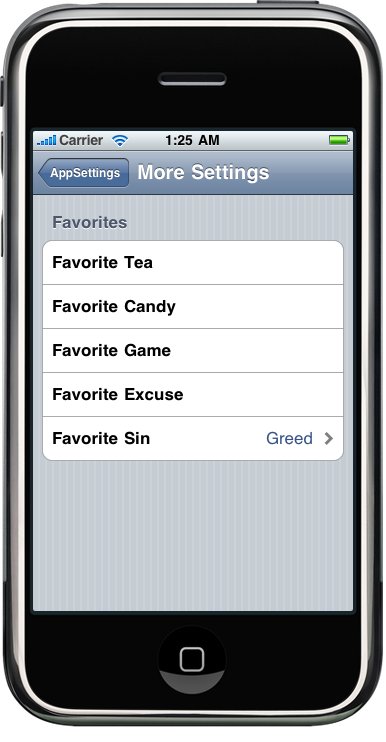
We will add another preference specifier to tell the Settings application that we want it to display a child settings view. This specifier will present a row with a disclosure indicator that will take the user down to a whole new view fill of preferences when tapped. Because we don't want this new preference to be grouped with the slider, we will copy the group specifier Item 0 and paste it at the end of the PreferenceSpecifiers array to create a new group for our child settings view. After expanding Item 7, change General Info to Additional Info.
Collapse Item 7, and make a sibling, Item 8. This will be our actual child view. Change the new row's type from String to Dictionary. Then add a child, and give it a key of Type and a value of PSChildPaneSpecifier. Add another child row with a key of Title and a value of More Settings.
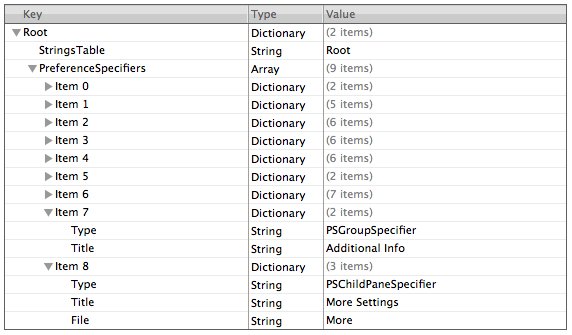
One more row, which will tell the Settings application which property list to load for the More Settings view. So, add another child row and give it a key of File and a value of More. he file extension .plist is assumed and must not be included, or the Settings application won't find the property list file.
We're adding a child view to our main preference view. That settings in that child view are specified in the More.plist file. We need to copy More.plist into the settings bundle. We can't add new files to the bundle in Xcode, and the Property List Editor's Save dialog will not let us save into a bundle. So, we have to create a new property list, save it somewhere else, and then drag it into the Settings.bundle window using th Finder.
Build and Run.
The user can get to our preferences, but how do we get to them? We'll take advantage of a class, NSUserDefaults, to read in the user's settings. NSUserDefaults is implemented as a singleton, which means there is only one instance of NSUserDefaults running in our application. To get access to that one instance, we call the class method standardUserDefaults:
NSUserDefaults *defaults = [NSUserDefaults standardUserDefaults];
We use it just like an NSDictionary once we have a pointer to the standard user defaults. To get a value out of it, we can call objectForKey: which will return an Objective_C object like an NSString, NSDate, or NSNumber. If we want to retrieve the value as a scalar like an int, float, or BOOL, we can use other methods, such as intForKey:, floatForKey:, or boolForKey:.
When we were creating the property list for this application, we created an array of PreferenceSpecifiers. Some of those specifiers were use to create groups. Others created interface objects that the user used to set their settings. Those are the specifiers we are really interested in, because that's where the real data is. Every specifier that was tied to a user setting had a Key named Key. For instance, the Key for our slider had a value of warpfactor. The Key for our Password field was password. We're going to use those keys to retrieve the user settings.
Now that we have a place to display the settings, let's set up our main view with a bunch of labels. Before going over to Interface Builder, we need to create outlets for all the labels. Let's make some changes to the interface file, "MainViewController.h"
#import "FlipsideViewController.h" #define kUsernameKey @"username" #define kPasswordKey @"password" #define kProtocolKey @"protocol" #define kWarpDriveKey @"warp" #define kWarpFactorKey @"warpFactor" #define kFavoriteTeaKey @"favoriteTea" #define kFavoriteCandyKey @"favoriteCandy" #define kFavoriteGameKey @"favoriteGame" #define kFavoriteExcuseKey @"favoriteExcuse" #define kFavoriteSinKey @"favoriteSin" @interface MainViewController : UIViewController{ UILabel *usernameLabel; UILabel *passwordLabel; UILabel *protocolLabel; UILabel *warpDriveLabel; UILabel *warpFactorLabel; UILabel *favoriteTeaLabel; UILabel *favoriteCandyLabel; UILabel *favoriteGameLabel; UILabel *favoriteExcuseLabel; UILabel *favoriteSinLabel; } @property (nonatomic, retain) IBOutlet UILabel *usernameLabel; @property (nonatomic, retain) IBOutlet UILabel *passwordLabel; @property (nonatomic, retain) IBOutlet UILabel *protocolLabel; @property (nonatomic, retain) IBOutlet UILabel *warpDriveLabel; @property (nonatomic, retain) IBOutlet UILabel *warpFactorLabel; @property (nonatomic, retain) IBOutlet UILabel *favoriteTeaLabel; @property (nonatomic, retain) IBOutlet UILabel *favoriteCandyLabel; @property (nonatomic, retain) IBOutlet UILabel *favoriteGameLabel; @property (nonatomic, retain) IBOutlet UILabel *favoriteExcuseLabel; @property (nonatomic, retain) IBOutlet UILabel *favoriteSinLabel; -(void)refreshFields; - (IBAction)showInfo; @end
We declared several constants. These are the key values that we used in our property list file for the different preference fields. Then, we declared ten outlets, all of them labels, and we created properties for each of them. After that, we declared a method that will read settings out of the user defaults and push those values into the various labels.
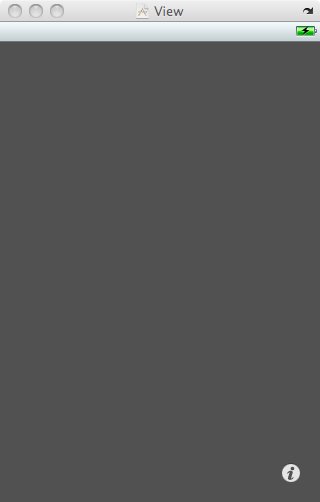
Open Interface Builder by double-clicking MainView.xib in Resources folder.
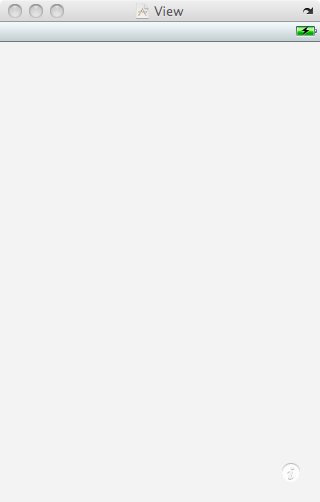
Let's change the dark gray view to white by using attribute inspector. Use the color well labeled Background to change the background to white.
Put the main window in list mode. Clicking the disclosure triangle of the Main View icon reveals an icon called Light Info Button.
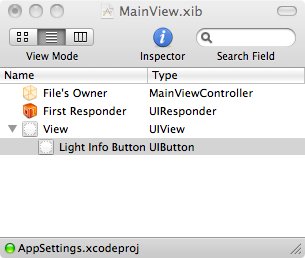
We will change this icon so it will look good on a white background. Bring up the attribute inspector for the Light Info Button. Change the button's Type to Info Dark from Info Light.

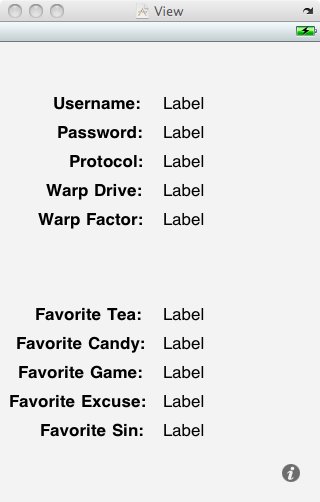
Now, it's time to add 20 labels to the Main View. Half of them will be static labels that are right-aligned and bold: the other half will be used to display the actual values retrieved from the user defaults and will have outlets pointing to them. Make them as in the picture below.
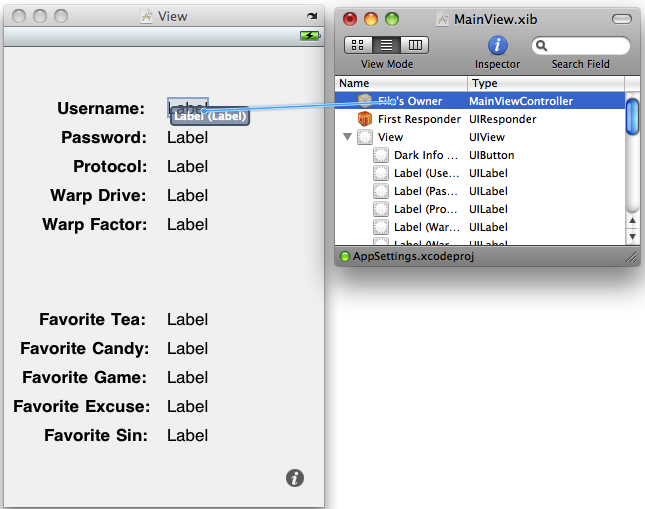
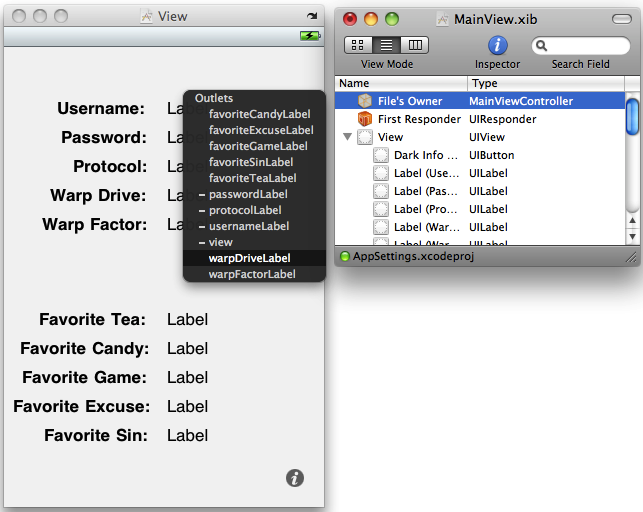
The next thing we want to do is control-drag from File's Owner to each of the labels intended to display a settings value. We will control-drag 10 times, setting each label to a different outlet. Once you have all ten outlets connected to labels, save, and go back to Xcode.
The implementation file, "MainViewController.m" is:
#import "MainViewController.h"
//#import "MainView.h"

@implementation MainViewController
@synthesize usernameLabel;
@synthesize passwordLabel;
@synthesize protocolLabel;
@synthesize warpDriveLabel;
@synthesize warpFactorLabel;
@synthesize favoriteTeaLabel;
@synthesize favoriteCandyLabel;
@synthesize favoriteGameLabel;
@synthesize favoriteExcuseLabel;
@synthesize favoriteSinLabel;

-(void)refreshFields {
    NSUserDefaults *defaults = [NSUserDefaults standardUserDefaults];
    usernameLabel.text = [defaults objectForKey:kUsernameKey];
    passwordLabel.text = [defaults objectForKey:kPasswordKey];
    protocolLabel.text = [defaults objectForKey:kProtocolKey];
    warpDriveLabel.text = [defaults objectForKey:kWarpDriveKey];
    warpFactorLabel.text = [[defaults objectForKey:kWarpFactorKey]
                            stringValue];
    favoriteTeaLabel.text = [defaults objectForKey:kFavoriteTeaKey];
    favoriteCandyLabel.text = [defaults objectForKey:kFavoriteCandyKey];
    favoriteGameLabel.text = [defaults objectForKey:kFavoriteGameKey];
    favoriteExcuseLabel.text = [defaults objectForKey:kFavoriteExcuseKey];
    favoriteSinLabel.text = [defaults objectForKey:kFavoriteSinKey];
}

- (void)viewDidAppear:(BOOL)animated {
    [self refreshFields];
    [super viewDidAppear:animated];
}

- (void)viewDidLoad {
    [self refreshFields];
}

- (id)initWithNibName:(NSString *)nibNameOrNil bundle:(NSBundle *)nibBundleOrNil {
    if (self = [super initWithNibName:nibNameOrNil bundle:nibBundleOrNil]) {
        // Custom initialization
    }
    return self;
}

- (void)flipsideViewControllerDidFinish:
        (FlipsideViewController *)controller {
	[self dismissModalViewControllerAnimated:YES];
    [self refreshFields];
}

- (IBAction)showInfo {

	FlipsideViewController *controller = [[FlipsideViewController alloc] initWithNibName:@"FlipsideView" bundle:nil];
	controller.delegate = self;

	controller.modalTransitionStyle = UIModalTransitionStyleFlipHorizontal;
	[self presentModalViewController:controller animated:YES];

	[controller release];
}

- (void)didReceiveMemoryWarning {
	// Releases the view if it doesn't have a superview.
    [super didReceiveMemoryWarning];

	// Release any cached data, images, etc that aren't in use.
}

- (void)viewDidUnload {
	// Release any retained subviews of the main view.
	// e.g. self.myOutlet = nil;
    self.usernameLabel = nil;
    self.passwordLabel = nil;
    self.protocolLabel = nil;
    self.warpDriveLabel = nil;
    self.warpFactorLabel = nil;
    self.favoriteTeaLabel = nil;
    self.favoriteCandyLabel = nil;
    self.favoriteGameLabel = nil;
    self.favoriteExcuseLabel = nil;
    self.favoriteSinLabel = nil;
    [super viewDidUnload];
}

- (void)dealloc {
    [usernameLabel release];
    [passwordLabel release];
    [protocolLabel release];
    [warpDriveLabel release];
    [warpFactorLabel release];
    [favoriteTeaLabel release];
    [favoriteCandyLabel release];
    [favoriteGameLabel release];
    [favoriteExcuseLabel release];
    [favoriteSinLabel release];
    [super dealloc];
}
@end
When the user is done using the flipside view where some preferences can be changed, our controller will get notified of the fact. When that happens, we need to make sure our labels are updated to show any changes, so we need the following line of code to:
- (void)flipsideViewControllerDidFinish:
         (FlipsideViewController *)controller {
	[self dismissModalViewControllerAnimated:YES];
    [self refreshFields];
}
The new method, refreshFields, grabs the standard user defaults, and sets the text property of all the labels to the appropriate object from the user defaults, using the key values we put in our properties file. Note that for warpFactorLabel, we're calling stringValue on the object returned. All of our other preferences are strings, which come back from the user defaults as NSString objects. The preferences stored by the slider, however, comes back as an KSNumber, so we call stringValue on it to get a string representation of the value it holds.
Next, we added a viewDidAppear: method, where we call our refreshFields method. We call refreshFields again when we get notified that the flipside controller is being dismissed. This will cause our displayed fields to get set to the appropriate preference values when the view loads, and then to get refreshed when the flipside view gets swapped out. MainViewController's viewDidAppear: method will not be called when the flipside view is dismissed because the flipside view is handled modally with the main view as its modal parent. Fortunately, the Utility Application template we chose has very kindly provided us with a delegate method we can use for exactly that purpose.
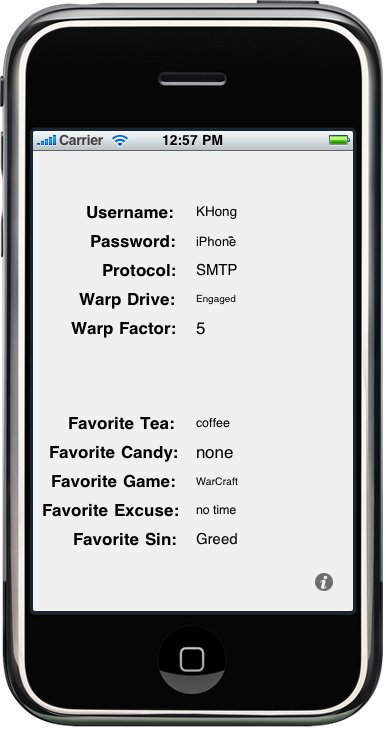
Build and Run.
Our main view is now up and running. Let's build the flipside view. The flipside view features our warp drive switch, as well as the warp factor slider. We're going to use the same controls that the Settings application uses for these two items: a switch and a slider. First, we should declare our outlets. Here is the interface file, "FlipsideViewController.h":
@protocol FlipsideViewControllerDelegate;

@interface FlipsideViewController : UIViewController {
	id  delegate;
    UISwitch *engineSwitch;
    UISlider *warpFactorSlider;
}

@property (nonatomic, assign) id  delegate;
@property (nonatomic, retain) IBOutlet UISwitch *engineSwitch;
@property (nonatomic, retain) IBOutlet UISlider *warpFactorSlider;

- (IBAction)done;
@end

@protocol FlipsideViewControllerDelegate
- (void)flipsideViewControllerDidFinish:(FlipsideViewController *)controller;
@end
Back to Interface Builder by double-clicking the FlipsideView.xib. Change the background color using the attribute inspector to a lighter shade of gray, about 25% gray. We are going to design the flipside view as the picture below.
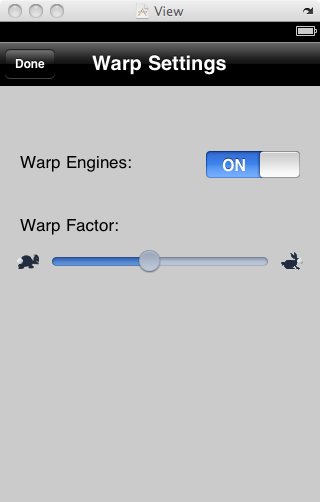
Drag two labels and changes the labels to Warp Engines: and Warp Factor:. Also change the title from Title to Warp Settings. Then, drag a Switch and Slider from the library to the view. Next step is to make connections to the outlets. From the File's Owner to the Switch and to the Slider and select engineSwitch and warpFactorSlider outlets, respectively.
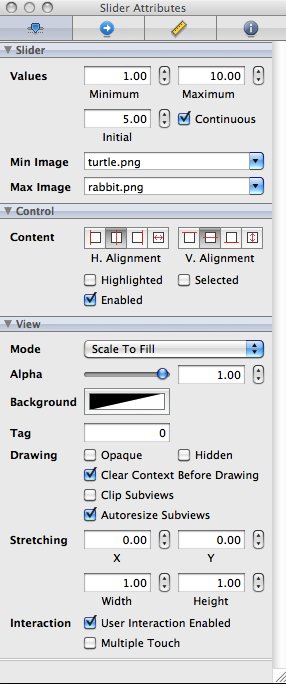
Then bring up attributes inspector for the slider. Set Minimum to 1.00, Maximum to 10.00, and Initial to 5.00. Then, select turtle.png for Min Image and rabbit.png for Max Image.
Save nib and back to Xcode. Here is the implementation file, "FlipsideViewController.m":
#import "FlipsideViewController.h"
#import "MainViewController.h"

@implementation FlipsideViewController
@synthesize engineSwitch;
@synthesize warpFactorSlider;
@synthesize delegate;

- (void)viewDidLoad {
    NSUserDefaults *defaults = [NSUserDefaults standardUserDefaults];
    engineSwitch.on  = ([[defaults objectForKey:kWarpDriveKey]
                         isEqualToString:@"Engaged"]) ? YES : NO;
    warpFactorSlider.value = [defaults floatForKey:kWarpFactorKey];

    [super viewDidLoad];
}

- (void)viewWillDisappear:(BOOL)animated
{
    NSUserDefaults *defaults = [NSUserDefaults standardUserDefaults];
    NSString *prefValue = (engineSwitch.on) ? @"Engaged" : @"Disabled";
    [defaults setObject:prefValue forKey:kWarpDriveKey];
    [defaults setFloat:warpFactorSlider.value forKey:kWarpFactorKey];
    [super viewWillDisappear:animated];
}

- (IBAction)done {
	[self.delegate flipsideViewControllerDidFinish:self];
}

/*
 // Override to allow orientations other than the default portrait orientation.
 - (BOOL)shouldAutorotateToInterfaceOrientation:(UIInterfaceOrientation)interfaceOrientation {
 // Return YES for supported orientations
 return (interfaceOrientation == UIInterfaceOrientationPortrait);
 }
 */

- (void)didReceiveMemoryWarning {
	// Releases the view if it doesn't have a superview.
    [super didReceiveMemoryWarning];

	// Release any cached data, images, etc that aren't in use.
}

- (void)viewDidUnload {
	// Release any retained subviews of the main view.
	// e.g. self.myOutlet = nil;
    self.engineSwitch = nil;
    self.warpFactorSlider = nil;
    [super viewDidUnload];
}

- (void)dealloc {
    [engineSwitch release];
    [warpFactorSlider release];
    [super dealloc];
}
@end
Build and Run.