Bogotobogo
contact@bogotobogo.com
7. Advanced ListView Widget - Part B
- 7.0 Advanced ListView
- 7.1 ListView with One Icon
- 7.2 ListView with Two Icons
- 7.3 Efficient ListView with Two Icons
- 7.4 ListView with RatingBar
- 7.5 Custom ListView - 3 subrows
- 7.6 Custom ListView with 3 Columns
- 7.7 Custom ListView with Collapsing Rows
- 7.8 Expandable ListView
Full List of Tutorial
- 25. Activity Life Cycle
- 24. Media
- 23. HTTP Internet Connection
- 22. Threads
- 21. Content Provider
- 20. Notification and Service
- 19. Animation - Frame By Frame, Layout, and View
- 18. Manifest
- 17. Map View
- 16. Preferences
- 15. Configuring Rotation
- 14. On Notepad Examples
- 13. Intent
- 12. Activity Testing
- 11. Android JUnit Test
- 10. Menus
- 9. TabWidget, Flipper, and SlidingDrawer
- 8. DatePicker, TimePicker, and Clocks
- 7. Advanced ListView Widget
- 6. ListView, Spinner
- 5. Layouts
- 4. User Interface
- 3. Back to Hello World Again
- 2. Hello World
- 1. Introduction
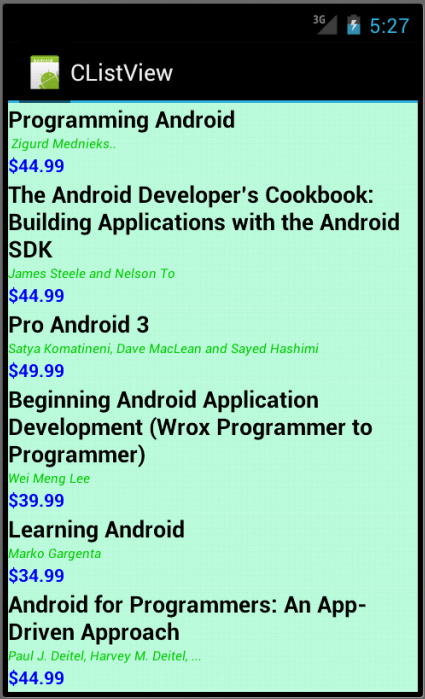
In this section we will learn how we do customize ListView. Actually, we only do customize the row.
Let's preview our main code, CListView.java:
package com.bogotobogo.android.clistview;

import java.util.ArrayList;
import java.util.HashMap;

import android.app.ListActivity;
import android.os.Bundle;
import android.widget.SimpleAdapter;

public class CListView extends ListActivity {

    static final ArrayList<HashMap<String,String>> list =
		new ArrayList<HashMap<String,String>>();

    /** Called when the activity is first created. */
    @Override
    public void onCreate(Bundle savedInstanceState) {
        super.onCreate(savedInstanceState);
        setContentView(R.layout.clistview);
        SimpleAdapter adapter = new SimpleAdapter(
        	this,
        	list,
        	R.layout.crowview,
        	new String[] {"title","author","price"},
        	new int[] {R.id.text1,R.id.text2, R.id.text3}
        );
        populateList();
        setListAdapter(adapter);
    }

    private void populateList() {
    	HashMap<String,String> map = new HashMap<String,String>();
    	map.put("title",
	"Professional Android 2 Application Development");
    	map.put("author", "Reto Meier");
    	map.put("price", "$44.99");
    	list.add(map);
    	map = new HashMap();
    	map.put("title","Pro Android 2");
    	map.put("author",
	"Sayed Hashimi, Satya Komatineni, and Dave MacLean");
    	map.put("price", "$49.99");
    	list.add(map);
    	map = new HashMap();
    	map.put("title","Android Wireless Application Development");
    	map.put("author", "Shane Conder and Lauren Darcey");
    	map.put("price", "$44.99");
    	list.add(map);
    	map = new HashMap();
    	map.put("title","Beginning Android 2");
    	map.put("author", "Mark Murphy");
    	map.put("price", "$44.99");
    	list.add(map);
    	map = new HashMap();
    	map.put("title",
    			"Hello, Android: Introducing Google's Mobile Development Platform");
    	map.put("author", "Ed Burnette");
    	map.put("price", "$34.95");
    	list.add(map);
    	map = new HashMap();
    	map.put("title","Unlocking Android: A Developer's Guide");
    	map.put("author", "Frank Ableson, Charlie Collins, and Robi Sen");
    	map.put("price", "$39.99");
    	list.add(map);
    	map = new HashMap();
    	map.put("title",
    			"Android Application Development: Programming with the Google SDK");
    	map.put("author",
    			"Rick Rogers, John Lombardo, Zigurd Mednieks, and G. Blake Meike");
    	map.put("price", "$39.99");
    	list.add(map);
    	map = new HashMap();
    	map.put("title",
    			"Sams Teach Yourself Android Application Development in 24 Hours");
    	map.put("author",
    			"Lauren Darcey and Shane Conder");
    	map.put("price", "$39.99");
    	list.add(map);
    	}
}
First, let's look at the layout for ListView, clistview.xml:
<?xml version="1.0" encoding="utf-8"?>
<LinearLayout xmlns:android="http://schemas.android.com/apk/res/android"
    android:orientation="vertical"
    android:layout_width="fill_parent"
    android:layout_height="fill_parent">
	<ListView android:id="@id/android:list"
			android:layout_width="fill_parent"
			android:layout_height="fill_parent"
			android:background="#bfffdf"
			android:drawSelectorOnTop="false">
	</ListView>
</LinearLayout>
We're going to have three sub-rows for each row of the ListView. So, layout file for each row crowview.xml should look like this:
<?xml version="1.0" encoding="utf-8"?>
<LinearLayout xmlns:android="http://schemas.android.com/apk/res/android"
    android:orientation="vertical"
    android:layout_width="fill_parent"
    android:layout_height="fill_parent">
	<TextView android:id="@+id/text1"
			android:textSize="18sp"
			android:textStyle="bold"
			android:textColor="#000000"
			android:layout_width="fill_parent"
			android:layout_height="fill_parent"/>
	<TextView android:id="@+id/text2"
			android:textSize="10sp"
			android:textStyle="italic"
			android:textColor="#00cd00"
			android:layout_width="wrap_content"
			android:layout_height="fill_parent"/>
	<TextView android:id="@+id/text3"
			android:typeface="sans"
			android:textSize="14sp"
			android:textStyle="bold"
			android:textColor="#0000ff"
			android:layout_width="wrap_content"
			android:layout_height="wrap_content"/>
</LinearLayout>
Note that we defined three TextViews for the three sub-rows.
So, we have the display layout. Let's look at the main code how it works.
Our activity is extending ListActivity.
public class CListView extends ListActivity {
We are using a SimpleAdpater provided by the SDK. This adapter needs the context, the layout and the handle to the data that we want to display
        SimpleAdapter adapter = new SimpleAdapter(
        		this,
        		list,
        		R.layout.crowview,
        		new String[] {"title","author","price"},
        		new int[] {R.id.text1,R.id.text2, R.id.text3}
        );
Actually, before passing the array, we declare a list of data in an ArrayList of HashMaps.
    static final ArrayList<HashMap<String,String>> list =
			new ArrayList<HashMap<String,String>>();
Then, we populate it.
    private void populateList() {
    	HashMap<String,String> map = new HashMap<String,String>();
    	map.put("title","Professional Android 2 Application Development");
    	map.put("author", "Reto Meier");
    	map.put("price", "$44.99");
    	list.add(map);
	.......
Finally, setListAdapter(adapter) automatically adds our ListView to fill the entire screen of the ListActivity.
Let's run our Customized ListView.
Files used in this Customized ListView example CListView.zip
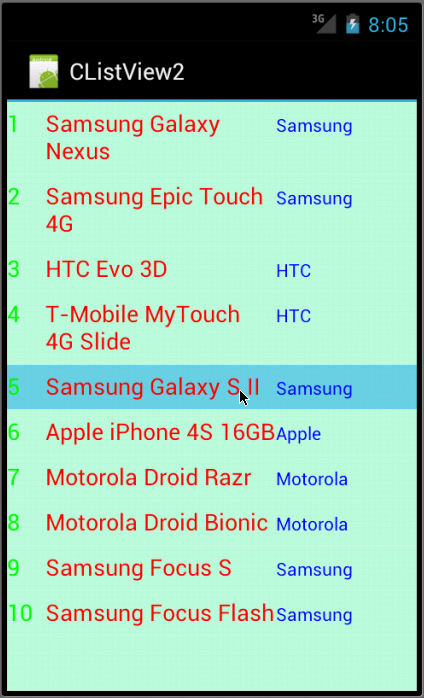
Custom Listview with 3 columns is not much different from the previous example with 3 subrows in terms of implementation.
Here is the main Java code, CListView2.java:
package com.bogotobogo.android.clistview2;

import java.util.ArrayList;
import java.util.HashMap;

import android.app.ListActivity;
import android.os.Bundle;
import android.widget.SimpleAdapter;

public class CListView2 extends ListActivity {

    static final ArrayList<HashMap<String,String>> list =
    	new ArrayList<HashMap<String,String>>();

    /** Called when the activity is first created. */
    @Override
    public void onCreate(Bundle savedInstanceState) {
        super.onCreate(savedInstanceState);
        setContentView(R.layout.clistview);
        SimpleAdapter adapter = new SimpleAdapter(
        		this,
        		list,
        		R.layout.crowview,
        		new String[] {"rank","model","company"},
        		new int[] {R.id.text1,R.id.text2, R.id.text3}
        );
        populateList();
        setListAdapter(adapter);
    }

    private void populateList() {
    	HashMap<String, String> map = new HashMap<String, String>();
    	map.put("rank", "1");
    	map.put("model", "32GB iPhone 4");
    	map.put("company", "Apple");
    	list.add(map);
    	map = new HashMap<String, String>();
    	map.put("rank", "2");
    	map.put("model", "EVO 4G");
    	map.put("company", "HTC");
    	list.add(map);
    	map = new HashMap<String, String>();
    	map.put("rank", "3");
    	map.put("model", "Droid X");
    	map.put("company", "Motorola");
    	list.add(map);
    	map = new HashMap<String, String>();
    	map.put("rank", "4");
    	map.put("model", "Droid Incredible");
    	map.put("company", "HTC");
    	list.add(map);
    	map = new HashMap<String, String>();
    	map.put("rank", "5");
    	map.put("model", "Nexus One");
    	map.put("company", "Google");
    	list.add(map);
    	map = new HashMap<String, String>();
    	map.put("rank", "6");
    	map.put("model", "Captivate");
    	map.put("company", "Samsung");
    	list.add(map);
    	map = new HashMap<String, String>();
    	map.put("rank", "7");
    	map.put("model", "Droid");
    	map.put("company", "Motorola");
    	list.add(map);
    	map = new HashMap<String, String>();
    	map.put("rank", "8");
    	map.put("model", "32GB iPhone 3GS");
    	map.put("company", "Apple");
    	list.add(map);
    	map = new HashMap<String, String>();
    	map.put("rank", "9");
    	map.put("model", "Bold 9700");
    	map.put("company", "BlackBerry ");
    	list.add(map);
    	map = new HashMap<String, String>();
    	map.put("rank", "10");
    	map.put("model", "Palm Pre Plus");
    	map.put("company", "Palm");
    	list.add(map);
    	}
}
The main layout for the list clistview.xml:
<?xml version="1.0" encoding="utf-8"?>
<ListView xmlns:android="http://schemas.android.com/apk/res/android"
 	android:id="@id/android:list"
	android:layout_width="fill_parent"
	android:layout_height="fill_parent"
	android:background="#bfffdf"
	android:drawSelectorOnTop="false">
</ListView>
The view for 3 columns for each row is specified in crowview.xml:
<?xml version="1.0" encoding="utf-8"?>
<LinearLayout
     xmlns:android="http://schemas.android.com/apk/res/android"
     android:paddingTop="4dip"
     android:paddingBottom="6dip"
     android:layout_width="fill_parent"
     android:layout_height="wrap_content"
     android:orientation="horizontal">
     <TextView android:id="@+id/text1"
		android:textColor="#00ff00"
		android:textSize="18sp"
		android:layout_width="30dip"
		android:layout_height="wrap_content"/>
     <TextView android:id="@+id/text2"
     	android:textColor="#ff0000"
     	android:textSize="18sp"
		android:layout_width="110dip"
		android:layout_height="wrap_content"
		android:layout_weight="1"/>
     <TextView android:id="@+id/text3"
     	android:textColor="#0000ff"
     	android:textSize="14sp"
		android:layout_width="40dip"
		android:layout_height="wrap_content"
		android:layout_weight="1"/>
</LinearLayout>
Note that in the XML for each row, we put three TextViews in LinearLayout with horizontal orientation not vertical:
<LinearLayout
   .....
	android:orientation="horizontal">
Let's run another Customized ListView.
Files used in this Customized ListView example CListView2.zip
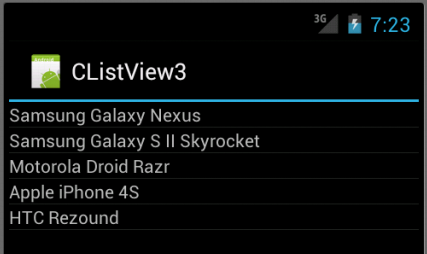
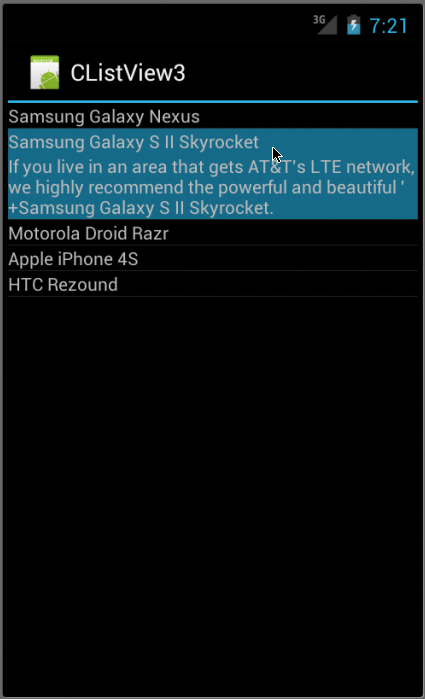
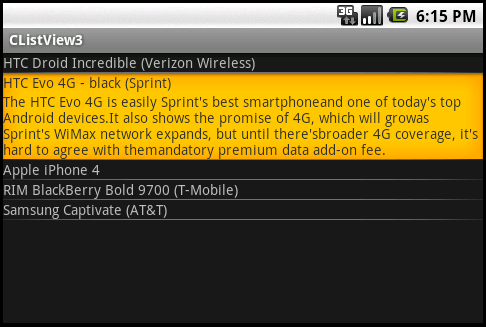
This example shows detail information of the phone when it is clicked.
Let's look at our Java code, CListView3.java:
package com.bogotobogo.android.clistview3;

import android.app.ListActivity;
import android.content.Context;
import android.os.Bundle;
import android.view.View;
import android.view.ViewGroup;
import android.widget.BaseAdapter;
import android.widget.LinearLayout;
import android.widget.ListView;
import android.widget.TextView;


/**
 * A list view example where the
 * data comes from a custom ListAdapter
 */
public class CListView3 extends ListActivity
{

    @Override
    public void onCreate(Bundle savedInstanceState) {
        super.onCreate(savedInstanceState);

        // Use our own list adapter
        setListAdapter(new PhoneListAdapter(this));
    }

    @Override
    protected void onListItemClick(ListView l, View v, int position, long id) {
       ((PhoneListAdapter)getListAdapter()).toggle(position);
    }

    /**
     * A sample ListAdapter that presents content
     * from arrays of phones and text.
     */
    private class PhoneListAdapter extends BaseAdapter {
        public PhoneListAdapter(Context context) {
            mContext = context;
        }

        /**
         * The number of items in the list is determined
         * by the number of phones in our array.
         */
        public int getCount() {
            return mPhones.length;
        }

        /**
         * Since the data comes from an array, just returning
         * the index is sufficent to get at the data. If we
         * were using a more complex data structure, we
         * would return whatever object represents one
         * row in the list.
         */
        public Object getItem(int position) {
            return position;
        }

        /**
         * Use the array index as a unique id.
         */
        public long getItemId(int position) {
            return position;
        }

        /**
         * Make a PhoneView to hold each row.
         */
        public View getView(int position, View convertView, ViewGroup parent) {
            PhoneView sv;
            if (convertView == null) {
                sv = new PhoneView
			(mContext, mPhones[position], mDetail[position], mExpanded[position]);
            } else {
                sv = (PhoneView)convertView;
                sv.setName(mPhones[position]);
                sv.setDetail(mDetail[position]);
                sv.setExpanded(mExpanded[position]);
            }

            return sv;
        }

        public void toggle(int position) {
            mExpanded[position] = !mExpanded[position];
            notifyDataSetChanged();
        }

        /**
         * Remember our context so we can use it when constructing views.
         */
        private Context mContext;

        /**
         * Our data for names of phones, part 1.
         */
        private String[] mPhones =
        {
                "HTC Droid Incredible (Verizon Wireless)",
                "HTC Evo 4G - black (Sprint) ",
                "Apple iPhone 4 ",
                "RIM BlackBerry Bold 9700 (T-Mobile) ",
                "Samsung Captivate (AT&T) "
        };

        /**
         * Our data for the detail description of each phone, part 2.
         */
        private String[] mDetail =
        {
                "With its polished design and user interface" +
                "and blazing fast speeds, the HTC Droid Incredible" +
                "takes pole position as Verizon's top smartphone" +
                "and is now the Android device to beat.",

                "The HTC Evo 4G is easily Sprint's best smartphone" +
                "and one of today's top Android devices." +
                "It also shows the promise of 4G, which will grow" +
                "as Sprint's WiMax network expands, but until there's" +
                "broader 4G coverage, it's hard to agree with the" +
                "mandatory premium data add-on fee.",

                "With the iPhone 4, Apple again shows that it is a" +
                "powerful player in the smartphone wars. It won't be" +
                "for everyone, the call quality and reception remain" +
                "sticking points, and AT&T remains a sticking point," +
                "but the handset's striking design, loaded feature set," +
                "and satisfying performance make it the best iPhone yet.",

                "The RIM BlackBerry Bold 9700 brings T-Mobile its first" +
                "3G BlackBerry and improves on its predecessor" +
                "with a sleeker design and more power. We only wish" +
                "it had a better browser to complete the package.",

                "The Samsung Captivate is easily AT&T's best Android" +
                "offering to date, delivering great performance, tons" +
                "of features, and an easy-to-use interface."
        };

        /**
         * Our data, part 3.
         */
        private boolean[] mExpanded =
        {
                false,
                false,
                false,
                false,
                false,
                false,
                false,
                false
        };
    }

    /**
     * We will use a PhoneView to display each phone.
     * It's just a LinearLayout with two text fields.
     */
    private class PhoneView extends LinearLayout {
        public PhoneView(Context context, String name, String detail, boolean expanded) {
            super(context);

            this.setOrientation(VERTICAL);

            // Here we build the child views in code. They could also have
            // been specified in an XML file.

            mPhone = new TextView(context);
            mPhone.setText(name);
            addView(mPhone,
		new LinearLayout.LayoutParams(LayoutParams.FILL_PARENT, LayoutParams.WRAP_CONTENT));

            mDetail = new TextView(context);
            mDetail.setText(detail);
            addView(mDetail,
		new LinearLayout.LayoutParams(LayoutParams.FILL_PARENT, LayoutParams.WRAP_CONTENT));

            mDetail.setVisibility(expanded ? VISIBLE : GONE);
        }

        /**
         * Convenience method to set the name of a PhoneView
         */
        public void setName(String name) {
            mPhone.setText(name);
        }

        /**
         * Convenience method to set the detail of a PhoneView
         */
        public void setDetail(String words) {
            mDetail.setText(words);
        }

        /**
         * Convenience method to expand or hide the detail
         */
        public void setExpanded(boolean expanded) {
            mDetail.setVisibility(expanded ? VISIBLE : GONE);
        }

        private TextView mPhone;
        private TextView mDetail;
    }
}
We are using our PhoneView to display each phone. It's a LinearLayout with two text fields.
The comments inside code are self-explanatory.
So, we will just run this Collapsing Customized ListView.
Files used in this Customized ListView example CListView3.zip
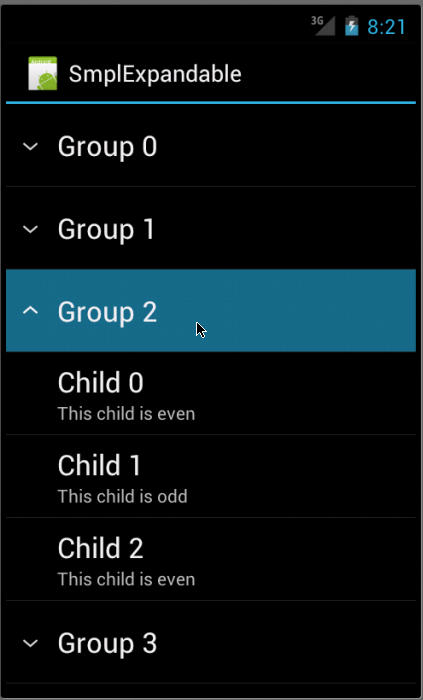
In this example, we subclass ExpandableListActivity to demonstrate expandable list. We use an adapter, ExpandableListAdapter which is a Simple Map-based adapter.
Here is our Java code, SmplExpandable.java:
package com.bogotobogo.android.smplexpandable;

import android.app.ExpandableListActivity;
import android.os.Bundle;
import android.widget.ExpandableListAdapter;
import android.widget.SimpleExpandableListAdapter;

import java.util.ArrayList;
import java.util.HashMap;
import java.util.List;
import java.util.Map;

/**
 * Demonstrates expandable lists backed by a Simple Map-based adapter
 */
public class SmplExpandable extends ExpandableListActivity {
    private static final String NAME = "NAME";
    private static final String IS_EVEN = "IS_EVEN";

    private ExpandableListAdapter mAdapter;

    @Override
    public void onCreate(Bundle savedInstanceState) {
        super.onCreate(savedInstanceState);

        List<Map<String, String>> groupData = new ArrayList<Map<String, String>>();
        List<List<Map<String, String>>> childData = new ArrayList<List<Map<String, String>>>();
        for (int i = 0; i < 10; i++) {
            Map<String, String> curGroupMap = new HashMap<String, String>();
            groupData.add(curGroupMap);
            curGroupMap.put(NAME, "Group " + i);
            curGroupMap.put(IS_EVEN, (i % 2 == 0) ? "This group is even" : "This group is odd");

            List<Map<String, String>> children = new ArrayList<Map<String, String>>();
            for (int j = 0; j < 3; j++) {
                Map<String, String> curChildMap = new HashMap<String, String>();
                children.add(curChildMap);
                curChildMap.put(NAME, "Child " + j);
                curChildMap.put(IS_EVEN, (j % 2 == 0) ? "This child is even" : "This child is odd");
            }
            childData.add(children);
        }

        // Set up our adapter
        mAdapter = new SimpleExpandableListAdapter(
                this,
                groupData,
                android.R.layout.simple_expandable_list_item_1,
                new String[] { NAME, IS_EVEN },
                new int[] { android.R.id.text1, android.R.id.text2 },
                childData,
                android.R.layout.simple_expandable_list_item_2,
                new String[] { NAME, IS_EVEN },
                new int[] { android.R.id.text1, android.R.id.text2 }
                );
        setListAdapter(mAdapter);
    }
}
Files used in this expandable ListView example SmplExpandable.zip
Previous sections:
- 7.0 Advanced ListView
- 7.1 ListView with One Icon
- 7.2 ListView with Two Icons
- 7.3 Efficient ListView with Two Icons
- 7.4 ListView with RatingBar
Full List of Android Tutorials
- 25. Activity Life Cycle
- 24. Media
- 23. HTTP Internet Connection
- 22. Threads
- 21. Content Provider
- 20. Notification and Service
- 19. Animation - Frame By Frame, Layout, and View
- 18. Manifest
- 17. Map View
- 16. Preferences
- 15. Configuring Rotation
- 14. On Notepad Examples
- 13. Intent
- 12. Activity Testing
- 11. Android JUnit Test
- 10. Menus
- 9. TabWidget, Flipper, and SlidingDrawer
- 8. DatePicker, TimePicker, and Clocks
- 7. Advanced ListView Widget
- 6. ListView, Spinner
- 5. Layouts
- 4. User Interface
- 3. Back to Hello World Again
- 2. Hello World
- 1. Introduction