MongoDB replication sets
MongoDB 3.0
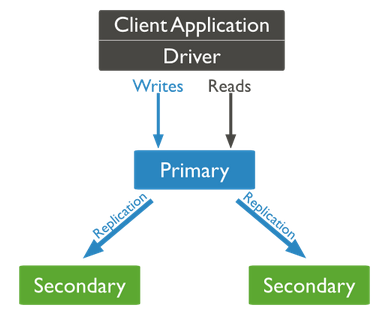
To show how to configure replication sets, we're going to configure a simple set with a primary and two secondaries.
Put the following lines for each instance. For :
127.0.0.1 localhost mongo-0
172.31.15.152 mongo-0
172.31.15.153 mongo-1
172.31.15.154 mongo-2
Issue the following command on each instance:
hostname mongo-0   // instance 0
hostname mongo-1   // instance 1
hostname mongo-2   // instance 2
Edit the /etc/hostname file to reflect the change.
Install steps are as below. For more details, check MongoDB Install and mongo shell.
$ sudo apt-key adv --keyserver hkp://keyserver.ubuntu.com:80 --recv 7F0CEB10

$ echo "deb http://repo.mongodb.org/apt/ubuntu "$(lsb_release -sc)"/mongodb-org/3.0 multiverse" | sudo tee /etc/apt/sources.list.d/mongodb-org-3.0.list

$ sudo apt-get update

$ sudo apt-get install -y mongodb-org

$ sudo mkdir -p /data/db

$ sudo service mongod restart
Once the MongoDB packages are installed, we can configure username and password for the database server.
Before we set up a username and password for MongoDB, we need to open mongodb shell on your server. We can login by typing:
$ mongo
Once we're in the MongoDB shell, switch to the database named admin:
> use admin
switched to db admin
Create the root user with the following command:
> db.createUser({user:"admin", pwd:"admin", roles:[{role:"root", db:"admin"}]})
Successfully added user: {
	"user" : "admin",
	"roles" : [
		{
			"role" : "root",
			"db" : "admin"
		}
	]
}
Now, we've created user admin with password admin and have the permission/role as root and the database is admin.
Restart MongoDB:
$ sudo service mongod restart
Here is the default /etc/mongod.conf:
# Where and how to store data.
storage:
  dbPath: /data/db
  journal:
    enabled: true

# where to write logging data.
systemLog:
  destination: file
  logAppend: true
  path: /var/log/mongodb/mongod.log

# network interfaces
net:
  port: 27017
  bindIp: 127.0.0.1
Now that we've modified /etc/mongod.conf, let's configure MongoDB:
$ sudo mongod --config /etc/mongod.conf
Now that we have configured each member of the replication set and started the mongod process on each machine, we can initiate the replication and add each member.
Now start the mongodb server by specifying --replSet option
$ sudo mongod --port 27017 --dbpath /data/db --smallfiles \
--fork --logpath /var/log/mongodb/mongod.log --replSet "rs0"
about to fork child process, waiting until server is ready for connections.
forked process: 2084
child process started successfully, parent exiting
These steps must be repeated on each member of the replication set.
It will start a mongodb instance with the name rs0.
Now start the command prompt and connect to this mongodb instance.
Now that we have configured each member of the replication set and started the mongodb process on each machine, we can initiate the replication and add each member.
On one of our members, type:
$ mongo
This will give you a MongoDB prompt for the current member.
Before setting replica set, let's check the current status:
> rs.status()
{
	"info" : "run rs.initiate(...) if not yet done for the set",
	"ok" : 0,
	"errmsg" : "no replset config has been received",
	"code" : 94
}
To initiate a new replica set:
> rs.initiate()
{
	"info2" : "no configuration explicitly specified -- making one",
	"me" : "mongo-0:27017",
	"ok" : 1
}
rs0:OTHER>
This will initiate the replication set and add the server we are currently connected to as the first member of the set. You can see this by rs.conf():
rs0:OTHER> rs.conf()
{
	"_id" : "rs0",
	"version" : 1,
	"members" : [
		{
			"_id" : 0,
			"host" : "mongo-0:27017",
			"arbiterOnly" : false,
			"buildIndexes" : true,
			"hidden" : false,
			"priority" : 1,
			"tags" : {

			},
			"slaveDelay" : 0,
			"votes" : 1
		}
	],
	"settings" : {
		"chainingAllowed" : true,
		"heartbeatTimeoutSecs" : 10,
		"getLastErrorModes" : {

		},
		"getLastErrorDefaults" : {
			"w" : 1,
			"wtimeout" : 0
		}
	}
}
rs0:PRIMARY>
Now, we can add the additional nodes to the replication set by referencing the hostname we set in the /etc/hosts file:
rs0:PRIMARY> rs.add("mongo-1")
{ "ok" : 1 }
rs0:PRIMARY> rs.add("mongo-2")
{ "ok" : 1 }
rs0:PRIMARY>
To check the status of replica sete issue the command rs.status():
rs0:PRIMARY> rs.status()
{
	"set" : "rs0",
	"date" : ISODate("2015-11-29T03:19:06.109Z"),
	"myState" : 1,
	"members" : [
		{
			"_id" : 0,
			"name" : "mongo-0:27017",
			"health" : 1,
			"state" : 1,
			"stateStr" : "PRIMARY",
			"uptime" : 6638,
			"optime" : Timestamp(1448765906, 1),
			"optimeDate" : ISODate("2015-11-29T02:58:26Z"),
			"electionTime" : Timestamp(1448760650, 2),
			"electionDate" : ISODate("2015-11-29T01:30:50Z"),
			"configVersion" : 9,
			"self" : true
		},
		{
			"_id" : 1,
			"name" : "mongo-1:27017",
			"health" : 1,
			"state" : 2,
			"stateStr" : "SECONDARY",
			"uptime" : 6326,
			"optime" : Timestamp(1448765906, 1),
			"optimeDate" : ISODate("2015-11-29T02:58:26Z"),
			"lastHeartbeat" : ISODate("2015-11-29T03:19:04.949Z"),
			"lastHeartbeatRecv" : ISODate("2015-11-29T03:19:05.603Z"),
			"pingMs" : 0,
			"syncingTo" : "mongo-0:27017",
			"configVersion" : 9
		},
		{
			"_id" : 2,
			"name" : "mongo-2:27017",
			"health" : 1,
			"state" : 2,
			"stateStr" : "SECONDARY",
			"uptime" : 19,
			"optime" : Timestamp(1448765906, 1),
			"optimeDate" : ISODate("2015-11-29T02:58:26Z"),
			"lastHeartbeat" : ISODate("2015-11-29T03:19:04.331Z"),
			"lastHeartbeatRecv" : ISODate("2015-11-29T03:19:04.374Z"),
			"pingMs" : 1,
			"configVersion" : 9
		}
	],
	"ok" : 1
}
rs0:PRIMARY>
Note: Initially, I had the "mongo-2" has "stateStr" : "(not reachable/healthy)". Issue the following command again on mongo-2:
$ sudo mongod --port 27017 --dbpath /data/db --smallfiles \
--fork --logpath /var/log/mongodb/mongod.log --replSet "rs0"
Then, removed a\the member from the set and add it again:
rs0:PRIMARY> rs.remove("mongo-2:27017")

rs0:PRIMARY> rs.add("mongo-2:27017")
We can check whether we are connected to primary or not issue the command db.isMaster() in mongo client. For example, on mongo-1:
rs0:SECONDARY> db.isMaster()
{
	"setName" : "rs0",
	"setVersion" : 9,
	"ismaster" : false,
	"secondary" : true,
	"hosts" : [
		"mongo-0:27017",
		"mongo-1:27017",
		"mongo-2:27017"
	],
	"primary" : "mongo-0:27017",
	"me" : "mongo-1:27017",
	"maxBsonObjectSize" : 16777216,
	"maxMessageSizeBytes" : 48000000,
	"maxWriteBatchSize" : 1000,
	"localTime" : ISODate("2015-11-29T03:07:19.845Z"),
	"maxWireVersion" : 3,
	"minWireVersion" : 0,
	"ok" : 1
}
rs0:SECONDARY>
This section is from Replication Introduction
The primary accepts all write operations from clients. A replica set can have only one primary. To support replication, the primary records all changes to its data sets in its oplog.
MongoDB 3.0
Ph.D. / Golden Gate Ave, San Francisco / Seoul National Univ / Carnegie Mellon / UC Berkeley / DevOps / Deep Learning / Visualization