The Java Web Start allows you to download and run Java applications from the web. The Java Web Start(JSW):
- Provides an easy, one-click activation of applications
- Guarantees that you are always running the latest version of the application
- Eliminates complicated installation or upgrade procedures
Here is an overview from the java.sun.com:
Java Web Start is an application-deployment technology that gives you the power to launch full-featured applications with a single click from your Web browser. You can now download and launch applications, such as a complete spreadsheet program or an Internet chat client, without going through complicated installation procedures.
Java Web Start includes the security features of the Java 2 platform, so the integrity of your data and files is never compromised. In addition, Java Web Start technology enables you to use the latest Java 2 technology with any browser.
With Java Web Start, you launch applications simply by clicking on a Web page link. If the application is not present on your computer, Java Web Start automatically downloads all necessary files. It then caches the files on your computer so the application is always ready to be relaunched anytime you want—either from an icon on your desktop or from the browser link.
And no matter which method you use to launch the application, the most current version of the application is always presented to you.
Java Web Start is included in the Java Runtime Environment (JRE) as a part of the JRE 5.0. This means that you get Java Web Start installed automatically when you install the JRE. When a Java application using Java Web Start is downloaded for the first time, The Java Web Start is launched automatically.
The Java Web Start caches (stores) the entire application locally on your computer. Thus, any subsequent launches are almost instantaneous as all the required resources are already available locally. Every time you start the application, the Java WebStart component checks the application's website to see if a new version is available, and if so, automatically downloads and launches it.
The Java Web Start software allows you to download and run Java applications from the web. The Java Web Start(JSW):
- From a browser: Click on a link from a web page.
- From desktop icon: If you use an application frequently, you can create a shortcut on your desktop or in the Start Menu. Java Web Start may ask if you would like to create shortcuts or an entry in the Start Menu. If you say "yes," all future launches of the application can start without a browser.
- From command prompt: You can also launch an application from a
command prompt by typing javaws jnlp_url where jnlp_url is a url to the
jnlp file of the application.
- Go to Start > Run > type "command". A command prompt window will appear
- Type "javaws url_of_jnlp"
- From Java Application Cache Viewer: Java Web Start also provides an Application Cache Viewer which you can launch from the Java Control Panel. The Cache viewer enables you to directly launch applications that you have downloaded.
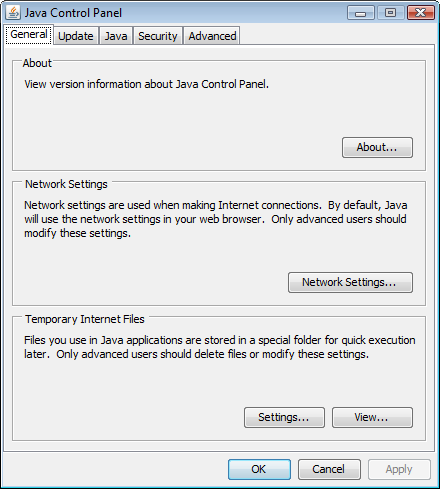
The Java Web Start software allows you to download and run Java applications from the web. The Java Web Start(JSW). The following steps of running JWS from Java Cache view may be different from system to system but not that much:
- Go to Start > Settings > Control Panel > Double click on the Java icon. The Java Control Panel will start.
- Click on the General tab
- Click on the Settings button from the Temporary Internet Files section
- Click on the View Applications button
- Double click on the respective application from the list that you
want to launch
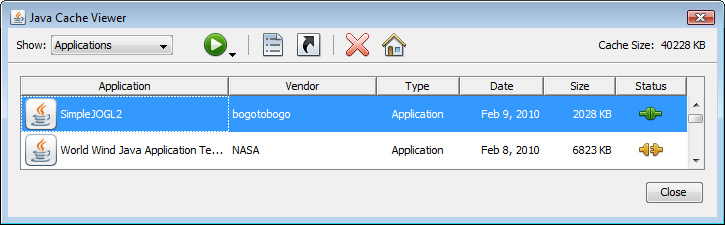
- Now you have JWS running if you have one. (The picture below is just a picture. For working varsion, please go to Java Web Start Home )
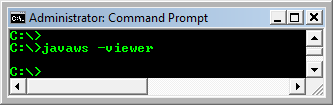
- The Java Cache Viewer can also be launched from a prompt, on both Windows and Linux systems.
Issue a command: "javaws - viewer"
You made your Java application and put it into your web site (web server). Once your customer click the URL which is pointing to the place you put application files, your customer is running your application on the web. To make your Java application run on your client's browser, actually, requires JRE(Java Runtime Environment) and JAR files on your web server.
JRE comes in the form of plug-in. The very first time users click on your application URL the browser will ask if that associated plug-in is to be installed. The plug-in, JRE, with a little native executable called Java Web Start(JWS) will manage the whole protocol on your client's machines.
So, deploying your allpication is now finished just by declaring where your files are on the Web. Clients will get them automatically even though they are scattered all over the file structure.
One more thing, whenever you update the JAR files on your Web server, they are automatically installed on client machines the next time your software is launched. So users always have the latest version of your application. Everything's done through the Web browser and the MIME type mechanism. Imagine adding capabilities, such as distinguishing between versions of the same file depending on some local parameter, and so on. That would save a lot of coding overloads from developers.
So, the question is who will configure the JVM to launch your application this way? Another application—a launcher. This will prepare everything for the JVM to correctly execute your program. Remember that the JVM needs files copied locally on the file system in order to use them.
Here comes the Java Network Launching Protocol (JNLP). It is a set of rules that describe how this launching mechanism should be implemented. Instead of setting the classpath variable, you will write a special XML file that describes carefully what the launcher (JNLP) should do before setting up a JVM instance to run your application.
The JNLP Client has to be launched before your Java application will begin to run. The objective of the JNLP client is to correctly initialize a JVM instance in order to execute the needed application.
What is the JNLP Client? The JNLP client is an application that runs locally on the client machine. In our case, it's Java Web Start. It reads the XML file (called the JNLP file), and executes what's written in it, eventually contacting a JNLP server or a normal Web server for some help.
Let's make the files needed ("HelloWorld.java" and "HelloWorld.jnlp").
- HelloWorld.java -
import javax.swing.JFrame;
import javax.swing.JLabel;

public class HelloWorld extends JFrame {

	public static void main(String args[]) {
		new HelloWorld();
	}
	HelloWorld() {
		JLabel Label = new JLabel("Hello World");
		add(Label);
		this.setSize(100, 100);
		setVisible(true);
	}
}
- HelloWorld.jnlp -
<?xml version="1.0" encoding="UTF-8"?>

<jnlp spec="1.0+" codebase="file:///C:\Java_Web_Start" href="HelloWorld.jnlp">

   <information>
      <title>Hello World Application</title>
      <vendor>BoGoToBoGo</vendor>
      <homepage href="http://www.bogotobogo.com" />
      <offline-allowed/>
   </information>

   <resources>
   	<jar href="HelloWorld.jar"/>
	<j2se version="1.6+" href="http://java.sun.com/products/autodl/j2se"/>
   </resources>

   <application-desc main-class="HelloWorld"/>

</jnlp>
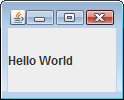
At this point, your program is ready to run locally. The HelloWorld.jnlp file will be loaded from a FILE URL. Then you will have picture below.
The task of packaging for deployment is where the Java Network Launch Protocol (JNLP) comes into play. In addition to a JAR file for the application classes, JNLP requires you to create a descriptor file on how to start up the application. The file format is fully described in the Java Network Launching Protocol & API Specification (JSR-56), with a subset shown in the Java Web Start Technology Developer's Guide.
Since this is just an XML file, the DTD is what's in the specification. You're required to provide the location of the application resources, what information should appear in the popup that appears while the application loads, and what the application resources are. Other pieces (like security) are optional and only required when you need to break out of the sandbox, as in this example. Details like which class to start when the program loads can be specified either in the JAR file or from the JNLP descriptor file. You'll now look at each block separately.
The first tag simply describes the XML version and encoding. This line is optional, however, it's good practice to include it, in case the encoding ever defaults to a different version or the XML version changes.
<?xml version="1.0" encoding="UTF-8"?>
Next up is the start of the <jnlp> tag. From here, you specify the JNLP specification version supported and where to locate the resources for the applications. Essentially, this is saying where the JAR file is for the application.
<jnlp spec="1.0+"
  codebase="file:///C:\Java_Web_Start/">
The <information> tag provides the content shown in the popup while the application is loading.
<information> <title>Hello World Application</title> <vendor>BoGoToBoGo</vendor> <homepage href="http://www.bogotobogo.com" /> <description>Demonstration of JNLP</description> </information> |
The optional <offline-allowed> tag allows the application to run while not connected to the network.
<offline-allowed/>
The <security> tag is only required when extra permissions are needed. While files will load and save without signed code (they simply generate the Security Advisory), tasks such as the network access in this sample program require that the code be signed. The security element supports two options, either <all-permissions/> or <j2ee-application-client-permissions/>. J2EE permissions are usually sufficient, since they include socket permissions, clipboard access permission, and printing permission, among a set of ten.
<security>
  <j2ee-application-client-permissions/>
</security>
The resources element allows you to specify the runtime version required, and identify the JAR files that contain the application classes. The location of this JAR file is specified by the prior codebase
<resources>
  <j2se version="1.6+" />
  <jar href="HelloWorld.jar"/>
</resources>
If you've specified a main-class in the manifest for the JAR, you don't
need to identify one in the <application-desc> element.
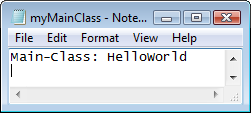
You can specify the main class when you make the jar by issuing the command:
"jar cmf myMainClass.txt HelloWorld.jar HelloWorld.class"
where the flag "m" indicates you are using Manifest file "myMainClass.txt" as in the picture below. Make sure you should have a carriage return at the end of the line.
(Otherwise, you do). As this is the last tag, you can close up the <jnlp> tag, too.
<application-desc main-class="HelloWorld" />
</jnlp>
While Java Web Start and JNLP rely on existing technologies like HTTP and a Web server, there is one configuration issue that must be addressed for JNLP to work properly. It isn't always sufficient to just create a .jnlp file and put it on your Web server with the rest of the application; the Web server must be configured to return the proper MIME type for the JNLP content -- and that MIME type must be application/x-java-jnlp-file.
If you are using the latest version of Tomcat 6.0.x, this is already configured for you. If you look in the web.xml file in the conf directory under the installation location, you'll find the following piece of information:
  <mime-mapping>
    <extension>jnlp</extension>
    <mime-type>application/x-java-jnlp-file</mime-type>
  </mime-mapping>
Prior versions required you to manually add this information. (Other Web servers support adding MIME types in different fashions.)
To try out your new JNLP-based application, copy the HelloWorld.jnlp file and HelloWorld.jar to a directory under the Web server where files are loaded from (for Tomcat, under webapps/ROOT). You'll also need to change the codebase in the .jnlp file to reference the Web server (most likely http://localhost:8080) instead of the previous file URL. Then, make sure Tomcat is started, and load the application.
To demonstrate the updating capabilities of JNLP, change the JAR file on the Web server to do something else. The next time you start up the application, the new version will be downloaded.
Java Web Start Official Sites:
- Java Web Start Tutorial (http://java.sun.com/docs/books/tutorial/deployment/webstart/index.html)
- Java Web Start Guide (http://java.sun.com/javase/6/docs/technotes/guides/javaws/developersguide/contents.html)