with Eclipse 3.5, Galileo
Compare to the NetBeans IDE, Eclipse is well suited for Rich Client Platform(RCP) applications.
However, at least to me, the whole process of deploying an application with Eclipse was tough while with NewBeans it was almost automatic. I spent all weekend to make it work. So, in this tutorial I tried to list every detail of the process hoping to give some hints when somebody is struggling. It may look overdone because of it.
In this tutorial, I will start with the simplest Java code with SWT (Standard Widget Toolkit
),
SWTHelloWorld.java, which displays a text "SWTHelloWorld".
OK. Let's start.
Fire up Eclipse and
Select File -> New Project...
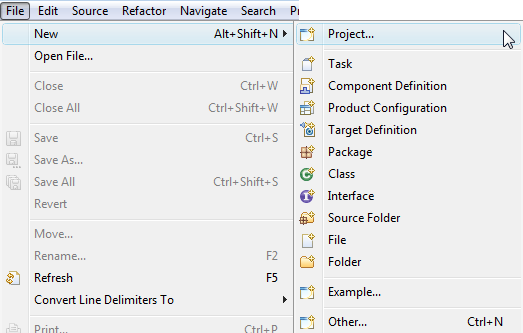
Choose "Java/Java Project" from the New Project dialog,
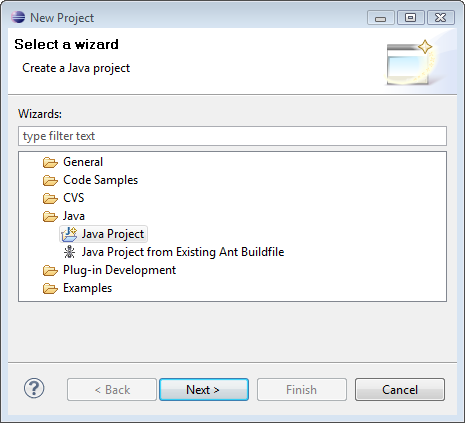
then click "Next". Type in your project name.
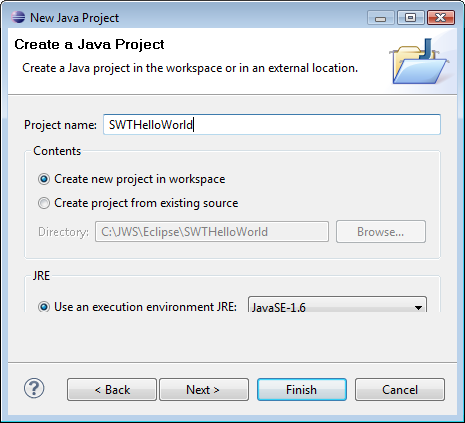
If you want to broaden the Java Runtime Environment(JRE), you can switch it to older one other than JavaSE1.6.

Then click "Finish" button.
Now let's make our class file.
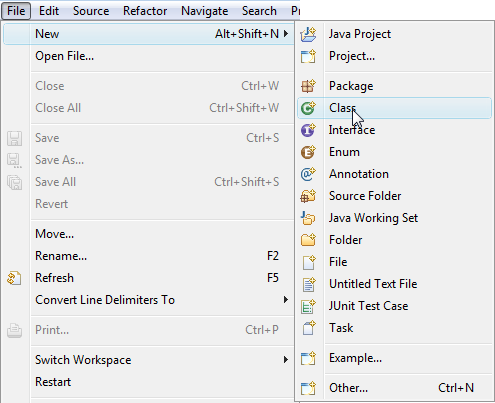
Type in class name
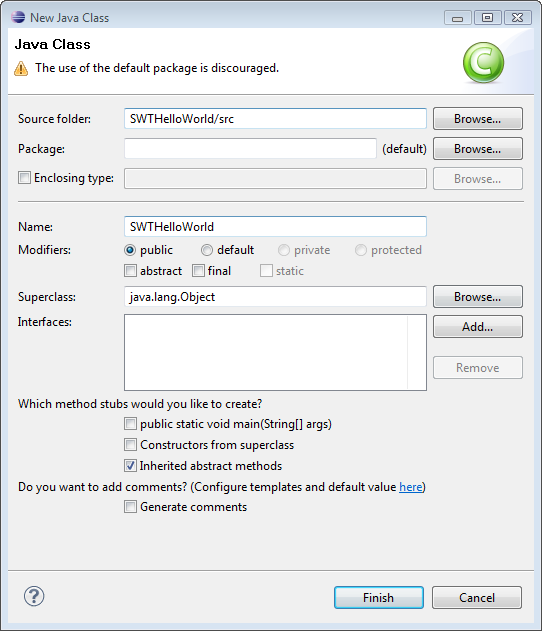
then click "Finish" button.
Now we see the SWTHelloWorld class in the IDE as the picture below.
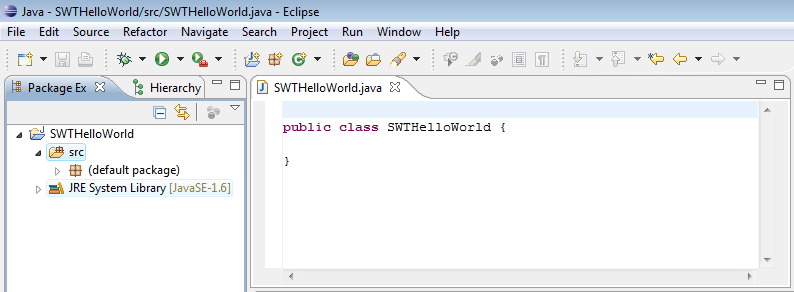
Using cut and paste, put the SWTHelloWorld.java into the class.
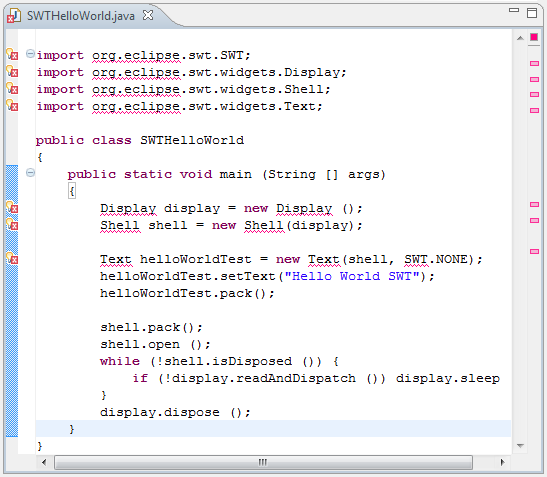
Then, you will see we need additional setup for the SWT library from the picture below.
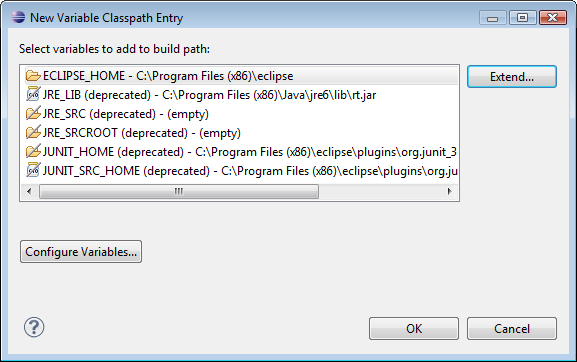
So, it's time to set the Build Path for the libraries. Pull up the Project properties window.
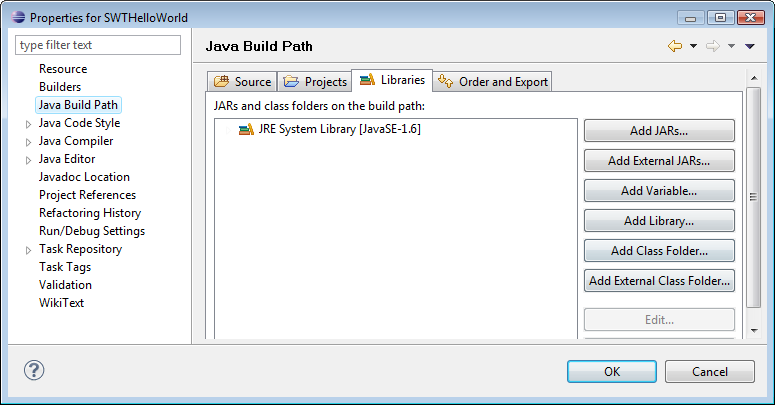
Click "Add Variable..." button. Then we get the "New Variable Classpath Entry" window.
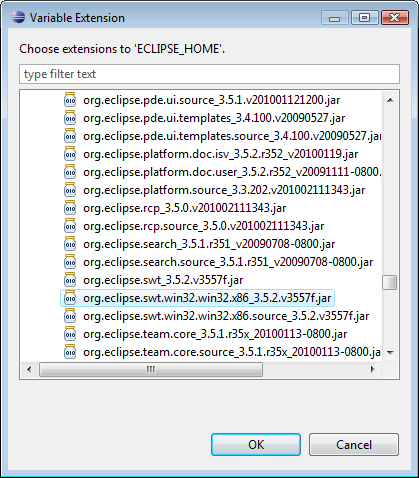
At the "Extend..." button, we have "Variable Extension" window.
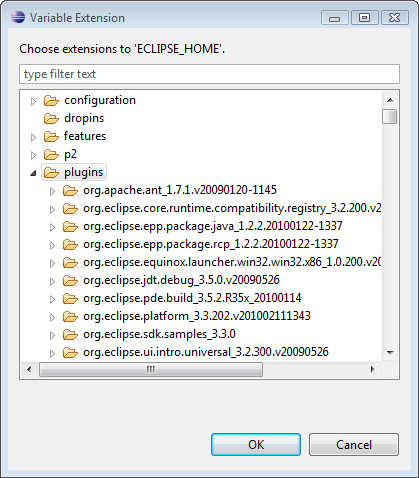
Select plugins and find SWT.jar as in the picture below.
Now we have a new Build Path
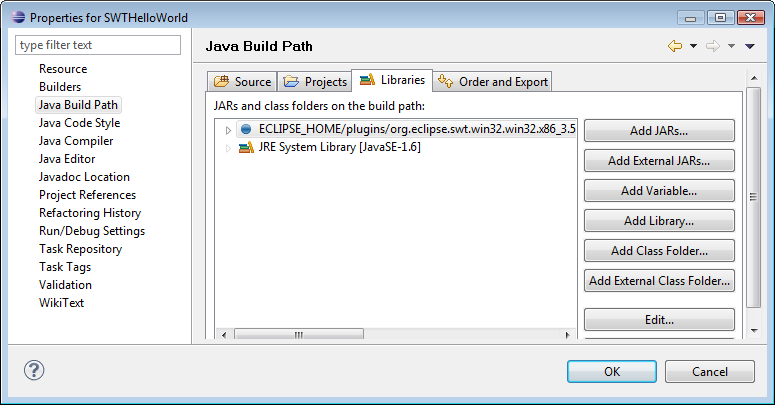
Hit OK, and you see the all the import errors are gone.

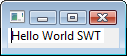
If you "Run as" "Java Application", you will have "Hello World SWT"
Let's look at the code.
Every SWT application requires a Display and one or more Shells. The Shell is a composite object; it can contain other composite objects. The Shell window must be opened to be displayed. The event handling loop reads and dispatches GUI events. If there is no event handling loop, the application window cannot be shown, even if the Shell window is opened by the open() method. Afterwards, you should dispose of the Display, when the Shell is discarded.
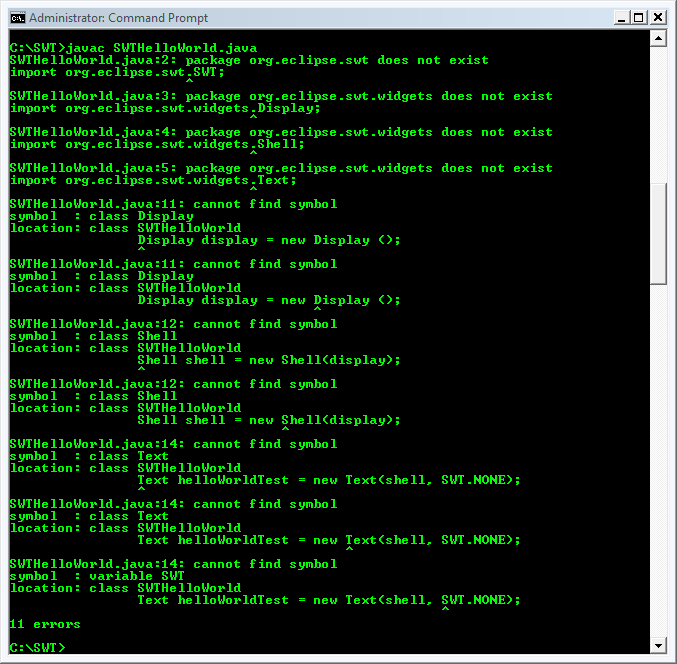
To run the application without using Eclipse, the swt.jar library must be in your classpath. If you run the SWTHelloWorld.java without proper classpath, you get the errors as in the picture below.
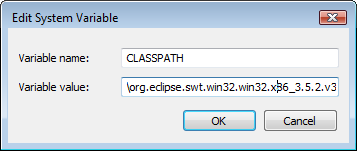
So, we need to set classpath to the swt.jar. For my Windows system,
it is 'C:\Program Files (x86)\eclipse\plugins\org.eclipse.swt.win32.win32.x86_3.5.2.v3557f.jar".
Go to Control Panel->System->Advanced system setting->Environment Variables... Add the swt.jar file to the CLASSPATH.
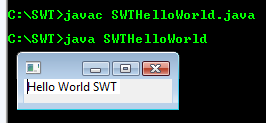
Now it will run and will pop up the "Hello Wolrd SWT".
Here is the JNLP file we are going to use:
- SWTHelloWorld.jnlp -
<?xml version="1.0" encoding="utf-8"?>
<jnlp spec="1.0+"
 codebase="file:///C:\JWS\SWTHelloWorld"

	href="SWTHelloWorld.jnlp">
	<information>
  		<title>SWT Hello World</title>
  		<vendor>BoGoToBoGo</vendor>
  		<homepage href="http://www.bogotobogo.com" />
  		<description>A demonstration of SWT with JWS</description>
  		<description>SWT Hello World</description>
	</information>

	<security>
		<all-permissions />
	</security>

	<resources>
		<j2se version="1.4+" />
		<jar href="SWTHelloWorld.jar" />
	</resources>

	<resources os="Windows" arch="x86">
		<jar href="swt-win32-windows-x86.jar" />

	</resources>

	<resources os="Windows" arch="x86_64">
		<jar href="swt-win32-windows-x86_64.jar" />
	</resources>

	<resources os="Windows" arch="amd64">
		<jar href="swt-win32-windows-x86_64.jar" />
	</resources>

	<resources os="Linux" arch="ppc">
		<jar href="swt-gtk-linux-ppc.jar" />
	</resources>

	<resources os="Linux" arch="x86_64">
		<jar href="swt-gtk-linux-x86_64.jar" />
	</resources>

	<resources os="Linux" arch="amd64">
		<jar href="swt-gtk-linux-x86_64.jar" />
	</resources>

	<resources os="Linux">
		<jar href="swt-gtk-linux-x86.jar" />
	</resources>

	<resources os="SunOS" arch="sparc">
		<jar href="swt-gtk-solaris-sparc.jar" />
	</resources>

	<resources os="SunOS" arch="x86">
		<jar href="swt-gtk-solaris-x86.jar" />
	</resources>

	<application-desc main-class="jws.SWTHelloWorld" />

</jnlp>
Note that you can also use file:// URLs to access the local file system. If you use file:// URLs you need to use file:/// because file:// doesn't work. The third slash is required for the left out host name.
Let's run Java Web Start locally.As you see in the jnlp file above, we need to put the files needed into our directory.
The picture below shows the files in C:\JWS\SWTHelloWorld\SWTHelloWorld folder.
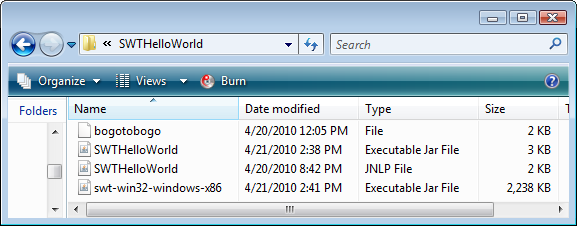
How I got those files?
- SWTHelloWorld.jar
File->Export...
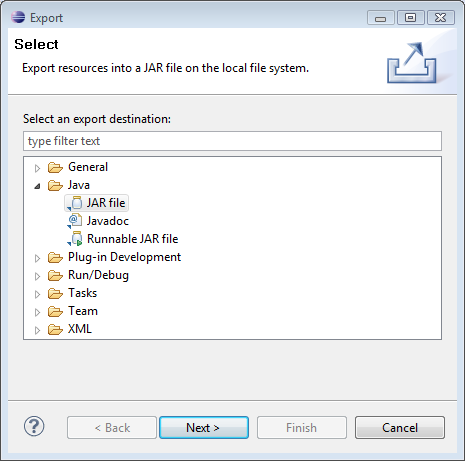
Click Next and check SWTHelloWorld and type in the destination for export as the picture in the below.
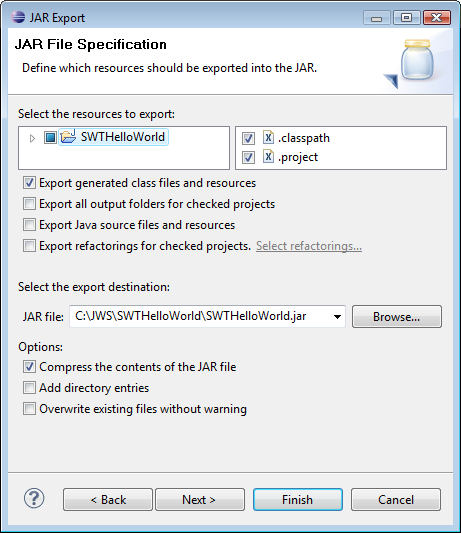
Then, press Finish. Now you have SWTHelloWorld.jar.
- swt-win32-windows-x86
Go to the Eclipse Home directory, in my case, it's C:\Program Files (x86)\eclipse. Go in plugins as in the picture below.
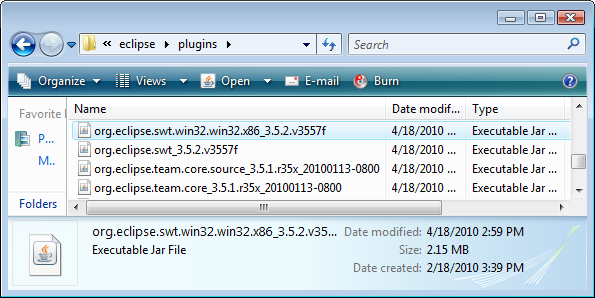
Then, copy "org.eclipse.swt.win32.win32.x86_3.5.2.v3557f.jar" file to a separate directory,
C:\JWS\SWTHelloWorld\SWTHelloWorld, in our case, rename it as swt-win32-windows-x86.jar which is a form of swt-<ws->-<os>-<arch>.jar.
So, now we have swt-win32-windows-x86.jar file.
- SWTHelloWorld.jnlp
We copied it from somewhere and edited it.
The file "bogotobogo" at the top has been generated in the process of signing jars. The "bogotobogo" was the "keystore".
Let's sign all jar archives that are to be deployed:
-
Go into the
folder, execute "keytool -genkey -keystore keystore -alias myself", in our case, "keytool -genkey -keystore bogotobogo -alias bogo" and enter all required information. - Execute "jarsigner -keystore keystore
.jar myself", in our case, "jarsigner -keystore bogotobogo SWTHelloWorld.jar bogo. - Repeat step 2 for each of the swt-
- - .jar and swt-native- - - .jar archives. In our case, swt-win32-windows-x86.jar and we do not need swt-native-* because we are using SWT 3.5.2 which is newer than SWT 3.3.
Issue the following command on Command Prompt:
"javaws file:///C:\JWS\SWTHelloWorld\SWTHelloWorld.jnlp"

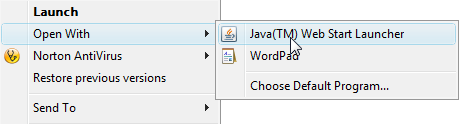
or you can just run it by clicking the "SWTHelloWorld.jnlp" file if it knows which application it should use. In this case, it's Java Web Start Launcher.
Then, you will see "Hello World SWT" again.
Now it's tough part, but actually it's gotten much easier since we've come a long way and we are almost there.
We can utilize the most of the things we setup for local run.
We should do (1) upload the required files to the directory where we will put our jnlp file, SWTHelloWorld.jnlp. Then a little bit of (2) modifying the jnlp file to adjust the URL to the server, (3) Setting up the link to the jnlp file on our web page (4)Running the JWS by clicking the link.
Upload the required files.

Modify the jnlp file.
- SWTHelloWorld.jnlp -
<?xml version="1.0" encoding="utf-8"?>
<jnlp spec="1.0+"
	codebase="http://www.bogotobogo.com/Java/SWTHelloWorld/"
	href="SWTHelloWorld.jnlp">
	<information>
  		<title>SWT Hello World</title>
  		<vendor>BoGoToBoGo</vendor>
  		<homepage href="http://www.bogotobogo.com" />
  		<description>A demonstration of SWT with JWS</description>
  		<description>SWT Hello World</description>
	</information>

	<security>
		<all-permissions />
	</security>

	<resources>
		<j2se version="1.4+" />
		<jar href="SWTHelloWorld.jar" />
	</resources>

	<resources os="Windows" arch="x86">
		<jar href="swt-win32-windows-x86.jar" />

	</resources>

	<resources os="Windows" arch="x86_64">
		<jar href="swt-win32-windows-x86_64.jar" />
	</resources>

	<resources os="Windows" arch="amd64">
		<jar href="swt-win32-windows-x86_64.jar" />
	</resources>

	<resources os="Linux" arch="ppc">
		<jar href="swt-gtk-linux-ppc.jar" />
	</resources>

	<resources os="Linux" arch="x86_64">
		<jar href="swt-gtk-linux-x86_64.jar" />
	</resources>

	<resources os="Linux" arch="amd64">
		<jar href="swt-gtk-linux-x86_64.jar" />
	</resources>

	<resources os="Linux">
		<jar href="swt-gtk-linux-x86.jar" />
	</resources>

	<resources os="SunOS" arch="sparc">
		<jar href="swt-gtk-solaris-sparc.jar" />
	</resources>

	<resources os="SunOS" arch="x86">
		<jar href="swt-gtk-solaris-x86.jar" />
	</resources>

	<application-desc main-class="jws.SWTHelloWorld" />
</jnlp>
Setup the link to jnlp file.
SWTHelloWorld.jnlp
Let's run it. Just click the link above.
Here comes again. Our "Hello World SWT".
