Flask blog app tutorial 2 : Sign-In / Sign-Out

In the previous part of this series, we implemented the user registration. In this page, we'll be implementing the sign-in and sign-out.
Here are the files we'll be using in this tutorial part-2:
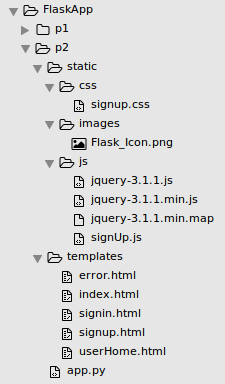
They are available from FlaskApp/p2
Let's create a signin.html file under templates folder:
<!DOCTYPE html>
<html lang="en">
  <head>
    <title>Python Flask Bucket List App</title>

    <link href="//getbootstrap.com/dist/css/bootstrap.min.css" rel="stylesheet">

    <link href="//getbootstrap.com/examples/jumbotron-narrow/jumbotron-narrow.css" rel="stylesheet">
    <link href="/static/css/signup.css" rel="stylesheet">
    <script src="/static/js/jquery-3.1.1.js"></script>
    <script src="/static/js/signUp.js"></script>

  </head>

  <body>

    <div class="container">
      <div class="header">
        <nav>
          <ul class="nav nav-pills pull-right">
            <li role="presentation" ><a href="/">Home</a></li>
            <li role="presentation" class="active"><a href="#">Sign In</a></li>
            <li role="presentation" ><a href="/showSignUp">Sign Up</a></li>
          </ul>
        </nav>
        <img src="/static/images/Flask_Icon.png" alt="Flask_Icon.png"/ >
      </div>

      <div class="jumbotron">
        <h1>Blog App</h1>
        <form class="form-signin" action="/validateLogin" method="post">
        <label for="inputEmail" class="sr-only">Email address</label>
        <input type="email" name="inputEmail" id="inputEmail" class="form-control" placeholder="Email address" required autofocus>
        <label for="inputPassword" class="sr-only">Password</label>
        <input type="password" name="inputPassword" id="inputPassword" class="form-control" placeholder="Password" required>

        <button id="btnSignIn" class="btn btn-lg btn-primary btn-block" type="submit">Sign in</button>
      </form>
      </div>

      <footer class="footer">
        <p>©etaman.com 2017</p>
      </footer>

    </div>
  </body>
</html>
We need to add a new route for the sign-in interface:
@app.route('/showSignin')
def showSignin():
    return render_template('signin.html')
And with index.html:
...
<div class="header">
    <nav>
        <ul class="nav nav-pills pull-right">
            <li role="presentation" class="active"><a href="#">Home</a>
            </li>
            <li role="presentation"><a href="/showSignin">Sign In</a>
            </li>
            <li role="presentation"><a href="/showSignUp">Sign Up</a>
            </li>
        </ul>
    </nav>
    <img src="/static/images/Flask_Icon.png" alt="Flask_Icon.png"/ >
</div>
...
Also, in signup.html:
<div class="header">
<nav>
  <ul class="nav nav-pills pull-right">
    <li role="presentation" ><a href="/">Home</a></li>
    <li role="presentation"><a href="/showSignin">Sign In</a></li>
    <li role="presentation" class="active"><a href="#">Sign Up</a></li>
  </ul>
</nav>
<img src="/static/images/Flask_Icon.png" alt="Flask_Icon.png"/ >
</div>
Now, we need to create function to validate the user login. At Sign-In, we'll post the input for the email address and password to the validation function.
To validate a user, we need a MySQL stored procedure. So, let's create it:
mysql> use FlaskBlogApp;
Reading table information for completion of table and column names
You can turn off this feature to get a quicker startup with -A

Database changed
mysql> DELIMITER $$
mysql> CREATE DEFINER=`root`@`localhost` PROCEDURE `sp_validateLogin`(
    -> IN p_username VARCHAR(20)
    -> )
    -> BEGIN
    ->     select * from blog_user where user_username = p_username;
    -> END$$
Query OK, 0 rows affected (0.26 sec)

mysql> DELIMITER ;

mysql> SHOW PROCEDURE STATUS WHERE db = 'FlaskBlogApp';
+--------------+------------------+-----------+----------------+---------------------+---------------------+---------------+---------+----------------------+----------------------+--------------------+
| Db           | Name             | Type      | Definer        | Modified            | Created             | Security_type | Comment | character_set_client | collation_connection | Database Collation |
+--------------+------------------+-----------+----------------+---------------------+---------------------+---------------+---------+----------------------+----------------------+--------------------+
| FlaskBlogApp | sp_createUser    | PROCEDURE | root@localhost | 2016-12-02 21:50:34 | 2016-12-02 21:50:34 | DEFINER       |         | utf8                 | utf8_general_ci      | latin1_swedish_ci  |
| FlaskBlogApp | sp_validateLogin | PROCEDURE | root@localhost | 2016-12-03 11:09:38 | 2016-12-03 11:09:38 | DEFINER       |         | utf8                 | utf8_general_ci      | latin1_swedish_ci  |
+--------------+------------------+-----------+----------------+---------------------+---------------------+---------------+---------+----------------------+----------------------+--------------------+
2 rows in set (0.01 sec)
We'll get the user details based on the username from the MySQL database using sp_validateLogin. Once we have the hashed password we'll validate it against the password entered by the user.
Let's create a method for the user validation which we'll call when the user submits the form:
@app.route('/validateLogin',methods=['POST'])
def validateLogin():
    try:
        _username = request.form['inputEmail']
        _password = request.form['inputPassword']

        # connect to mysql
        con = mysql.connect()
        cursor = con.cursor()
        cursor.callproc('sp_validateLogin',(_username,))
        data = cursor.fetchall()

        if len(data) > 0:
            if check_password_hash(str(data[0][3]),_password):
                session['user'] = data[0][0]
                return redirect('/userHome')
            else:
                return render_template('error.html',error = 'Wrong Email address or Password.')
        else:
            return render_template('error.html',error = 'Wrong Email address or Password.')

    except Exception as e:
        return render_template('error.html',error = str(e))
    finally:
        cursor.close()
        con.close()
In the above code, we read the posted email address and password into _username and _password. Now we need to call the sp_validateLogin procedure with the parameter _username. So, create a MySQL connection inside the validateLogin() method.
con = mysql.connect()
cursor = con.cursor()
cursor.callproc('sp_validateLogin',(_username,))
data = cursor.fetchall()
As we can see from the snippet, we create the connection and then a cursor using the con connection. Using the cursor, call the MySQL stored procedure (sp_validateLogin). After that we get the fetched records from the cursor.
If the data has some records (len(data) > 0), we'll match the retrieved password against the password entered by the user:
if len(data) > 0:
   if check_password_hash(str(data[0][3]),_password):
      session['user'] = data[0][0]
      return redirect('/userHome')
   else:
      return render_template('error.html',error = 'Wrong Email address or Password.')
else:
   return render_template('error.html',error = 'Wrong Email address or Password.')
In the code above, we call check_password_hash() to check if the returned hash password matches the password entered by the user. If all is good then we'll redirect the user to userHome.html. And if there is any error, we'll display error.html with the error message.
Here is the templates/userHome.html:
<!DOCTYPE html>
<html lang="en">
  <head>
    <title>Python Flask Bucket List App</title>

    <link href="//getbootstrap.com/dist/css/bootstrap.min.css" rel="stylesheet">

    <link href="//getbootstrap.com/examples/jumbotron-narrow/jumbotron-narrow.css" rel="stylesheet">
    <link href="/static/css/signup.css" rel="stylesheet">
    <script src="/static/js/jquery-3.1.1.js"></script>

  </head>

  <body>

    <div class="container">
      <div class="header">
        <nav>
          <ul class="nav nav-pills pull-right">
            <li role="presentation" class="active"><a href="/logout">Logout</a></li>
          </ul>
        </nav>
        <img src="/static/images/Flask_Icon.png" alt="Flask_Icon.png"/ >
      </div>

      <div class="jumbotron">
        <h1>Welcome Home !!</h1>

      </div>

      <footer class="footer">
        <p>©etaman.com 2017</p>
      </footer>

    </div>
  </body>
</html>
Here is the error page, error.html:
<!DOCTYPE html>
<html lang="en">
  <head>
    <title>Unauthorized Access:: Flask Blog App</title>

    <link href="//getbootstrap.com/dist/css/bootstrap.min.css" rel="stylesheet">
    <link href="//getbootstrap.com/examples/jumbotron-narrow/jumbotron-narrow.css" rel="stylesheet">
    <link href="/static/css/signup.css" rel="stylesheet">

  </head>

  <body>

    <div class="container">
      <div class="header">
        <nav>
           <ul class="nav nav-pills pull-right">
            <li role="presentation" class="active"><a href="#">Home</a></li>
            <li role="presentation"><a href="/showSignin">Sign In</a></li>
 	    <li role="presentation"><a href="/showSignUp">Sign Up</a></li>
          </ul>
        </nav>
        <img src="/static/images/Flask_Icon.png" alt="Flask_Icon.png"/ >
      </div>

      <div class="jumbotron">
        <h1>{{error}}</h1>
      </div>

      <footer class="footer">
        <p>©etaman.com 2017</p>
      </footer>

    </div>
  </body>
</html>
Inside error.html we have an element as the following:
<h1>{{error}}</h1>
The value for the variable error can be passed from the render_template() and can be set dynamically.
When the user signed-in successfully, the user should be redirected to the user's home page, so we need to create a route called /userHome in app.py:
@app.route('/userHome')
def userHome():
    return render_template('userHome.html')
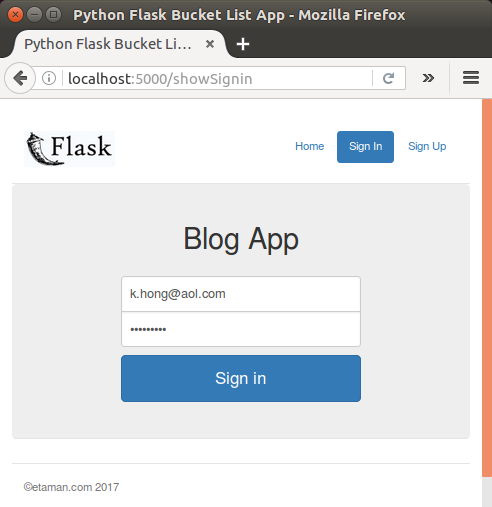
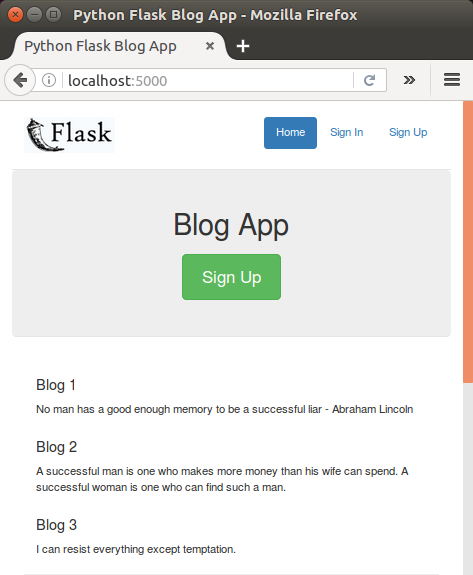
Let's restart the server, then click on the "Sign In" button in the home page. On successful user validation, we should have a page as shown below:
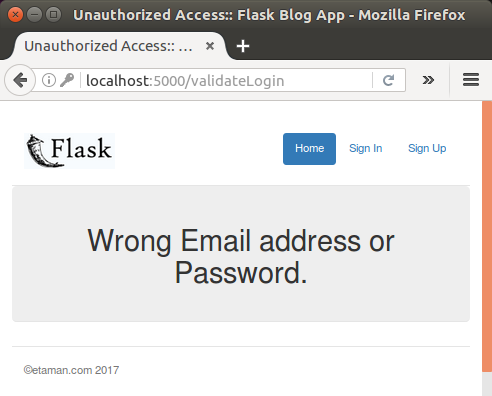
If we type wrong email or passoword, we get the following error page:
In order to implement the logout functionality, we need to do the following two things:
- make the session variable user null.
- redirect the user to the main page.
Let's create a new route and method for logout() in app.py:
@app.route('/logout')
def logout():
    session.pop('user', None)
    return redirect('/')
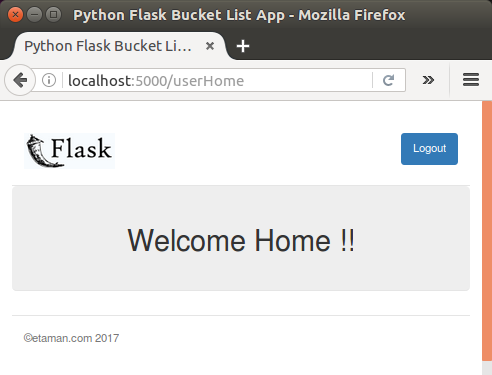
After signed in, click on the "Logout" button in user home and we get the following user's home page after logged out:
Here is the app.py file:
from flask import Flask, render_template, json, request, redirect, session
from flaskext.mysql import MySQL
from werkzeug import generate_password_hash, check_password_hash

mysql = MySQL()
app = Flask(__name__)
app.secret_key = 'spooky action at a distance-Einstein'

# MySQL configurations
app.config['MYSQL_DATABASE_USER'] = 'khong'
app.config['MYSQL_DATABASE_PASSWORD'] = 'khong'
app.config['MYSQL_DATABASE_DB'] = 'FlaskBlogApp'
app.config['MYSQL_DATABASE_HOST'] = 'localhost'
mysql.init_app(app)

@app.route('/')
def main():
    return render_template('index.html')

@app.route('/showSignUp')
def showSignUp():
    return render_template('signup.html')

@app.route('/showSignin')
def showSignin():
    return render_template('signin.html')

@app.route('/userHome')
def userHome():
    if session.get('user'):
        return render_template('userHome.html')
    else:
        return render_template('error.html',error = 'Unauthorized Access')

@app.route('/logout')
def logout():
    session.pop('user', None)
    return redirect('/')

@app.route('/validateLogin',methods=['POST'])
def validateLogin():
    try:
        _username = request.form['inputEmail']
        _password = request.form['inputPassword']

        # connect to mysql
        con = mysql.connect()
        cursor = con.cursor()
        cursor.callproc('sp_validateLogin',(_username,))
        data = cursor.fetchall()

        if len(data) > 0:
            if check_password_hash(str(data[0][3]),_password):
                session['user'] = data[0][0]
                return redirect('/userHome')
            else:
                return render_template('error.html',error = 'Wrong Email address or Password.')
        else:
            return render_template('error.html',error = 'Wrong Email address or Password.')

    except Exception as e:
        return render_template('error.html',error = str(e))
    finally:
        cursor.close()
        con.close()

@app.route('/signUp',methods=['POST','GET'])
def signUp():
    try:
        _name = request.form['inputName']
        _email = request.form['inputEmail']
        _password = request.form['inputPassword']

        # validate the received values
        if _name and _email and _password:

            # All Good, let's call MySQL

            conn = mysql.connect()
            cursor = conn.cursor()
            _hashed_password = generate_password_hash(_password)
            cursor.callproc('sp_createUser',(_name,_email,_hashed_password))
            data = cursor.fetchall()

            if len(data) is 0:
                conn.commit()
                return json.dumps({'message':'User created successfully !'})
            else:
                return json.dumps({'error':str(data[0])})
        else:
            return json.dumps({'html':'Enter the required fields'})

    except Exception as e:
        return json.dumps({'error':str(e)})
    finally:
        cursor.close()
        conn.close()

if __name__ == "__main__":
    app.run(port=5000)
Ph.D. / Golden Gate Ave, San Francisco / Seoul National Univ / Carnegie Mellon / UC Berkeley / DevOps / Deep Learning / Visualization