DevOps / Sys Admin Q & A #2 : Networks
A TCP connection on a network can be uniquely defined by 4 things. What are those things?
The TCP layer on either end maintains table entries corresponding to the 4-tuple (remote-ip-address, remote-port, source-ip-address, source-port). This 4-tuple uniquely identifies a connection.
How many NTP (Network Time Protocol) servers would we configure in our local ntp.conf?
Over time, a computer's clock is prone to drift. This is problematic as many network services require the computers on a network to share the same accurate time. Accurate time is also needed to ensure that file timestamps stay consistent. The Network Time Protocol (NTP) is one way to provide clock accuracy in a network.
It is recommended that we list at least 2 remote servers that we can synchronize against. One will act as a primary server and the other as a backup.
$ sudo apt-get install ntp

$ sntp --version
sntp 4.2.8p10@1.3728-o (1)
After installing the ntp, we can see it's configured to fetch proper time from a pool of time servers (/etc/ntp.conf):
...
pool 0.ubuntu.pool.ntp.org iburst
pool 1.ubuntu.pool.ntp.org iburst
pool 2.ubuntu.pool.ntp.org iburst
pool 3.ubuntu.pool.ntp.org iburst
...
Note that pool.ntp.org uses DNS round robin to make a random selection from a pool of time servers. These usually work just as fine. However, we may consider changing to NTP server pools closest to our location (https://support.ntp.org/bin/view/Servers/NTPPoolServers).
$ sudo service ntp start
 * Starting NTP server ntpd                                                                        [ OK ]

$ service ntp status
 * NTP server is running                                                                           [ OK ]
What does the column reach mean in ntpq -p output?
$ ntpq -pn
     remote           refid      st t when poll reach   delay   offset  jitter
==============================================================================
 0.ubuntu.pool.n .POOL.          16 p    -   64    0    0.000    0.000   0.004
 1.ubuntu.pool.n .POOL.          16 p    -   64    0    0.000    0.000   0.004
 2.ubuntu.pool.n .POOL.          16 p    -   64    0    0.000    0.000   0.004
 3.ubuntu.pool.n .POOL.          16 p    -   64    0    0.000    0.000   0.004
 ntp.ubuntu.com  .POOL.          16 p    -   64    0    0.000    0.000   0.004
+75.76.123.222 ( 17.253.6.125     2 u  11h 1024  376   95.943   -5.616   8.542
+srcf-ntp.stanfo 171.64.7.105     2 u 216m 1024  377   16.539  -35449. 35437.7
 99-104-170-138. 61.233.105.6     2 u 157m 1024  377   78.974  -35480. 35467.8
+rabendary.tesp. 69.89.207.99     2 u   6h 1024  377   64.798  967106. 967114.
*karhu.miuku.net 198.60.22.240    2 u  11h 1024  376   17.523  -12.497   7.925
+mirrors.switch. 206.108.0.131    2 u  11h 1024  376   53.443  -15.375  10.988
- -p: print a list of the peers known to the server as well as a summary of their state. This is equivalent to the peers interactive command.
- -n: output all host addresses in dotted-quad numeric format rather than converting to the canonical host names.
It is an 8-bit left shift octal value that shows the success and failure rate of communicating with the remote server. Success means the bit is set, failure means the bit is not set. 377 (in decimal it is 255, 011 111 111) is the highest value.
The simple diagram looks like this:
 CLIENT   <--->   PROXY   <--->   SERVER
(Browser)                       (Web Server)
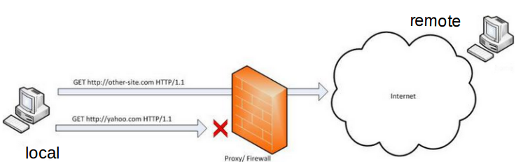
The HTTP request is sent from Client to the Proxy Server. The Proxy Server then originates a new HTTP request to the destination site. The proxy, depending on the configuration, will often add a "X-Forwarded-For" header to the HTTP request. The log files on the destination web site will show the proxy's IP address, but may or may not be configured to log the "X-Forwarded-For" address.
Actually, proxy servers do much more than just forwarding web requests. Proxy servers act as a firewall and web filter, provide shared network connections, and cache data to speed up common requests. The proxy server keeps users and the internal network protected from outside.
It also can be very useful for caching proxy (Squid). For instance, this can be useful when lots of our network computers trying to do Windows Update, the proxy server can cache GBs of files once and for all, and saving bandwidth.
Please check out Reverse proxy servers and load balancers (nginx).
Visit What's HAProxy.
RAID stands for Redundant Array of Independent Disks.
RAID employs the techniques of striping, mirroring, or parity to create large reliable data stores from multiple general-purpose computer hard disk drives (HDDs). The most common types are RAID 0 (striping), RAID 1 and its variants (mirroring), RAID 5 (distributed parity).
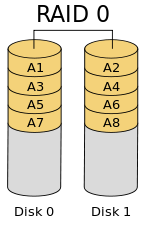
RAID 0 (striped disk array without fault tolerance) - splits ("stripes") data evenly across two or more disks, without parity information, redundancy, or fault tolerance. Minimum 2 drives to implement.
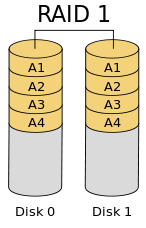
RAID 1 (mirroring & duplexing) - consists of an exact copy (or mirror) of a set of data on two or more disks; a classic RAID 1 mirrored pair contains two disks. Minimum 2 drives to implement.
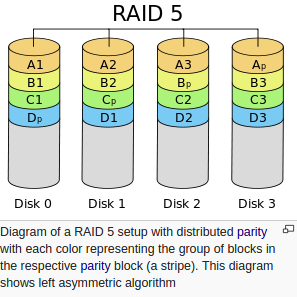
RAID 5 (independent data disk with distributed parity blocks) - consists of block-level striping with distributed parity. Parity information is distributed among the drives. It requires that all drives but one be present to operate. Upon failure of a single drive, subsequent reads can be calculated from the distributed parity such that no data is lost. Minimum 3 drives to implement.
Picture source : Standard RAID levels
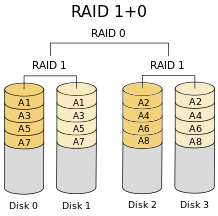
RAID 10, also called RAID 1+0 and sometimes RAID 1&0, is similar to RAID 01 with an exception that two used standard RAID levels are layered in the opposite order; thus, RAID 10 is a stripe (RAID 0) of mirrors (RAID 1). Note that there are mirrorings (disk0-disk1) & (disk2-disk3) and striping (disk01)-(disk23). Minimum 4 drives to implement
To see RAID in action, try Jestor.
We use the dig (domain information groper) command to query Domain Name System (DNS) name servers.
When we pass a domain name to the dig command, by default, it displays the A record (the ip-address of the site that is queried) as shown below:
$ dig epicmath.com

; <<>> DiG 9.10.3-P4-Ubuntu <<>> epicmath.com
;; global options: +cmd
;; Got answer:
;; ->>HEADER<<- opcode: QUERY, status: NOERROR, id: 280
;; flags: qr rd ra; QUERY: 1, ANSWER: 1, AUTHORITY: 0, ADDITIONAL: 1

;; OPT PSEUDOSECTION:
; EDNS: version: 0, flags:; udp: 4096
;; QUESTION SECTION:
;epicmath.com.			IN	A

;; ANSWER SECTION:
epicmath.com.		300	IN	A	52.8.47.59

;; Query time: 885 msec
;; SERVER: 127.0.1.1#53(127.0.1.1)
;; WHEN: Sat Jun 17 15:08:28 PDT 2017
;; MSG SIZE  rcvd: 57
The A record of epicmath.com in the "ANSWER SECTION" of the dig command output.
The dig command output has the following sections:
- Header: This displays the dig command version number, the global options used by the dig command, and few additional header information.
- QUESTION SECTION: This displays the question it asked the DNS. i.e This is our input. Since we said 'dig epicmath.com', and the default type dig command uses is A record, it indicates in this section that we asked for the A record of the epicmath.com website.
- ANSWER SECTION: This displays the answer it receives from the DNS. It displays the A record of epicmath.com.
Meaning of the five fields of the ANSWER SECTION in 'dig' query:- domain name being returned
- TTL in seconds
- IN is the CLASS. Here, IN stands for Internet
- A is the TYPE. Here, A stands for mapping a domain name to an IPv4 address.
- The last field is of course the IP Address
- AUTHORITY SECTION: This displays the DNS name server that has the authority to respond to this query. Basically this displays available name servers of epicmath.com.
- ADDITIONAL SECTION: This displays the ip address of the name servers listed in the AUTHORITY SECTION. Stats section at the bottom displays few dig command statistics including how much time it took to execute this query
The default output of dig provides us with all the data we'll require for troubleshooting: reply/error codes from the server, flags used in the query, a reiteration of our query, the answer to our query, how long the query took, which server it received the reply from, and how much data it received in the reply.
The dig can be quite useful when we're trying to diagnose slow network applications, by determining how long it takes a computer to get DNS resolution for the application server's domain name.
We can also do a reverse lookup: By using the -x switch and giving it an IP address, Dig it will return the corresponding domain name for that IP address:
$ dig -x 52.8.47.59

; <<>> DiG 9.10.3-P4-Ubuntu <<>> -x 52.8.47.59
;; global options: +cmd
;; Got answer:
;; ->>HEADER<<- opcode: QUERY, status: NOERROR, id: 207
;; flags: qr rd ra; QUERY: 1, ANSWER: 1, AUTHORITY: 0, ADDITIONAL: 1

;; OPT PSEUDOSECTION:
; EDNS: version: 0, flags:; udp: 4096
;; QUESTION SECTION:
;59.47.8.52.in-addr.arpa.	IN	PTR

;; ANSWER SECTION:
59.47.8.52.in-addr.arpa. 300	IN	PTR	ec2-52-8-47-59.us-west-1.compute.amazonaws.com.

;; Query time: 55 msec
;; SERVER: 127.0.1.1#53(127.0.1.1)
;; WHEN: Sat Jun 17 15:11:39 PDT 2017
;; MSG SIZE  rcvd: 112
nslookup (name server lookup) is used to query the Domain Name System (DNS) to obtain domain name or IP address mapping or for any other specific DNS record.
nslookup operates in interactive or non-interactive mode.
$ nslookup
> google.com
Server:		127.0.1.1
Address:	127.0.1.1#53

Non-authoritative answer:
Name:	google.com
Address: 216.58.192.14
>
The ping command tests the connection between the local machine and a remote address or machine. The following command "pings" google.com:
$ ping google.com
These commands send a bit of data (i.e. an ICMP packet) to the remote host, and wait for a response. If the system is able to make a connection, for every packet it will report on the "round trip time." Here is the output of four pings of google.com:
64 bytes from nuq04s19-in-f9.1e100.net (74.125.239.41): icmp_seq=1 ttl=54 time=28.4 ms
64 bytes from nuq04s19-in-f9.1e100.net (74.125.239.41): icmp_seq=2 ttl=54 time=27.7 ms
64 bytes from nuq04s19-in-f9.1e100.net (74.125.239.41): icmp_seq=3 ttl=54 time=27.8 ms
64 bytes from nuq04s19-in-f9.1e100.net (74.125.239.41): icmp_seq=4 ttl=54 time=27.5 ms
...
In this case, nuq04s19-in-f9.1e100.net is the reverse DNS for this IP address. The time field specifies in milliseconds that the round trip takes for an individual packet. When we've gathered the amount of information we need, send Control+C to interrupt the process. At this juncture, we'll be presented with some statistics. This will give us:
--- google.com ping statistics ---
7 packets transmitted, 7 received, 0% packet loss, time 6008ms
rtt min/avg/max/mdev = 26.758/27.626/28.451/0.492 ms
Round Trip Time (rtt) statistics on the final line report important information about all the ping responses. For this ping, we see that the fastest packet round trip took 26.758 milliseconds. The longest packet took 28.451 ms. The average round trip took 27.626 ms. A single standard deviation unit for these four packets is 0.492 ms.
We usually use the ping tool to contact a server and ensure that we are able to make a connection. Furthermore, ping is useful as an informal diagnostic tool to measure point-to-point network latency, and as a network connection testing tool.
The traceroute command expands on the functionality of the ping command.
It provides a report on the path that the packets take to get from the local machine to the remote machine.
Route information is useful when troubleshooting a networking issue: if there is packet loss in one of the first few "hops",
the problem is often related to the user's local area network (LAN) or Internet service provider (ISP).
On the other hand, if there is packet loss near the end of the route, the problem may be caused by an issue with the server's connection.
Here is an example of output from a traceroute command:
$ traceroute
traceroute to google.com (74.125.224.0), 30 hops max, 60 byte packets
 1  homeportal (192.168.1.254)  8.519 ms  8.454 ms  8.398 ms
 2  108-239-132-2.lightspeed.frokca.sbcglobal.net (108.239.132.2)  30.332 ms  37.723 ms  42.492 ms
 3  75.29.64.138 (75.29.64.138)  46.969 ms  47.038 ms  47.005 ms
 4  12.83.77.137 (12.83.77.137)  48.508 ms 12.83.77.145 (12.83.77.145)  55.705 ms  55.776 ms
 5  12.122.137.181 (12.122.137.181)  62.520 ms  62.595 ms  62.567 ms
 6  12.250.31.10 (12.250.31.10)  55.553 ms  40.903 ms  40.909 ms
 7  216.239.49.168 (216.239.49.168)  40.891 ms  38.806 ms  29.103 ms
 8  72.14.232.33 (72.14.232.33)  46.875 ms  48.146 ms  48.204 ms
 9  nuq04s18-in-f0.1e100.net (74.125.224.0)  48.172 ms  53.669 ms  53.742 ms
Often the hostnames and IP addresses on either side of a failed jump are useful in determining who operates the machine where the routing error occurs. Failed jumps are designated by line with three asterisks (e.g. * * *).
The traceroute based on ICMP (Internet Control Message Protocol RFC 792). To discover the routers on the path to a destination, it uses the TTL field in the header of ICMP packets. The main goal of the TTL field is to avoid infinite loop of packets in networks. By increasing the TTL by one each time the program send a packet each router hops on the path are successively discovered and the time needed for a round trip is deducted.
It does two things:
- Discover the intermediate router between a source IP address and a destination IP address.
- Evaluate the time (Round Trip Time or RTT) needed by the IP packet to reach each router on the path and get a overview of the network latency.
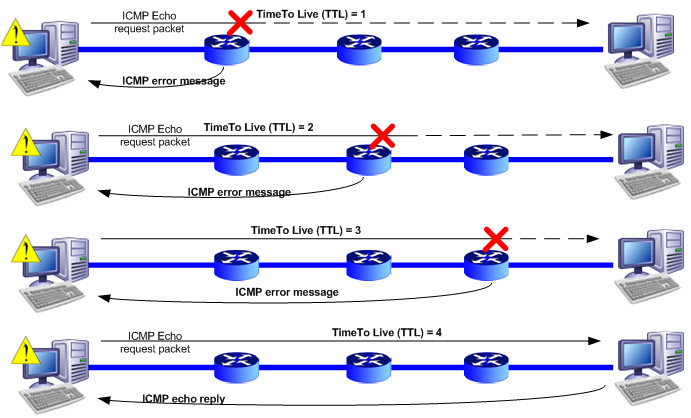
Credit Graphical traceroute
The netcat or nc is a networking utility for debugging, monitoring, testing, and sending data across network connections.
We can use it to create TCP/UDP connections and investigating them. The biggest use of this utility is in the scripts where we need to deal with TCP/UDP sockets.
Here is the man page description:
The nc (or netcat) utility is used for just about anything under the sun involving TCP, UDP, or UNIX-domain sockets. It can open TCP connections, send UDP packets, listen on arbitrary TCP and UDP ports, do port scanning, and deal with both IPv4 and IPv6. Unlike telnet(1), nc scripts nicely, and separates error messages onto standard error instead of sending them to standard output, as telnet(1) does with some.
Let's make a connection to "google.com" with "-v" (verbose) option, and get packets from its web server:
$ nc -v google.com 80
found 0 associations
found 1 connections:
     1:	flags=82<CONNECTED,PREFERRED>
	outif en0
	src 2601:646:8a00:38b0:d963:2daf:f366:4d67 port 53913
	dst 2607:f8b0:4005:80a::200e port 80
	rank info not available
	TCP aux info available

Connection to google.com port 80 [tcp/http] succeeded!
Note that by default, the netcat tool assumes we want to perform a port scan unless indicated otherwise.
We can setup a listener on port 9999 on my local:
$ nc -l -p 9999
where,
- -l is used to specify that nc should listen for an incoming connection.
- -p is a port.
Then, open up another terminal, and connect to localhost on port 9999. Then type in a message:
$ nc localhost 9999
Hi, listener.
The listener will get the message back:
Hi, listener.
tcpdump is a utility used to capture and analyze packets on network interfaces.
Information about these packets can either be displayed to the screen or they can be saved to a file for later analysis.
It uses the libpcap for packet capturing.
Check the version:
$ tcpdump -h
tcpdump version tcpdump version 4.9.2 -- Apple version 83.30.1
libpcap version 1.8.1 -- Apple version 79.20.1
LibreSSL 2.2.7
...
The tcpdump requires root privileges.
To list of the network interfaces available on the system and on which tcpdump can capture packets, we use -D:
$ tcpdump -D
1.en0 [Up, Running]
2.p2p0 [Up, Running]
3.awdl0 [Up, Running]
4.bridge0 [Up, Running]
5.utun0 [Up, Running]
6.en1 [Up, Running]
7.lo0 [Up, Running, Loopback]
8.gif0
9.stf0
10.XHC20
If we use any options with -i, it will display packets from all interfaces:
$ sudo tcpdump -i any
...
15:26:11.159405 ARP, Request who-has 192.168.1.13 (Broadcast) tell homeportal, length 28
15:26:11.159518 ARP, Request who-has 192.168.1.14 (Broadcast) tell homeportal, length 28
It won't stop without interrupt signal. We can use lowercase -c count option to exit after receiving count packets:
$ sudo tcpdump -i any -c 2
tcpdump: verbose output suppressed, use -v or -vv for full protocol decode
listening on any, link-type LINUX_SLL (Linux cooked), capture size 65535 bytes
15:29:24.596788 ARP, Request who-has laptop (Broadcast) tell homeportal, length 28
15:29:24.596899 ARP, Reply laptop is-at 20:16:d8:f3:35:e2 (oui Unknown), length 28
2 packets captured
33 packets received by filter
0 packets dropped by kernel
If we want to get ip-address (not converting it), we can use -n:
$ sudo tcpdump -i any -c 2 -n
tcpdump: verbose output suppressed, use -v or -vv for full protocol decode
listening on any, link-type LINUX_SLL (Linux cooked), capture size 65535 bytes
15:31:53.360564 IP 192.168.1.6.56218 > 239.255.255.250.1900: UDP, length 125
15:31:53.663782 IP 192.168.1.6.56218 > 239.255.255.250.1900: UDP, length 125
2 packets captured
4 packets received by filter
0 packets dropped by kernel
The size of packet we capture was 65536, but we can adjust the size using -s:
$ sudo tcpdump -i any -c 2 -n -s96
tcpdump: verbose output suppressed, use -v or -vv for full protocol decode
listening on any, link-type LINUX_SLL (Linux cooked), capture size 96 bytes
...
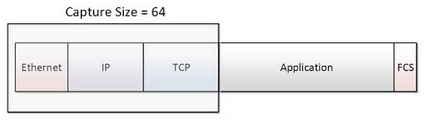
Picture source: Introduction to TCPDUMP
If we have a slow internal Web application, we can use tcpdump to locate the bottleneck.
If we see a long delay in the DNS lookup requests and replies but the actual HTTP requests and replies are fast, then we know the trouble lies with the DNS system or the network links to the DNS servers.
If the DNS process is working normally, then we'll want to examine how long it takes for client requests to reach the server and how long it takes for the server to reply back.
Wherever our network problem lies, tcpdump can help us put our fingers on it.
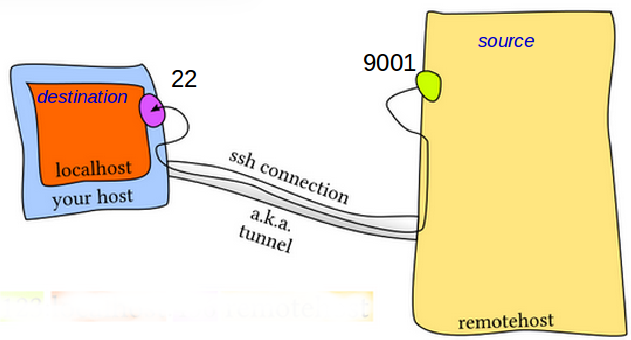
We have two ways of ssh port forwarding (ssh tunneling). The name (local or remote) is based on where request is being made relative to my desktop.
- Local port forwarding: forward my local (desktop) port (request made on local) to remote : outbound.
Picture credit: SSH Tunneling Explained
To simulate the picture below, we'll use EC2 as a remote and my home computer as a local:
$ ssh -L 9001:google.com:80 ec2b
ubuntu@ip-172-31-1-211:~$
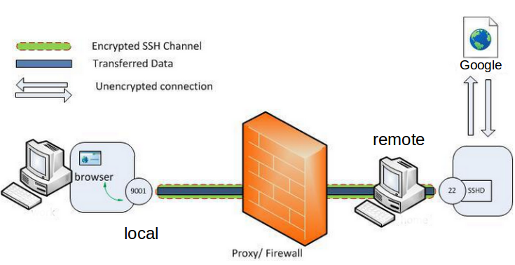
The L switch indicates that a local port forward is need to be created. The switch syntax is as follows:
-L <local-port-to-listen>:<remote-host>:<remote-port>
Now the SSH client at "local" will connect to SSH server running at "remote" (usually running at ssh port 22) binding port 9001 of "local" to listen for local requests thus creating a SSH tunnel between "local" and "remote". At the "remote" end it will create a connection to "google.com" at port 80. So "local" doesn't need to know how to connect to "google.com". Only "remote" needs to worry about that. The channel between "remote" and "local" will be encrypted while the connection between "remote" and "google.com" will be unencrypted.
So, the syntax of the full command would be as follows:
ssh -L <local-port-to-listen>:<remote-host>:<remote-port> <gateway>
As another example, if we want to see DB on remote (45.79.90.218:80) from our local machine via 9001 port, we do the following:
k@laptop:~$ ssh -L 9001:localhost:80 -l sfvue 45.79.90.218
sfvue@45.79.90.218's password:
[sfvue@sf ~]$
Open a browser on our local machine, and type in localhost:9001/phpmyadmin, then we can go in our database on remote server
Linux Secure Shell (SSH) IV : Local port forwarding - Remote port forwarding: forward remote port (request made on remote) to my local (desktop) port : inbound.
Remote port forwarding is the exact opposite of local port forwarding. It forwards traffic coming to a port on our server to our local computer, and then it is sent to a destination.
Here is the diagram used for our sample:
Suppose our destination is a linux box that's behind NAT. So, other people can't access it directly because it's sitting behind a NAT network without a public IP.
Now, we want to access it from a source. In other words, we're in the situation like this:
Destination <- |NAT/Firewall| <- Source
On the shell of firewalled (remote/source) host:
$ ssh -R 9001:localhost:22 remotehost
This is telling our client to establish a tunnel with a -Remote entry point. When we run the command, the SSH server binds to the 9001 port on the remotehost. Any traffic that it receives on this port is sent to the SSH client on our local computer, which in turn forwards it to port 22 on 127.0.0.1. In other words, anything that attaches to port 9001 on the far end of the tunnel will actually reach localhost port 22, where localhost is from the perspective of the exit point of the tunnel (i.e. our ssh client).
Now we can SSH from source to destination through SSH tunneling:
$ ssh localhost -p 9001
Linux Secure Shell (SSH) V : Reverse SSH Tunnel (remote port forwarding)
- It is transaction-oriented, suitable for simple query-response protocols such as the Domain Name System (DNS) or the Network Time Protocol(NTP).
- It provides datagrams, suitable for modeling other protocols such as in IP tunneling or Remote Procedure Call (RPC) and the Network File System (NFS).
- It is simple, suitable for bootstrapping or other purposes without a full protocol stack, such as the DHCP Protocol.
- It is stateless, suitable for very large numbers of clients, such as in streaming media applications for example IPTV
- The lack of retransmission delays makes it suitable for real-time applications such as Voice over IP (VoIP), online games, and many protocols built on top of the Real Time Streaming Protocol (RTSP).
ref: https://en.wikipedia.org/wiki/User_Datagram_Protocol
We can use ifconfig (interface configurator) command to
- initialize an interface
- assign IP Address to interface
- enable or disable interface on demand
Assigning IP Address on demand using ip command. ifconfig command is deprecated and replaced by ip command in Linux.
However, ifconfig command is still works and available for most of the Linux distributions.
By running ifconfig command, we can see IP Address and Hardware / MAC address assign to interface and also MTU (Maximum transmission unit) size.
$ ifconfig
eth0      Link encap:Ethernet  HWaddr 06:b2:06:6c:ae:cf
          inet addr:172.31.14.243  Bcast:172.31.15.255  Mask:255.255.240.0
          inet6 addr: fe80::4b2:6ff:fe6c:aecf/64 Scope:Link
          UP BROADCAST RUNNING MULTICAST  MTU:9001  Metric:1
          RX packets:13128 errors:0 dropped:0 overruns:0 frame:0
          TX packets:6055 errors:0 dropped:0 overruns:0 carrier:0
          collisions:0 txqueuelen:1000
          RX bytes:13097970 (13.0 MB)  TX bytes:681892 (681.8 KB)

lo        Link encap:Local Loopback
          inet addr:127.0.0.1  Mask:255.0.0.0
          inet6 addr: ::1/128 Scope:Host
          UP LOOPBACK RUNNING  MTU:65536  Metric:1
          RX packets:168 errors:0 dropped:0 overruns:0 frame:0
          TX packets:168 errors:0 dropped:0 overruns:0 carrier:0
          collisions:0 txqueuelen:0
          RX bytes:14784 (14.7 KB)  TX bytes:14784 (14.7 KB)
ifconfig with interface (eth0) command only shows specific interface details like IP Address, MAC Address etc.
$ ifconfig eth0
eth0      Link encap:Ethernet  HWaddr 06:b2:06:6c:ae:cf
          inet addr:172.31.14.243  Bcast:172.31.15.255  Mask:255.255.240.0
          inet6 addr: fe80::4b2:6ff:fe6c:aecf/64 Scope:Link
          UP BROADCAST RUNNING MULTICAST  MTU:9001  Metric:1
          RX packets:13163 errors:0 dropped:0 overruns:0 frame:0
          TX packets:6075 errors:0 dropped:0 overruns:0 carrier:0
          collisions:0 txqueuelen:1000
          RX bytes:13100232 (13.1 MB)  TX bytes:684576 (684.5 KB)
We can assign an IP Address and Gateway to interface on the fly. The setting will be removed at system reboot.
$ sudo ifconfig eth0 172.31.14.243 netmask 255.255.240.0
We can enable or disable specific Interface:
$ sudo ifup eth0

$ sudo ifdown eth0
We can set required MTU (maximum transmission unit) size:
$ sudo ifconfig eth0 mtu 9001
ifconfig has been there for a long time and is still widely used, but on Linux distributions ip command (from iproute2util package) is much more powerful.
- Displaying all Network Interfaces:
$ ip a
1: lo: <LOOPBACK,UP,LOWER_UP> mtu 65536 qdisc noqueue state UNKNOWN group default qlen 1000
    link/loopback 00:00:00:00:00:00 brd 00:00:00:00:00:00
    inet 127.0.0.1/8 scope host lo
       valid_lft forever preferred_lft forever
2: tunl0@NONE: <NOARP> mtu 1480 qdisc noop state DOWN group default qlen 1000
    link/ipip 0.0.0.0 brd 0.0.0.0
3: ip6tnl0@NONE: <NOARP> mtu 1452 qdisc noop state DOWN group default qlen 1000
    link/tunnel6 :: brd ::
8: eth0@if9: <BROADCAST,MULTICAST,UP,LOWER_UP> mtu 1500 qdisc noqueue state UP group default
    link/ether 02:42:ac:11:00:02 brd ff:ff:ff:ff:ff:ff link-netnsid 0
    inet 172.17.0.2/16 brd 172.17.255.255 scope global eth0
       valid_lft forever preferred_lft forever
ipshows all the interfaces whether enabled or disabled whileifconfigonly shows enabled interfaces:$ ifconfig eth0: flags=4163<UP,BROADCAST,RUNNING,MULTICAST> mtu 1500 inet 172.17.0.2 netmask 255.255.0.0 broadcast 172.17.255.255 ether 02:42:ac:11:00:02 txqueuelen 0 (Ethernet) RX packets 16238 bytes 23843031 (23.8 MB) RX errors 0 dropped 0 overruns 0 frame 0 TX packets 4560 bytes 251722 (251.7 KB) TX errors 0 dropped 0 overruns 0 carrier 0 collisions 0 lo: flags=73<UP,LOOPBACK,RUNNING> mtu 65536 inet 127.0.0.1 netmask 255.0.0.0 loop txqueuelen 1000 (Local Loopback) RX packets 0 bytes 0 (0.0 B) RX errors 0 dropped 0 overruns 0 frame 0 TX packets 0 bytes 0 (0.0 B) TX errors 0 dropped 0 overruns 0 carrier 0 collisions 0 - Adding or Deleting an IP Address:
$ ip a add 192.168.0.2/16 dev eth0 ... 10: eth0@if11:
With
ifconfig:$ ifconfig eth0 add 192.168.0.2 $ ifconfig eth0 del 192.168.0.2
- Setting MTU value using
ip link:$ ip link set dev eth0 mtu 1999
With
ifconfig:$ ifconfig eth0 mtu 1999
ipcommand is also used to show or manipulate routing, devices, policy routing and tunnels. Here is an example usingip link showto see link-layer information of all available devices (which have a driver loaded):$ ip link show 1: lo: <loopback,up,lower_up> mtu 65536 qdisc noqueue state UNKNOWN mode DEFAULT group default link/loopback 00:00:00:00:00:00 brd 00:00:00:00:00:00 2: eth0: <no-carrier,broadcast,multicast,up> mtu 1500 qdisc pfifo_fast state DOWN mode DEFAULT group default qlen 1000 link/ether 74:46:a0:c6:78:a6 brd ff:ff:ff:ff:ff:ff 3: wlan0: <broadcast,multicast,up,lower_up> mtu 1500 qdisc mq state UP mode DORMANT group default qlen 1000 link/ether 20:16:d8:f3:35:e2 brd ff:ff:ff:ff:ff:ff 4: vmnet1: <broadcast,multicast,up,lower_up> mtu 1500 qdisc pfifo_fast state UNKNOWN mode DEFAULT group default qlen 1000 link/ether 00:50:56:c0:00:01 brd ff:ff:ff:ff:ff:ff 5: vmnet8: <broadcast,multicast,up,lower_up> mtu 1500 qdisc pfifo_fast state UNKNOWN mode DEFAULT group default qlen 1000 link/ether 00:50:56:c0:00:08 brd ff:ff:ff:ff:ff:ff </broadcast,multicast,up,lower_up></broadcast,multicast,up,lower_up></broadcast,multicast,up,lower_up></no-carrier,broadcast,multicast,up></loopback,up,lower_up>
where:
- lo - Loopback interface.
- eth0 - First Ethernet network interface.
- wlan0 - First Wireless network interface.
- vmnet1, vmnet8 - Virtual machine interface working in bridge mode or NAT mode
- /etc/resolv.conf - host name resolver configuration file
nameserver 172.31.0.2
search us-west-1.compute.internal
This configures Linux so that it knows which DNS server will be resolving domain names into IP addresses. If using DHCP client, this will automatically be sent to us by the ISP and loaded into this file as part of the DHCP protocol. If using a static IP address, ask the ISP or check another machine on our network. - /etc/hosts - It is a static table lookup for hostnames. It locally resolves node names to IP addresses.
For each host a single line should be present with the following information:
IP_address canonical_hostname [aliases...]
For example:
127.0.0.1 localhost
Note when adding hosts to this file, place the fully qualified name first. (It helps sendmail identify our server correctly) i.e.:
XXX.XXX.XXX.XXX subdomain.mydomain.com subdomain
This informs Linux of local systems on the network which are not handled by the DNS server.
-
/etc/sysconfig/network:
Red Hat network configuration file used by the system during the boot process. - /etc/sysconfig/network-scripts/ifcfg-eth0
Configuration settings for our first ethernet port (0). Our second port is eth1.
It's the complete domain name of a host and it should look like this:
[hostname].[domain].[tld].
For example, for www.amazon.com, the first part (www) is the host name, the second part (amazon) is the domain name, and the third part (com) is the TLD (top-level domain).
Actually, FQDNs contain an empty element to the right of the TLD that indicates the unnamed domain root zone, and thus a trailing period follows the TLD (www.amazon.com.). However, today's software (including internet browsers) usually processes the trailing period for us. The unnamed domain root zone essentially represents the internet.
Note that amazon.com isn't technically fully qualified name because it's missing the host name, even though most browsers assume the host name is www. So, the amazon.com is a Partially Qualified Domain Name (PQDN).
Note also a hostname often specifies a particular service or protocol for a domain such as mail or ftp as in mail.domain.com or ftp.domain.net, respectively.
We can check gateway ip using netstat or route:
$ netstat -nr
Kernel IP routing table
Destination     Gateway         Genmask         Flags   MSS Window  irtt Iface
0.0.0.0         172.31.0.1      0.0.0.0         UG        0 0          0 eth0
172.31.0.0      0.0.0.0         255.255.240.0   U         0 0          0 eth0
Or:
$ route -n
Kernel IP routing table
Destination     Gateway         Genmask         Flags Metric Ref    Use Iface
0.0.0.0         172.31.0.1      0.0.0.0         UG    0      0        0 eth0
172.31.0.0      0.0.0.0         255.255.240.0   U     0      0        0 eth0
netstat command is used to display network connections, routing tables, interface statistics, masquerade connections, and multicast memberships.
To list Network Interfaces using netstat -i:
$ netstat -i
Kernel Interface table
Iface   MTU Met   RX-OK RX-ERR RX-DRP RX-OVR    TX-OK TX-ERR TX-DRP TX-OVR Flg
eth0       1500 0         0      0      0 0             0      0      0      0 BMU
lo        65536 0     12621      0      0 0         12621      0      0      0 LRU
vmnet1     1500 0         0      0      0 0            24      0      0      0 BMRU
vmnet8     1500 0         0      0      0 0            24      0      0      0 BMRU
wlan0      1500 0     97991      0      0 0         77137      0      0      0 BMRU
Note that to do the same, we can also use ip link show (ip command).
There are couple of ways to find the ports that are listening on the network:
-
$ netstat -a
Active Internet connections (including servers)
Proto Recv-Q Send-Q Local Address           Foreign Address         State
tcp        0      0 localhost:smtp          *:*                     LISTEN
tcp        0      0 *:https                 *:*                     LISTEN
tcp        0      0 localhost:mysql         *:*                     LISTEN
tcp        0      0 localhost:6379          *:*                     LISTEN
tcp        0      0 *:http                  *:*                     LISTEN
tcp        0      0 *:ssh                   *:*                     LISTEN
...
Active UNIX domain sockets (servers and established)
Proto RefCnt Flags       Type       State         I-Node   Path
unix  2      [ ACC ]     STREAM     LISTENING     18482    private/bounce
unix  2      [ ACC ]     STREAM     LISTENING     18485    private/defer
unix  2      [ ACC ]     STREAM     LISTENING     37186061 /var/run/docker/metrics.sock
The "Active Internet connections" section lists the connected external connections and local sockets listening for remote connection requests. The "Active UNIX domain sockets" section lists the connected and listening internal connections. In other words, it lists the connections that have been established within our computer between different processes and applications.
Command options:
- -a: To see all the connected and waiting sockets.
- -t: To see the TCP sockets.
- -u: To see the UDP sockets.
- -l: To see the sockets that are in the listening or waiting state.
- -p: To see the PID/Program names.
$ sudo netstat -plt
Active Internet connections (only servers)
Proto Recv-Q Send-Q Local Address           Foreign Address         State       PID/Program name
tcp        0      0 localhost:smtp          *:*                     LISTEN      1563/master
tcp        0      0 *:https                 *:*                     LISTEN      14062/nginx -g daem
tcp        0      0 localhost:mysql         *:*                     LISTEN      29516/mysqld
tcp        0      0 localhost:6379          *:*                     LISTEN      1138/redis-server 1
tcp        0      0 *:http                  *:*                     LISTEN      14062/nginx -g daem
tcp        0      0 *:ssh                   *:*                     LISTEN      1292/sshd
tcp6       0      0 ip6-localhost:smtp      [::]:*                  LISTEN      1563/master
tcp6       0      0 [::]:ssh                [::]:*                  LISTEN      1292/sshd
- -n: To see the local and remote addresses as IP addresses instead of their resolved domain and hostnames.
$ sudo netstat -pltn
Active Internet connections (only servers)
Proto Recv-Q Send-Q Local Address           Foreign Address         State       PID/Program name
tcp        0      0 127.0.0.1:25            0.0.0.0:*               LISTEN      1563/master
tcp        0      0 0.0.0.0:443             0.0.0.0:*               LISTEN      14062/nginx -g daem
tcp        0      0 127.0.0.1:3306          0.0.0.0:*               LISTEN      29516/mysqld
tcp        0      0 127.0.0.1:6379          0.0.0.0:*               LISTEN      1138/redis-server 1
tcp        0      0 0.0.0.0:80              0.0.0.0:*               LISTEN      14062/nginx -g daem
tcp        0      0 0.0.0.0:22              0.0.0.0:*               LISTEN      1292/sshd
tcp6       0      0 ::1:25                  :::*                    LISTEN      1563/master
tcp6       0      0 :::22                   :::*                    LISTEN      1292/sshd
lsof(LiSt Open Files) command is used to find out which files are open by which process. We look for the open files because in Linux/Unix everything is a file (pipes, sockets, directories, devices etc).
Visit lsof$ sudo lsof -i COMMAND PID USER FD TYPE DEVICE SIZE/OFF NODE NAME dhclient 1070 root 6u IPv4 14110 0t0 UDP *:bootpc redis-ser 1138 redis 4u IPv4 15270 0t0 TCP localhost:6379 (LISTEN) sshd 1292 root 3u IPv4 16974 0t0 TCP *:ssh (LISTEN) sshd 1292 root 4u IPv6 16976 0t0 TCP *:ssh (LISTEN) master 1563 root 12u IPv4 18460 0t0 TCP localhost:smtp (LISTEN) master 1563 root 13u IPv6 18461 0t0 TCP ip6-localhost:smtp (LISTEN) sshd 7288 root 3u IPv4 47338101 0t0 TCP ip-172-31-11-56.us-west-1.compute.internal:ssh->c-73-70-219-237.hsd1.ca.comcast.net:65011 (ESTABLISHED) sshd 7372 ubuntu 3u IPv4 47338101 0t0 TCP ip-172-31-11-56.us-west-1.compute.internal:ssh->c-73-70-219-237.hsd1.ca.comcast.net:65011 (ESTABLISHED) nginx 14062 root 6u IPv4 38631182 0t0 TCP *:http (LISTEN) nginx 14062 root 7u IPv4 38631183 0t0 TCP *:https (LISTEN) nginx 19192 www-data 6u IPv4 38631182 0t0 TCP *:http (LISTEN) nginx 19192 www-data 7u IPv4 38631183 0t0 TCP *:https (LISTEN) mysqld 29516 mysql 29u IPv4 46196568 0t0 TCP localhost:mysql (LISTEN)
To excluded root user, we can use '^' with -u:
$ sudo lsof -i -u^root
COMMAND     PID     USER   FD   TYPE   DEVICE SIZE/OFF NODE NAME
redis-ser  1138    redis    4u  IPv4    15270      0t0  TCP localhost:6379 (LISTEN)
sshd       7372   ubuntu    3u  IPv4 47338101      0t0  TCP ip-172-31-11-56.us-west-1.compute.internal:ssh->c-73-70-219-237.hsd1.ca.comcast.net:65011 (ESTABLISHED)
sshd       7497     sshd    3u  IPv4 47341928      0t0  TCP ip-172-31-11-56.us-west-1.compute.internal:ssh->222.187.222.55:35443 (ESTABLISHED)
nginx     19192 www-data    6u  IPv4 38631182      0t0  TCP *:http (LISTEN)
nginx     19192 www-data    7u  IPv4 38631183      0t0  TCP *:https (LISTEN)
mysqld    29516    mysql   29u  IPv4 46196568      0t0  TCP localhost:mysql (LISTEN)
-
The more reliable way to check which ports are listening on the network is to use a port scanner such as
nmap. The following command (nmap -sS <target_ip>) issued from the console determines which ports are listening for TCP connections from the network:$ sudo nmap -sT -O localhost Starting Nmap 7.01 ( https://nmap.org ) at 2021-02-18 19:10 UTC Nmap scan report for localhost (127.0.0.1) Host is up (0.000093s latency). Not shown: 995 closed ports PORT STATE SERVICE 22/tcp open ssh 25/tcp open smtp 80/tcp open http 443/tcp open https 3306/tcp open mysql Device type: general purpose Running: Linux 3.X OS CPE: cpe:/o:linux:linux_kernel:3 OS details: Linux 3.8 - 3.19 Network Distance: 0 hops OS detection performed. Please report any incorrect results at https://nmap.org/submit/ . Nmap done: 1 IP address (1 host up) scanned in 2.37 seconds
The
nmapis most commonly used to see which services or ports are open or available on a host.In the command above, we do full TCP scan with OS (-O) detection enabled.
For more, please visit Is the Remote Port Open? - Nmap (Network Mapper)
Network Address Translation (NAT) occurs when one of the IP addresses in an IP packet header is changed.
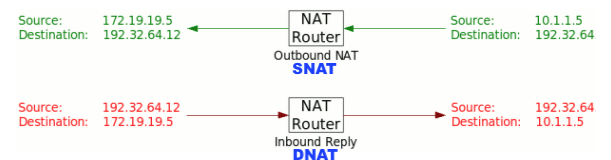
Picture credit: Understanding Network Address Translation, NAT
- SNAT - the destination IP address is maintained and the source IP address is changed.
Most commonly, a SNAT allows a host on the "inside" of the NAT to initiate a connection to a host on the "outside" of the NAT (inside => outside).
The device performing NAT changes the private IP address of the source host to public IP address. - DNAT - occurs when the destination address is changed and the source IP address is maintained.
A DNAT allows a host on the "outside" to connect to a host on the "inside" (outside => inside).
Users over Internet Accessing a Web Server hosted in a Data Center is a typical example where DNAT is used to hide the private Address of Web Server and NAT device translates the Public Destination IP reachable to Internet Users to Private IP address of Web Server. - note - In both cases, the NAT has to maintain a connection table which tells the NAT where to route returning packets.
An important difference between a SNAT and a DNAT is that a SNAT allows multiple hosts on the "inside" to get to any host on the "outside".
By way of contrast, a DNAT allows any host on the "outside" to get to a single host on the "inside".
DevOps
DevOps / Sys Admin Q & A
Linux - system, cmds & shell
- Linux Tips - links, vmstats, rsync
- Linux Tips 2 - ctrl a, curl r, tail -f, umask
- Linux - bash I
- Linux - bash II
- Linux - Uncompressing 7z file
- Linux - sed I (substitution: sed 's///', sed -i)
- Linux - sed II (file spacing, numbering, text conversion and substitution)
- Linux - sed III (selective printing of certain lines, selective definition of certain lines)
- Linux - 7 File types : Regular, Directory, Block file, Character device file, Pipe file, Symbolic link file, and Socket file
- Linux shell programming - introduction
- Linux shell programming - variables and functions (readonly, unset, and functions)
- Linux shell programming - special shell variables
- Linux shell programming : arrays - three different ways of declaring arrays & looping with $*/$@
- Linux shell programming : operations on array
- Linux shell programming : variables & commands substitution
- Linux shell programming : metacharacters & quotes
- Linux shell programming : input/output redirection & here document
- Linux shell programming : loop control - for, while, break, and break n
- Linux shell programming : string
- Linux shell programming : for-loop
- Linux shell programming : if/elif/else/fi
- Linux shell programming : Test
- Managing User Account - useradd, usermod, and userdel
- Linux Secure Shell (SSH) I : key generation, private key and public key
- Linux Secure Shell (SSH) II : ssh-agent & scp
- Linux Secure Shell (SSH) III : SSH Tunnel as Proxy - Dynamic Port Forwarding (SOCKS Proxy)
- Linux Secure Shell (SSH) IV : Local port forwarding (outgoing ssh tunnel)
- Linux Secure Shell (SSH) V : Reverse SSH Tunnel (remote port forwarding / incoming ssh tunnel) /)
- Linux Processes and Signals
- Linux Drivers 1
- tcpdump
- Linux Debugging using gdb
- Embedded Systems Programming I - Introduction
- Embedded Systems Programming II - gcc ARM Toolchain and Simple Code on Ubuntu/Fedora
- LXC (Linux Container) Install and Run
- Linux IPTables
- Hadoop - 1. Setting up on Ubuntu for Single-Node Cluster
- Hadoop - 2. Runing on Ubuntu for Single-Node Cluster
- ownCloud 7 install
- Ubuntu 14.04 guest on Mac OSX host using VirtualBox I
- Ubuntu 14.04 guest on Mac OSX host using VirtualBox II
- Windows 8 guest on Mac OSX host using VirtualBox I
- Ubuntu Package Management System (apt-get vs dpkg)
- RPM Packaging
- How to Make a Self-Signed SSL Certificate
- Linux Q & A
- DevOps / Sys Admin questions
Ph.D. / Golden Gate Ave, San Francisco / Seoul National Univ / Carnegie Mellon / UC Berkeley / DevOps / Deep Learning / Visualization