Qt5 Tutorial MainWindow and ImageViewer using Creator - Part A - 2020
In this tutorial, we will learn how to setup the action from the menu and toolbar of the Main Window class as in the previous tutorial. But this time, it is a little bit more complicated and closer to the real application. This is largely based on the Qt Tutorial but intended to be more kind with more detail: building ui using designer rather than directly typing the code.
The example demonstrates how QLabel's ability to scale its contents (QLabel::scaledContents), and QScrollArea's ability to automatically resize its contents (QScrollArea::widgetResizable), can be used to implement zooming and scaling features. In addition the example shows how to use QPainter to print an image.
File->New File or Project...
Applications->Qt Gui Application->Choose...
We rename the class as ImageViewer.
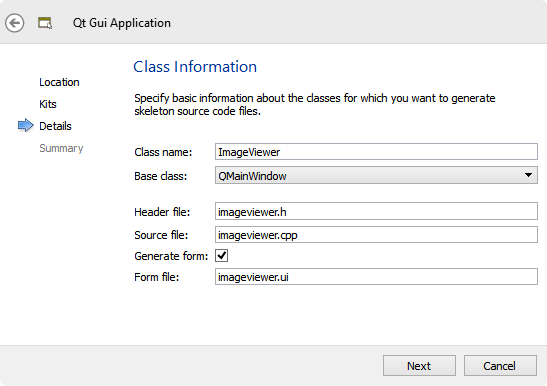
Hit Next ->Finish.
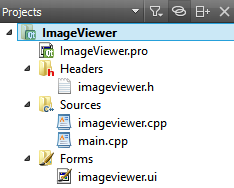
These are the files we get:
Let's open up imageviewer.pro, add a line to support print:
QT       += core gui
QT       += printsupport

greaterThan(QT_MAJOR_VERSION, 4): QT += widgets

TARGET = ImageViewer
TEMPLATE = app


SOURCES += main.cpp\
        imageviewer.cpp

HEADERS  += imageviewer.h

FORMS    += imageviewer.ui
Here is the main.cpp:
#include "imageviewer.h"
#include <QApplication>

int main(int argc, char *argv[])
{
    QApplication a(argc, argv);
    ImageViewer w;
    w.show();

    return a.exec();
}
From the highlight line, we have an incident of the ImageViewer class.
Here is the header file: imageviewer.h:
#ifndef IMAGEVIEWER_H
#define IMAGEVIEWER_H

#include <QMainWindow>

namespace Ui {
class ImageViewer;
}

class ImageViewer : public QMainWindow
{
    Q_OBJECT

public:
    explicit ImageViewer(QWidget *parent = 0);
    ~ImageViewer();

private:
    Ui::ImageViewer *ui;
};

#endif // IMAGEVIEWER_H
Note that we have a namespace UI, and our ImageViewer is under the UI scope. Also, in the header, we declared a pointer to the Ui::ImageViewer as a private member, ui.
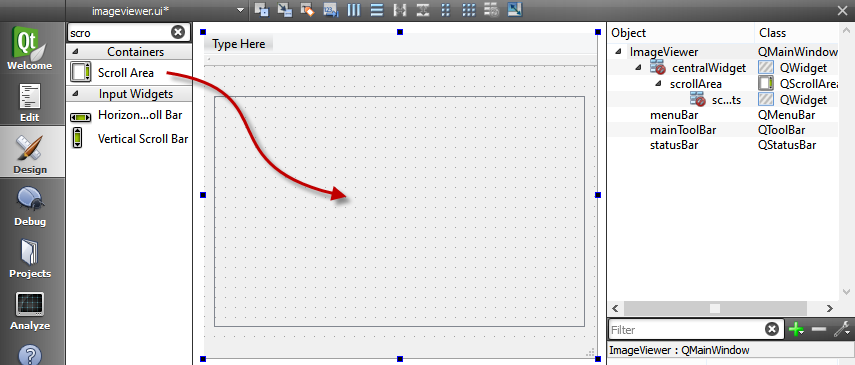
Let's open up Designer by double-clicking the imageviewer.ui. We want to put Scroll Area into the Main Window:
Then, a Label widget as well.
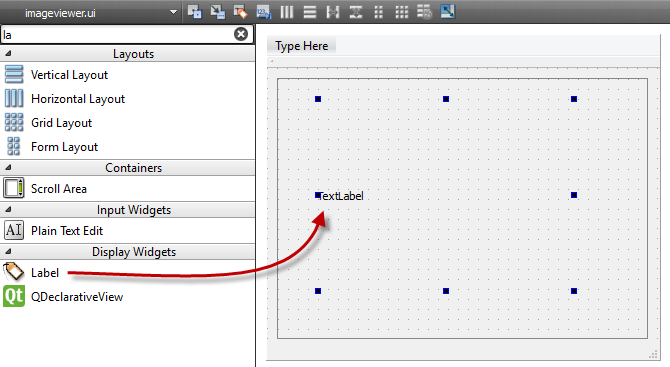
QLabel is typically used for displaying text, but it can also display an image.
QScrollArea provides a scrolling view around another widget. If the child widget exceeds the size of the frame, QScrollArea automatically provides scroll bars.
Let's do some check how it will work.
Here is the minimal version just for a display. The code below is the constructor of the ImageViewer which is the bear minimum.
ImageViewer::ImageViewer(QWidget *parent) :
QMainWindow(parent),
ui(new Ui::ImageViewer)
{
ui->setupUi(this);
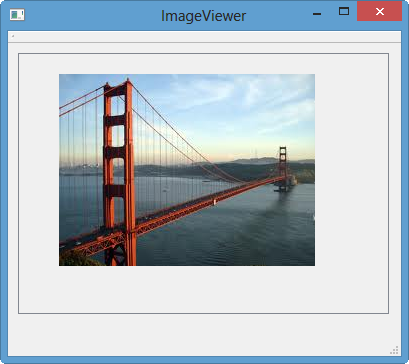
QImage image("C:/TEST/GoldenGate.png");
ui->imageLabel->setPixmap(QPixmap::fromImage(image));
}
Of course, we need the two pointers to QScroll and QLabel in imageviewer.h:
private:
    Ui::ImageViewer *ui;
    QLabel *imageLabel;
    QScrollArea *scrollArea;
When we run the code, we get:
Now, we know what to do.
- Menus to select an image
- To do that, we need a kind of file open dialog
- Also, we may want to play with the image such as zoom-in/out
- If possible, we want print the image
This time, we set up the QScrollArea and the QLable using code but not Designer.
// imageview.cpp

#include "imageviewer.h"
#include "ui_imageviewer.h"

ImageViewer::ImageViewer(QWidget *parent) :
    QMainWindow(parent),
    ui(new Ui::ImageViewer)
{
    ui->setupUi(this);

    imageLabel = new QLabel;
    imageLabel->setBackgroundRole(QPalette::Base);
    imageLabel->setSizePolicy(QSizePolicy::Ignored, QSizePolicy::Ignored);
    imageLabel->setScaledContents(true);

    scrollArea = new QScrollArea;
    scrollArea->setBackgroundRole(QPalette::Dark);
    scrollArea->setWidget(imageLabel);
    setCentralWidget(scrollArea);

    setWindowTitle(tr("Image Viewer"));
    resize(500, 400);
}

ImageViewer::~ImageViewer()
{
    delete ui;
}
The setBackgroundRole() method let us use a color role for the background, which means one of the predefined color of the style applied to the widget.
The setSizePolicy() sets the size policy to policy. The size policy describes how the item should grow horizontally and vertically when arranged in a layout. We set imageLabel's size policy to ignored, making the users able to scale the image to whatever size they want when the Fit to Window option is turned on. Otherwise, the default size policy (preferred) will make scroll bars appear when the scroll area becomes smaller than the label's minimum size hint.
The setScaledContents(bool) decides whether the label will scale its contents to fill all available space. When enabled and the label shows a pixmap, it will scale the pixmap to fill the available space. This property's default is false. Here, we ensure that the label will scale its contents to fill all available space, to enable the image to scale properly when zooming. If we omitted to set the imageLabel's scaledContents property, zooming in would enlarge the QLabel, but leave the pixmap at its original size, exposing the QLabel's background.
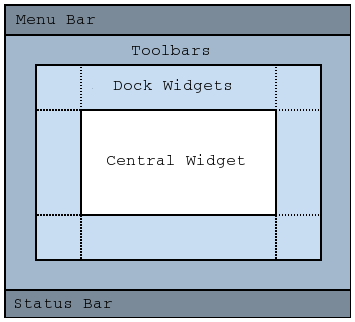
The setCentralWidget(ui->scrollArea) make the scrollArea as a central widget of MainWindow.
With the Image Viewer application, the users can view an image of their choice. The File menu gives the user the possibility to:
- Open... - Open an image file
- Print... - Print an image
- Exit - Exit the application
- Zoom In - Scale the image up by 25%
- Zoom Out - Scale the image down by 25%
- Normal Size - Show the image at its original size
- Fit to Window - Stretch the image to occupy the entire window
Let's open up Designer by double-clicking the imageviewer.ui to put menu bar and actions. Type in "File" at the top menu, and "Open..." under the "File" menu. We need to press Enter to make a real change in the menu. Notice that at the bottom, in the Action Editor, a new action called actionOpen has been created.

Let's change the object name to openAct, and make a shortcut (we should type in real key combination, not typing in each character) as shown in the picture below:
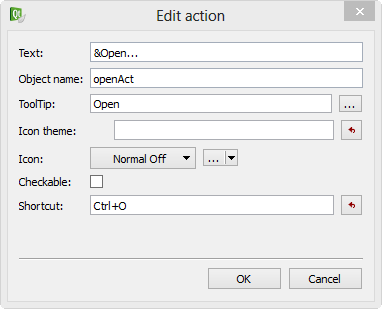
Note that we can get the "Edit action" window either by double click the item in the Action Editor window or right mouse click on the item, and then select "Edit..."
The equivalent code in C++ would be like this:
openAct = new QAction(tr("&Open...;"), this);
openAct->setShortcut(tr("Ctrl+O"));
The translation, tr(), is set enabled by default.
More work with Creater than just coding!
The next is Print...:
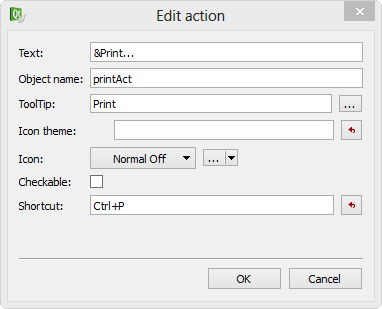
For the Print menu, we need to set it disabled (unchecked) initially. Later, after the image is loaded it will be reset as enabled:
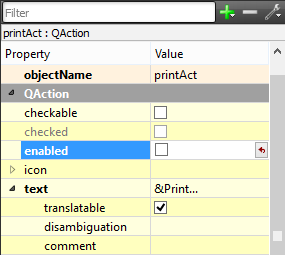
Again, the equivalent code should look like this:
printAct = new QAction(tr("&Print...;"), this);
printAct->setShortcut(tr("Ctrl+P"));
printAct->setEnabled(false);
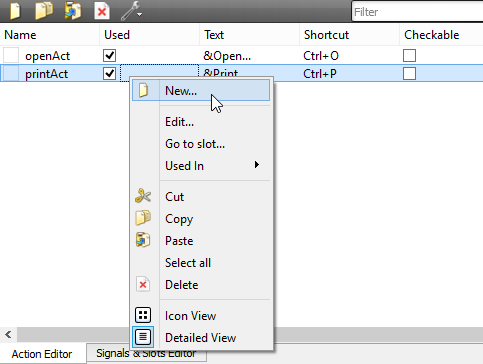
For the Exit menu, we open up the "Edit action" pop-up either by clicking the icon(New) or by right-click on the item -> select New... instead of directly double-clicking on the top menu area:
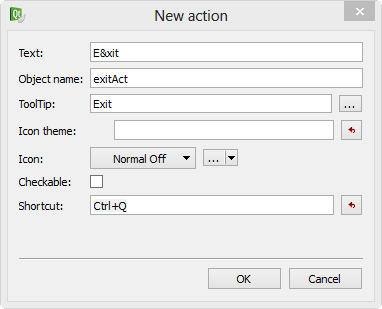
Equivalent code:
exitAct = new QAction(tr("E&xit;"), this);
exitAct->setShortcut(tr("Ctrl+Q"));
However, when we run the code and look at the menu, the "Exit" is not in the top menu. We can check carefully the Action Editor again:
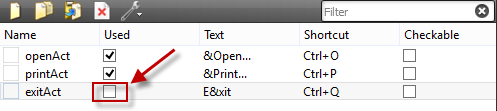
It's marked as NOT used for the menu. So, we need to drag the exitAct, and then drop it under the top menu's Print... item. Then it will be in the top menu items and will be marked as used.
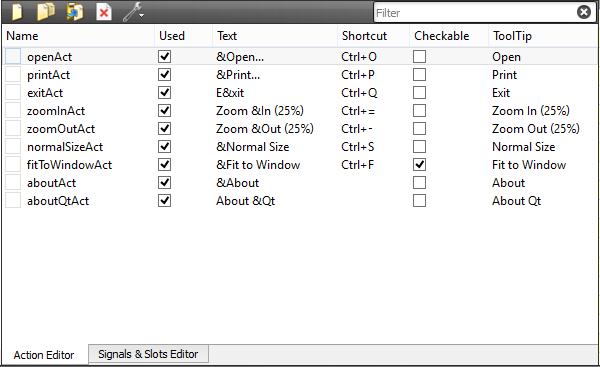
Here is the final version of Action Editor:
Equivalent code should look like this:
openAct = new QAction(tr("&Open...;"), this);
openAct->setShortcut(tr("Ctrl+O"));

printAct = new QAction(tr("&Print...;"), this);
printAct->setShortcut(tr("Ctrl+P"));
printAct->setEnabled(false);

exitAct = new QAction(tr("E&xit;"), this);
exitAct->setShortcut(tr("Ctrl+Q"));

zoomInAct = new QAction(tr("Zoom &In; (25%)"), this);
zoomInAct->setShortcut(tr("Ctrl+="));   //(Ctrl)(+)
zoomInAct->setEnabled(false);

zoomOutAct = new QAction(tr("Zoom &Out; (25%)"), this);
zoomOutAct->setShortcut(tr("Ctrl+-"));  //(Ctrl)(-)
zoomOutAct->setEnabled(false);

normalSizeAct = new QAction(tr("&Normal; Size"), this);
normalSizeAct->setShortcut(tr("Ctrl+S"));
normalSizeAct->setEnabled(false);

fitToWindowAct = new QAction(tr("&Fit; to Window"), this);
fitToWindowAct->setEnabled(false);
fitToWindowAct->setCheckable(true);
fitToWindowAct->setShortcut(tr("Ctrl+F"));

aboutAct = new QAction(tr("&About;"), this);

aboutQtAct = new QAction(tr("About &Qt;"), this);
Actually the code above is not the same as we've done. We implicitly added Menu Bar and Each item of the Top menu has its submenus. So, more coding (shown below) is needed to achieve the same as we've done using Designer:
    fileMenu = new QMenu(tr("&File;"), this);
    fileMenu->addAction(openAct);
    fileMenu->addAction(printAct);
    fileMenu->addSeparator();
    fileMenu->addAction(exitAct);

    viewMenu = new QMenu(tr("&View;"), this);
    viewMenu->addAction(zoomInAct);
    viewMenu->addAction(zoomOutAct);
    viewMenu->addAction(normalSizeAct);
    viewMenu->addSeparator();
    viewMenu->addAction(fitToWindowAct);

    helpMenu = new QMenu(tr("&Help;"), this);
    helpMenu->addAction(aboutAct);
    helpMenu->addAction(aboutQtAct);

    menuBar()->addMenu(fileMenu);
    menuBar()->addMenu(viewMenu);
    menuBar()->addMenu(helpMenu);
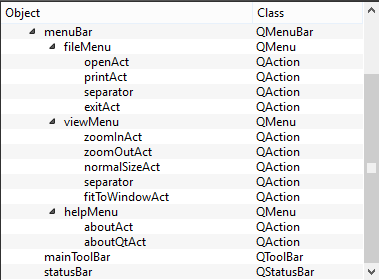
Actually, the menu structure looks like this:
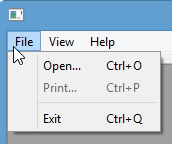
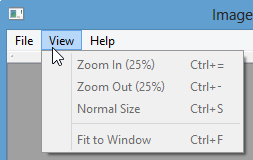
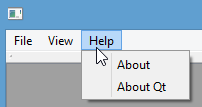
If we run the code, the menus we've made so far are looks like this:
We only enable the openAct and exitAct at the time of creation, the others are updated once an image has been loaded into the application. In addition we make the fitToWindowAct checkable.
We'll continue in next tutorial.
Qt 5 Tutorial
- Hello World
- Signals and Slots
- Q_OBJECT Macro
- MainWindow and Action
- MainWindow and ImageViewer using Designer A
- MainWindow and ImageViewer using Designer B
- Layouts
- Layouts without Designer
- Grid Layouts
- Splitter
- QDir
- QFile (Basic)
- Resource Files (.qrc)
- QComboBox
- QListWidget
- QTreeWidget
- QAction and Icon Resources
- QStatusBar
- QMessageBox
- QTimer
- QList
- QListIterator
- QMutableListIterator
- QLinkedList
- QMap
- QHash
- QStringList
- QTextStream
- QMimeType and QMimeDatabase
- QFile (Serialization I)
- QFile (Serialization II - Class)
- Tool Tips in HTML Style and with Resource Images
- QPainter
- QBrush and QRect
- QPainterPath and QPolygon
- QPen and Cap Style
- QBrush and QGradient
- QPainter and Transformations
- QGraphicsView and QGraphicsScene
- Customizing Items by inheriting QGraphicsItem
- QGraphicsView Animation
- FFmpeg Converter using QProcess
- QProgress Dialog - Modal and Modeless
- QVariant and QMetaType
- QtXML - Writing to a file
- QtXML - QtXML DOM Reading
- QThreads - Introduction
- QThreads - Creating Threads
- Creating QThreads using QtConcurrent
- QThreads - Priority
- QThreads - QMutex
- QThreads - GuiThread
- QtConcurrent QProgressDialog with QFutureWatcher
- QSemaphores - Producer and Consumer
- QThreads - wait()
- MVC - ModelView with QListView and QStringListModel
- MVC - ModelView with QTreeView and QDirModel
- MVC - ModelView with QTreeView and QFileSystemModel
- MVC - ModelView with QTableView and QItemDelegate
- QHttp - Downloading Files
- QNetworkAccessManager and QNetworkRequest - Downloading Files
- Qt's Network Download Example - Reconstructed
- QNetworkAccessManager - Downloading Files with UI and QProgressDialog
- QUdpSocket
- QTcpSocket
- QTcpSocket with Signals and Slots
- QTcpServer - Client and Server
- QTcpServer - Loopback Dialog
- QTcpServer - Client and Server using MultiThreading
- QTcpServer - Client and Server using QThreadPool
- Asynchronous QTcpServer - Client and Server using QThreadPool
- Qt Quick2 QML Animation - A
- Qt Quick2 QML Animation - B
- Short note on Ubuntu Install
- OpenGL with QT5
- Qt5 Webkit : Web Browser with QtCreator using QWebView Part A
- Qt5 Webkit : Web Browser with QtCreator using QWebView Part B
- Video Player with HTML5 QWebView and FFmpeg Converter
- Qt5 Add-in and Visual Studio 2012
- Qt5.3 Installation on Ubuntu 14.04
- Qt5.5 Installation on Ubuntu 14.04
- Short note on deploying to Windows
Ph.D. / Golden Gate Ave, San Francisco / Seoul National Univ / Carnegie Mellon / UC Berkeley / DevOps / Deep Learning / Visualization