BogoToBogo
  • Home
  • About
  • Big Data
  • Machine Learning
  • AngularJS
  • Python
  • C++
  • go
  • DevOps
  • Kubernetes
  • Algorithms
  • More...
    • Qt 5
    • Linux
    • FFmpeg
    • Matlab
    • Django 1.8
    • Ruby On Rails
    • HTML5 & CSS

Screen capture, recording, casting A - 2020

ffmpeg_new_logo_161_42.png


Bookmark and Share


bogotobogo.com site search:


FFMPEG with x11grab

In this chapter, we want to record the screen of our desktop running Ubuntu 13.1.

We'll use the FFmpeg's x11grab, a module for screen capture. This method known for giving the best results for capturing screen and is one of the the most flexible methods. It allows us to use a variety of inputs and output formats.

Because doing both of recording and compressing takes time and computing power, we may want to do it in two steps:

  1. Capture a lossless video.
  2. Encode the captured video.


Step 1 - Lossless recording

The resolution is set to 1366x768 with framerate at 25 and the command looks like this:

$ ffmpeg -f alsa -ac 2 -i pulse -f x11grab -r 25 -s 1366x768 -i :0.0 \
-vcodec libx264 -pix_fmt yuv420p -preset ultrafast -crf 0 -threads 0 \
-acodec pcm_s16le -y output.mkv

In the command, -i :0.0 means to capture the primary screen (0.0). We're using libx264 video codec. To support some of the media players that does YUV planar color space with 4:2:0 chroma subsampling for H.264 vide, we can use -pix_fmt yuv420p, if no pixel format is specified, yuv444p for H.264 encoding will be used by default.

To stop recording, make the terminal active and then press q.

Here is a summary what we've done:
We captured audio from pulseaudio sound server and encode it to lossless raw PCM with 2 audio channels (stereo). Then, we grab a video stream from X11 at a frame rate of 25 and a size of 1366x768 from the display :0.0 (primary screen) and encode it to lossless h264 using libx264. Using -threads 0 means automatic thread detection. The resulting streams will be muxed in a Matroska container (output.mkv).


Step 2 - Encode

Now we need to encode the stream we got.

ffmpeg -i output.mkv -acodec libfdk_aac -ab 128k -ac 2 -vcodec libx264 -preset slow -crf 22 -threads 0 final_video.mp4

We encode the audio to AAC at a bitrate of 128k with 2 audio channels (stereo). We encode the video to the high quality H.264 video compression standard. We use the preset slow and a crf value of 22 for rate control. The output file is final_video.mp4. We can tweak the crf value to get different results. The lower we set the crf value, we get the better quality, and consequently the file size and encoding time will increase, and vice-versa.


Your browser does not support the video tag.


Doing it in one step

If the machine we're using has enough power, we can do it all at once.

ffmpeg -video_size 1366x768 -framerate 25 -f x11grab -i :0.0 -f alsa -ac 2 -i pulse InOneStep.mp4


pavucontrol

We may need the pavucontrol to capture application (system) audio instead of microphone.


pavucontrol.png

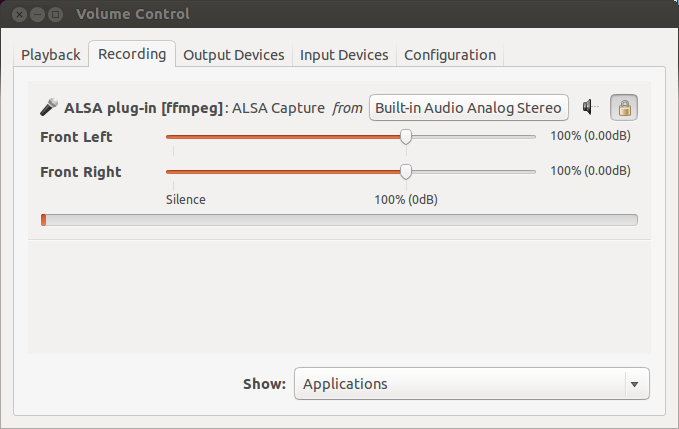
It usually comes with default Ubuntu install. So, we can just fire it up.

$ pavucontrol

To change the input, open up pavucontrol, go to the Recording tab and we'll find ffmpeg listed there. Then, change audio capture from Built-in Audio Analog Stereo to Monitor of Built-in Audio Analog Stereo.


References
  1. HOWTO: Proper Screencasting on Linux
  2. wiki:How to grab the desktop (screen) with FFmpeg


Next

In this chapter, we captured a full screen but we'll extend it to capturing current (active) screen after detecting it by a python code: FFmpeg Screen Recording B - Active Window Screen Capture with Python on Ubuntu B


Ph.D. / Golden Gate Ave, San Francisco / Seoul National Univ / Carnegie Mellon / UC Berkeley / DevOps / Deep Learning / Visualization

YouTubeMy YouTube channel

Sponsor Open Source development activities and free contents for everyone.

Thank you.

- K Hong


FFmpeg image & video processing


Image/video scaling

Image/video cropping

Cropdetect and ffplay

Speeding-up & slowing-down video

Basic slide show from images

Advanced slide show from images

Thumbnails -Selecting specific frames : I-frame extraction etc.

Creating a mosaic/tile of screenshots from a movie

Seeking and cutting sections of a video & audio

Concatenating two video files or two audio files

Transitions : fade-in & fade-out for 1 slide

Transitions : python script for fade-in & fade-out with two slides

Concatenate slides

Creating test videos

Screen Recording on Ubuntu A

Active window capture with Python on Ubuntu B


Sponsor Open Source development activities and free contents for everyone.

Thank you.

- K Hong


OpenCV 3 -

image & video processing


Installing on Ubuntu 13

Mat(rix) object (Image Container)

Creating Mat objects

The core : Image - load, convert, and save

Smoothing Filters A - Average, Gaussian

Smoothing Filters B - Median, Bilateral


OpenCV 3 image and video processing with Python


OpenCV 3 with Python

Image - OpenCV BGR : Matplotlib RGB

Basic image operations - pixel access

iPython - Signal Processing with NumPy

Signal Processing with NumPy I - FFT and DFT for sine, square waves, unitpulse, and random signal

Signal Processing with NumPy II - Image Fourier Transform : FFT & DFT

Inverse Fourier Transform of an Image with low pass filter: cv2.idft()

Image Histogram

Video Capture and Switching colorspaces - RGB / HSV

Adaptive Thresholding - Otsu's clustering-based image thresholding

Edge Detection - Sobel and Laplacian Kernels

Canny Edge Detection

Hough Transform - Circles

Watershed Algorithm : Marker-based Segmentation I

Watershed Algorithm : Marker-based Segmentation II

Image noise reduction : Non-local Means denoising algorithm

Image object detection : Face detection using Haar Cascade Classifiers

Image segmentation - Foreground extraction Grabcut algorithm based on graph cuts

Image Reconstruction - Inpainting (Interpolation) - Fast Marching Methods

Video : Mean shift object tracking

Machine Learning : Clustering - K-Means clustering I

Machine Learning : Clustering - K-Means clustering II

Machine Learning : Classification - k-nearest neighbors (k-NN) algorithm


Matlab Image and Video Processing


Vectors and Matrices

m-Files (Scripts)

For loop

Indexing and masking

Vectors and arrays with audio files

Manipulating Audio I

Manipulating Audio II

Introduction to FFT & DFT

Discrete Fourier Transform (DFT)


Digital Image Processing 2 - RGB image & indexed image

Digital Image Processing 3 - Grayscale image I

Digital Image Processing 4 - Grayscale image II (image data type and bit-plane)

Digital Image Processing 5 - Histogram equalization

Digital Image Processing 6 - Image Filter (Low pass filters)

Video Processing 1 - Object detection (tagging cars) by thresholding color

Video Processing 2 - Face Detection and CAMShift Tracking


Contact

BogoToBogo
contactus@bogotobogo.com

Follow Bogotobogo

About Us

contactus@bogotobogo.com

YouTubeMy YouTube channel
Pacific Ave, San Francisco, CA 94115

Pacific Ave, San Francisco, CA 94115

Copyright © 2024, bogotobogo
Design: Web Master