Docker & Kubernetes : Deploying .NET Core app to Kubernetes Engine and configuring its traffic managed by Istio (Part II - Prometheus, Grafana, pin service, split traffic, inject faults) - 2020
In the 1st part of the post, we created an ASP.NET Core application, containerized, and deployed it to Google Kubernetes Engine (GKE) and configured its traffic to be managed by Istio.
This 2nd part of the lab assumes that we already have our Kubernetes cluster and the application from the Part I running. We will see how Istio can help to manage, monitor, and secure our services with minimal code changes. Specifically, we explore features of Istio such as metrics, tracing, service visualization, dynamic traffic management, fault injection, and more.
We'll learn:
- How to query metrics with Prometheus.
- How to visualize metrics with Grafana.
- How to create a new version of our service.
- How to pin a service to a specific version.
- How to split traffic between different versions.
- How to inject faults in service calls.
Before looking into metrics, let's make sure we create cluster role bindings for Istio. This makes sure that Istio can create the necessary add-ons we'll install later:
$ kubectl create clusterrolebinding cluster-admin-binding \
 --clusterrole=cluster-admin \
 --user=$(gcloud config get-value core/account)
Your active configuration is: [cloudshell-9815]
clusterrolebinding.rbac.authorization.k8s.io/cluster-admin-binding created
We'll also need to know the Istio version number to install Prometheus in the next step. If we're not sure which istio-version we have, we can check the pilot pod.
Find the Pilot pod id:
$ kubectl get pods -n istio-system | grep pilot
istio-pilot-668bf94f44-mxvch              2/2       Running     0          80m
Then, check the image the Pilot uses:
$ kubectl get pod istio-pilot-668bf94f44-mxvch -n istio-system -oyaml | grep image:
    image: gcr.io/gke-release/istio/pilot:1.0.3-gke.3
    image: gcr.io/gke-release/istio/proxyv2:1.0.3-gke.3
    image: gcr.io/gke-release/istio/pilot:1.0.3-gke.3
    image: gcr.io/gke-release/istio/proxyv2:1.0.3-gke.3
This tells us that the istio-version is 1.0.3-gke.3.
By default, Istio generates some metrics. We can use add-ons to query and visualize these default metrics.
Prometheus is an open-source monitoring solution. We can use Prometheus to query metrics generated by Istio but we need to first install Prometheus add-on.
Replace istio-version with our current Istio version, for example, 1.0.3-gke.3:
# curl https://storage.googleapis.com/gke-release/istio/release/istio-version/patches/install-prometheus.yaml | kubectl apply -n istio-system -f -

$ curl https://storage.googleapis.com/gke-release/istio/release/1.0.3-gke.3/patches/install-prometheus.yaml | kubectl apply -n istio-system -f -
...
configmap/prometheus created
clusterrole.rbac.authorization.k8s.io/prometheus-istio-system created
serviceaccount/prometheus created
clusterrolebinding.rbac.authorization.k8s.io/prometheus-istio-system created
service/prometheus created
deployment.extensions/prometheus created
Verify that Prometheus is running:
$ kubectl get svc prometheus -n istio-system
NAME         TYPE        CLUSTER-IP      EXTERNAL-IP   PORT(S)    AGE
prometheus   ClusterIP   10.63.247.196   <none>        9090/TCP   66s

$ echo $GATEWAY_URL
35.238.102.62:80
Send some traffic to the application by visiting http://<gatewayurl> a few times or running the curl command.
Setup port forwarding for the Prometheus UI:
$ kubectl -n istio-system port-forward $(kubectl -n istio-system get pod -l app=prometheus -o jsonpath='{.items[0].metadata.name}') 8080:9090
Forwarding from 127.0.0.1:8080 -> 9090
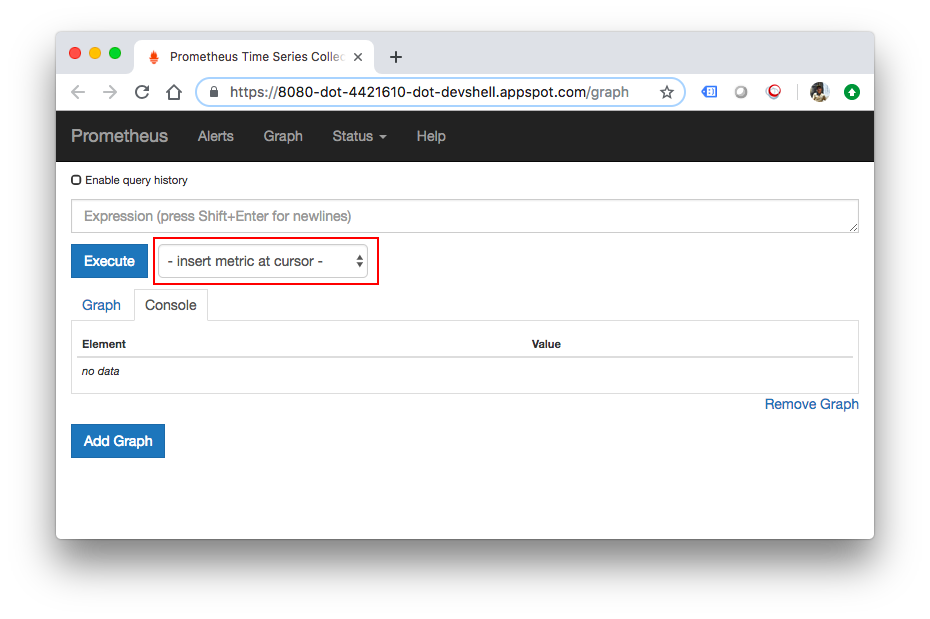
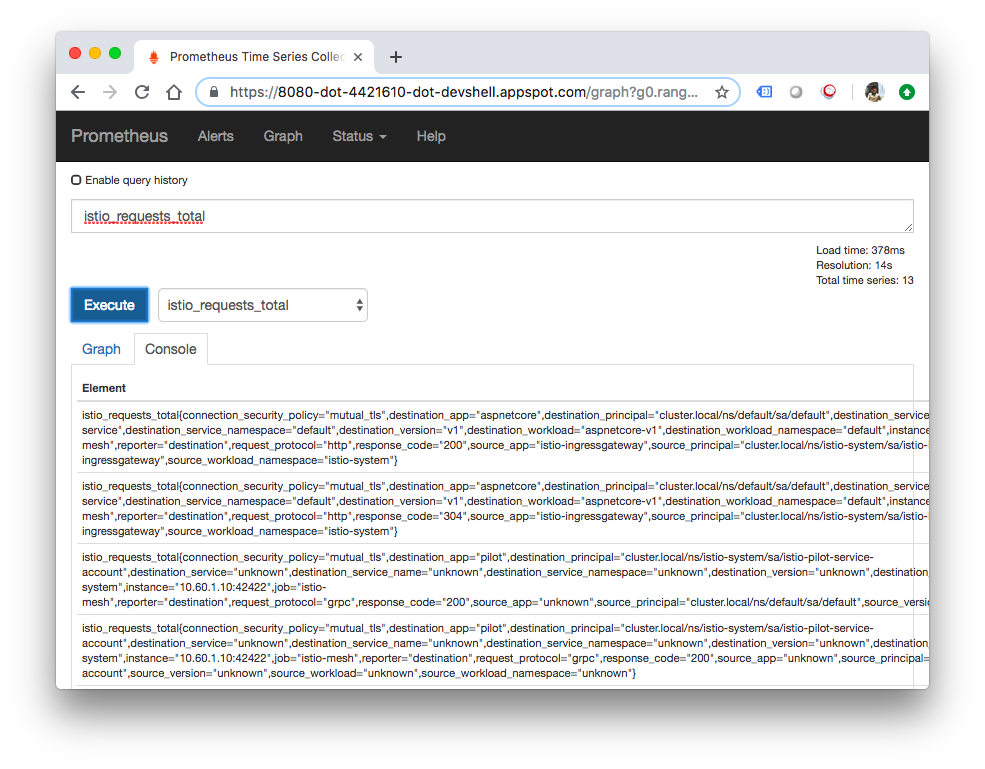
We can now execute a query by clicking on the Web Preview button in the top-right corner of Cloud Shell and click Preview on port 8080:
This time, let's try with Grafana which is another add-on for visualizing metrics.
Install Grafana. Replace istio-version with our current Istio version,for example, 1.0.3-gke.3:
# curl https://storage.googleapis.com/gke-release/istio/release/istio-version/patches/install-grafana.yaml | kubectl apply -n istio-system -f -

$ curl https://storage.googleapis.com/gke-release/istio/release/1.0.3-gke.3/patches/install-grafana.yaml | kubectl apply -n istio-system -f -
...
configmap/istio-grafana-configuration-dashboards created
configmap/istio-grafana created
serviceaccount/istio-grafana-post-install-account created
clusterrole.rbac.authorization.k8s.io/istio-grafana-post-install-istio-system created
clusterrolebinding.rbac.authorization.k8s.io/istio-grafana-post-install-role-binding-istio-system created
job.batch/istio-grafana-post-install created
service/grafana created
deployment.extensions/grafana created
Verify that Grafana is running:
$ kubectl get svc grafana -n istio-system
NAME      TYPE        CLUSTER-IP     EXTERNAL-IP   PORT(S)    AGE
grafana   ClusterIP   10.63.240.96   <none>        3000/TCP   74s
Send some traffic to the application by visiting http://<gatewayurl> a few times or running the curl command.
Setup port forwarding for the Grafana UI:
$ kubectl -n istio-system port-forward $(kubectl -n istio-system get pod -l app=grafana -o jsonpath='{.items[0].metadata.name}') 8080:3000
Forwarding from 127.0.0.1:8080 -> 3000
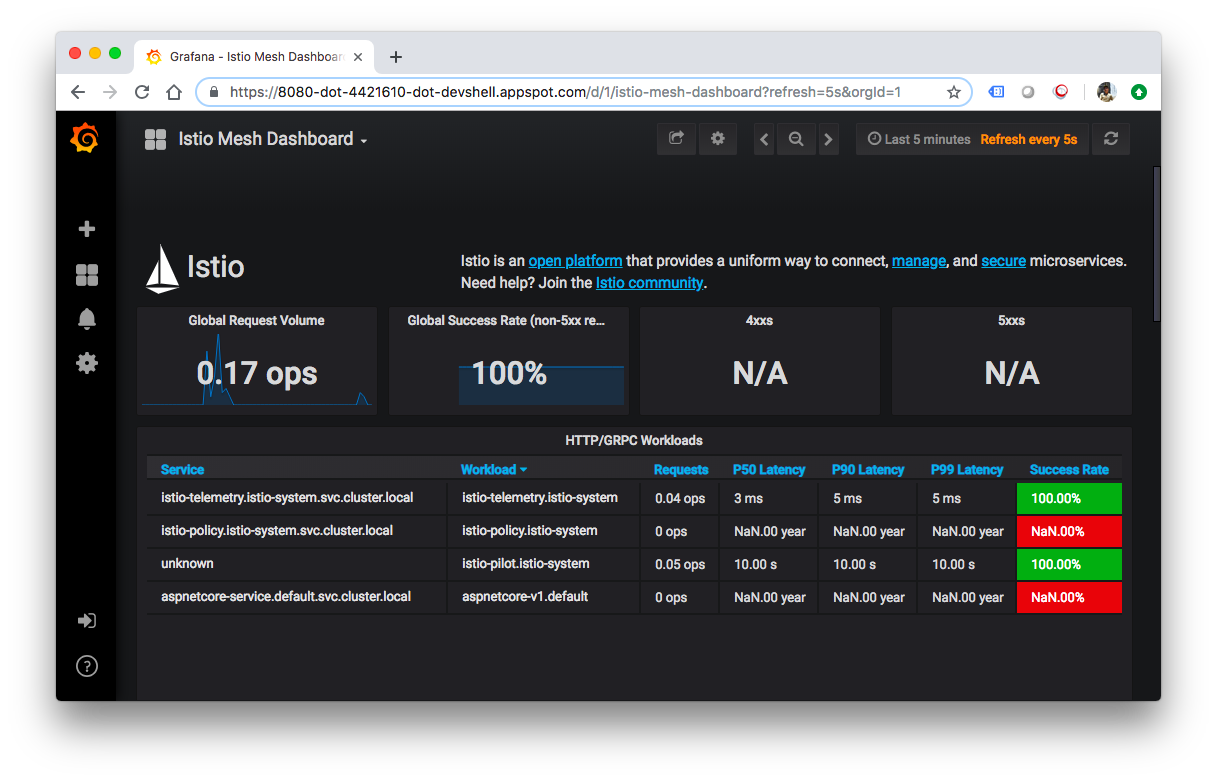
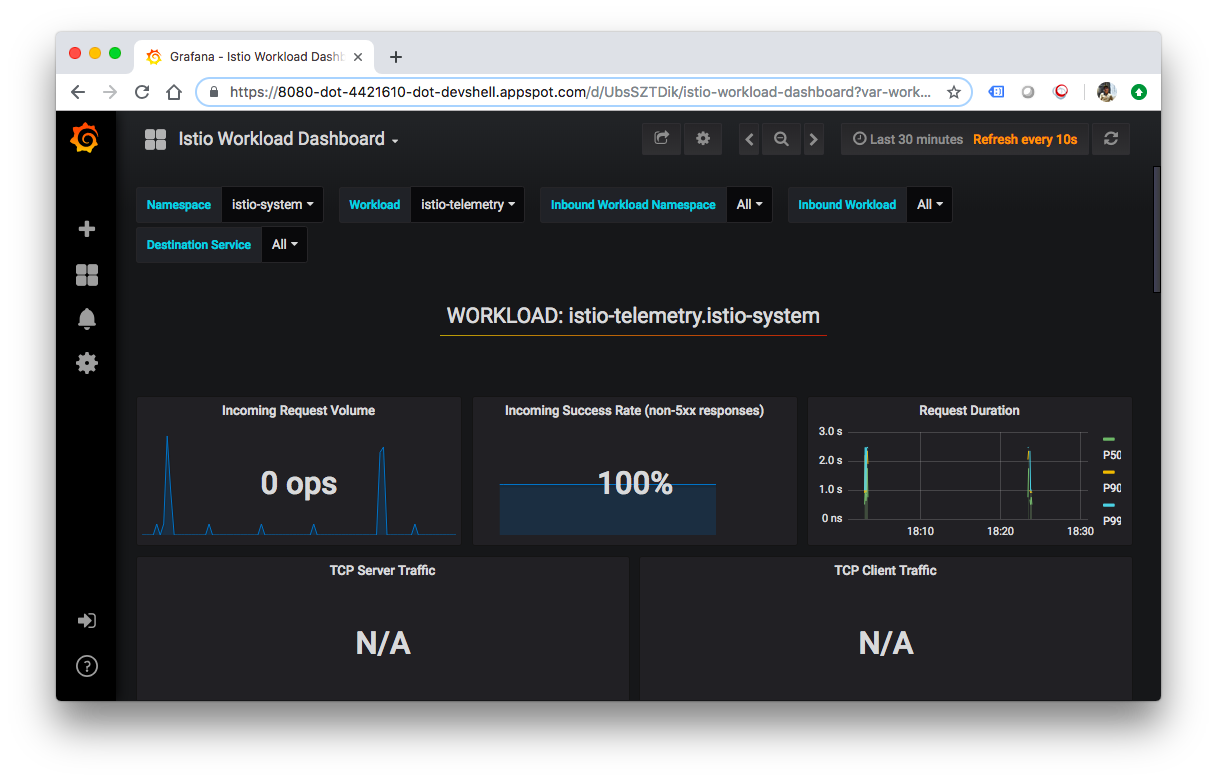
We can view Grafana dashboards by visiting Web Preview:
At some point, the application that we've deployed to production will require bug fixes or additional features. Let's see how that process looks like.
First, let's modify the application. Open the code editor from Cloud Shell, and navigate to "Index.cshtml" under "HelloWorldAspNetCore > Views > Home" and update one of the carousel messages.
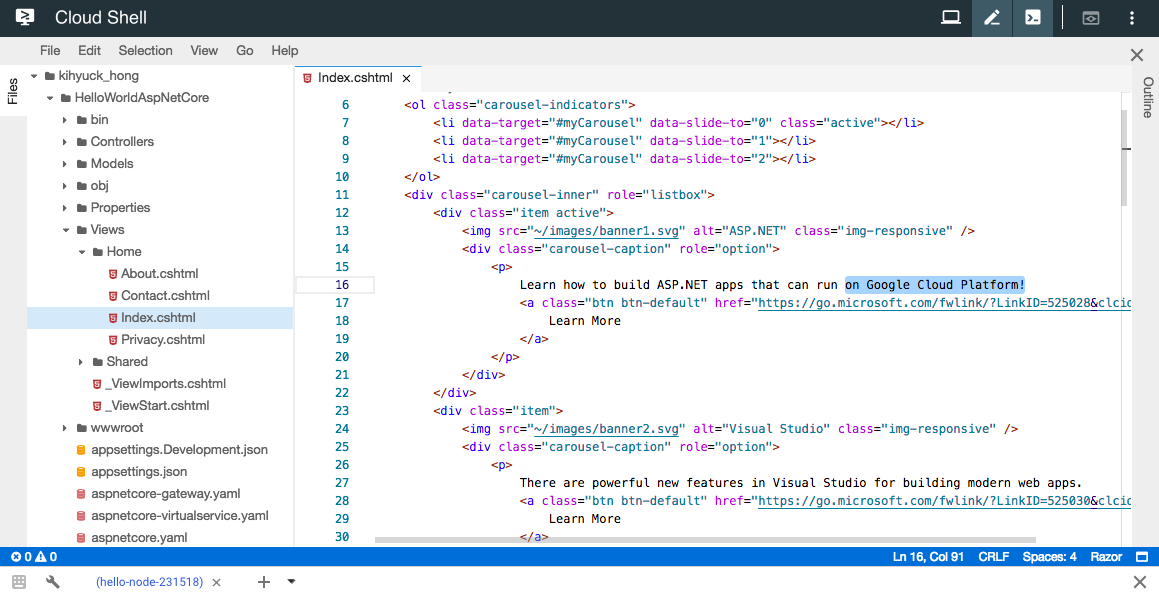
Find the following line:
Learn how to build ASP.NET apps that can run anywhere
And change it to this:
Learn how to build ASP.NET apps that can run on Google Cloud Platform!
Save the changes and then go back to Cloud Shell. Inside "HelloWorldAspNetCore", build the docker image:
$ docker build -t gcr.io/${PROJECT_ID}/hello-dotnet:v2 .
Sending build context to Docker daemon  4.104MB
Step 1/8 : FROM microsoft/dotnet:2.2-sdk
 ---> 81d80198a492
Step 2/8 : WORKDIR /app
 ---> Using cache
 ---> d0bb14f1f9c4
Step 3/8 : COPY *.csproj .
 ---> Using cache
 ---> b22c997a28ab
Step 4/8 : RUN dotnet restore
 ---> Using cache
 ---> b25e7b0e0ac1
Step 5/8 : COPY . .
 ---> 6a11815d6b17
Step 6/8 : RUN dotnet publish -c Release -o out
 ---> Running in ff25a698e160
Microsoft (R) Build Engine version 15.9.20+g88f5fadfbe for .NET Core
Copyright (C) Microsoft Corporation. All rights reserved.
  Restoring packages for /app/HelloWorldAspNetCore.csproj...
  Generating MSBuild file /app/obj/HelloWorldAspNetCore.csproj.nuget.g.props.
And push to the Container Registry:
$ docker push gcr.io/${PROJECT_ID}/hello-dotnet:v2
The push refers to repository [gcr.io/hello-node-231518/hello-dotnet]
0e11c8eea115: Pushed
1031313acb7f: Pushed
c4b61872580d: Layer already exists
1ca8e9da0a86: Layer already exists
c492866df5f9: Layer already exists
42bf0f45c95e: Layer already exists
040a05060eb8: Layer already exists
552aa1be82ac: Layer already exists
3443d6cf0f1f: Layer already exists
f3a38968d075: Layer already exists
a327787b3c73: Layer already exists
5bb0785f2eee: Layer already exists
v2: digest: sha256:69ffb160dcfa29a5a116438ace795001c7d9310375ac12e5fddacb435bb02bbc size: 2848
Building and pushing this updated image should be much quicker as we take full advantage of caching.
After we push the container image, we can deploy the new version in the next step.
To deploy the new version, we first need to create a new deployment for it in Kubernetes. Add the following at the end of the aspnetcore.yaml file:
apiVersion: v1
kind: Service
metadata:
  name: aspnetcore-service
  labels:
    app: aspnetcore
spec:
  ports:
  - port: 8080
    name: http
  selector:
    app: aspnetcore
---
apiVersion: extensions/v1beta1
kind: Deployment
metadata:
  name: aspnetcore-v1
spec:
  replicas: 1
  template:
    metadata:
      labels:
        app: aspnetcore
        version: v1
    spec:
      containers:
      - name: aspnetcore
        image: gcr.io/hello-node-231518/hello-dotnet:v1
        imagePullPolicy: IfNotPresent
        ports:
        - containerPort: 8080
---
apiVersion: extensions/v1beta1
kind: Deployment
metadata:
  name: aspnetcore-v2
spec:
  replicas: 1
  template:
    metadata:
      labels:
        app: aspnetcore
        version: v2
    spec:
      containers:
      - name: aspnetcore
        image: gcr.io/hello-node-231518/hello-dotnet:v2
        imagePullPolicy: IfNotPresent
        ports:
        - containerPort: 8080
Deploy the new version to the default namespace with kubectl:
$ kubectl apply -f aspnetcore.yaml
service/aspnetcore-service unchanged
deployment.extensions/aspnetcore-v1 unchanged
deployment.extensions/aspnetcore-v2 created
Verify that the expected pods are running:
$ kubectl get pods
NAME                             READY     STATUS    RESTARTS   AGE
aspnetcore-v1-5fd9c4dfc4-5hjc5   2/2       Running   0          137m
aspnetcore-v2-7f8bc7b5d4-xv8jq   2/2       Running   0          2m16s
Now, test the application again. Get the external IP of the gateway:
$ kubectl get svc istio-ingressgateway -n istio-system
NAME                   TYPE           CLUSTER-IP     EXTERNAL-IP     PORT(S)
                 AGE
istio-ingressgateway   LoadBalancer   10.63.241.81   35.238.102.62   80:31380/TCP,443:31390/TCP,31400:31400/TCP,15011:30765/TCP,8060:32578/TCP,853:31523/TCP,15030:32209/TCP,1
5031:32070/TCP   158m
It's listed under EXTERNAL-IP. Open up the browser and visit http://<replace-with-external-ip>
When we refresh, sometimes, we'll see the message "Learn how to build ASP.NET apps that can run anywhere":
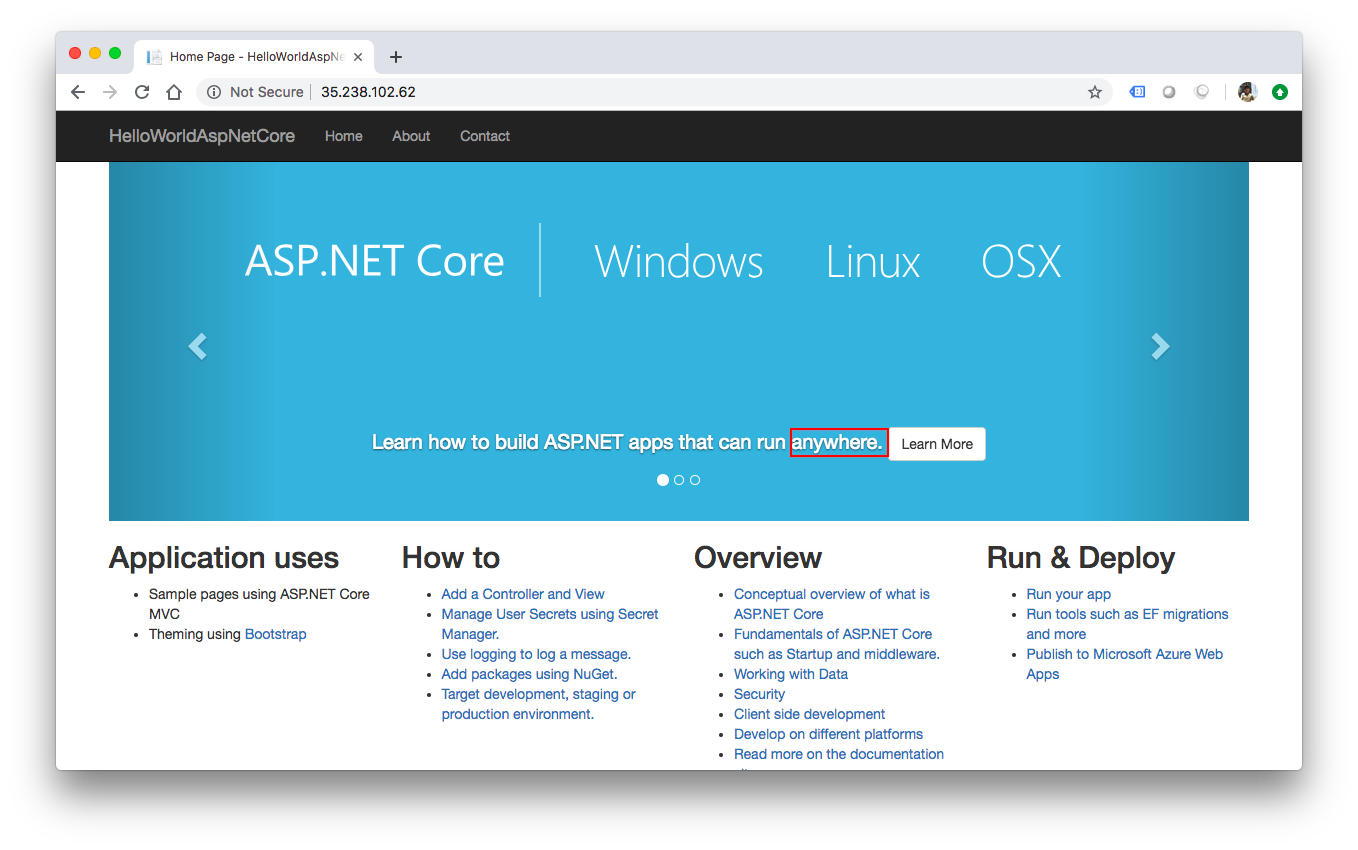
This is because both v1 and v2 deployments are exposed behind the same Kubernetes service (aspnetcore-service) and the VirtualService we created in the previous lab (aspnetcore-virtualservice) uses that service as a host.
In the next step, we pin the service to the v2 deployment using a DestinationRule.
In this step, we pin our service to use the v2 deployment and we can do that with a DestinationRule. A DestinationRule configures the set of policies to be applied to a request after a VirtualService routing operation has occurred.
A DestinationRule also defines addressable subsets, meaning named versions, of the corresponding destination host. These subsets are used in VirtualService route specifications when sending traffic to specific versions of the service.
Create a new file called aspnetcore-destinationrule.yaml:
apiVersion: networking.istio.io/v1alpha3
kind: DestinationRule
metadata:
  name: aspnetcore-destinationrule
spec:
  host: aspnetcore-service
  trafficPolicy:
    tls:
      mode: ISTIO_MUTUAL
  subsets:
  - name: v1
    labels:
      version: v1
  - name: v2
    labels:
      version: v2
Next, create the DestinationRule. This creates two subsets (v1 and v2) that we can use from the VirtualService:
$ kubectl apply -f aspnetcore-destinationrule.yaml
destinationrule.networking.istio.io/aspnetcore-destinationrule created
Now, go back to aspnetcore-virtualservice.yaml file to update the VirtualService to use the v2 subset:
apiVersion: networking.istio.io/v1alpha3
kind: VirtualService
metadata:
  name: aspnetcore-virtualservice
spec:
  hosts:
  - "*"
  gateways:
  - aspnetcore-gateway
  http:
  - route:
    - destination:
        host: aspnetcore-service
        subset: v2
Update the VirtualService and check the Expernal-IP again:
$ kubectl apply -f aspnetcore-virtualservice.yaml
virtualservice.networking.istio.io/aspnetcore-virtualservice configured

$ kubectl get svc istio-ingressgateway -n istio-system
NAME                   TYPE           CLUSTER-IP     EXTERNAL-IP     PORT(S)
                 AGE
istio-ingressgateway   LoadBalancer   10.63.241.81   35.238.102.62   80:31380/TCP,443:31390/TCP,31400:31400/TCP,15011:30765/TCP,8060:32578/TCP,853:31523/TCP,15030:32209/TCP,1
5031:32070/TCP   3h27m
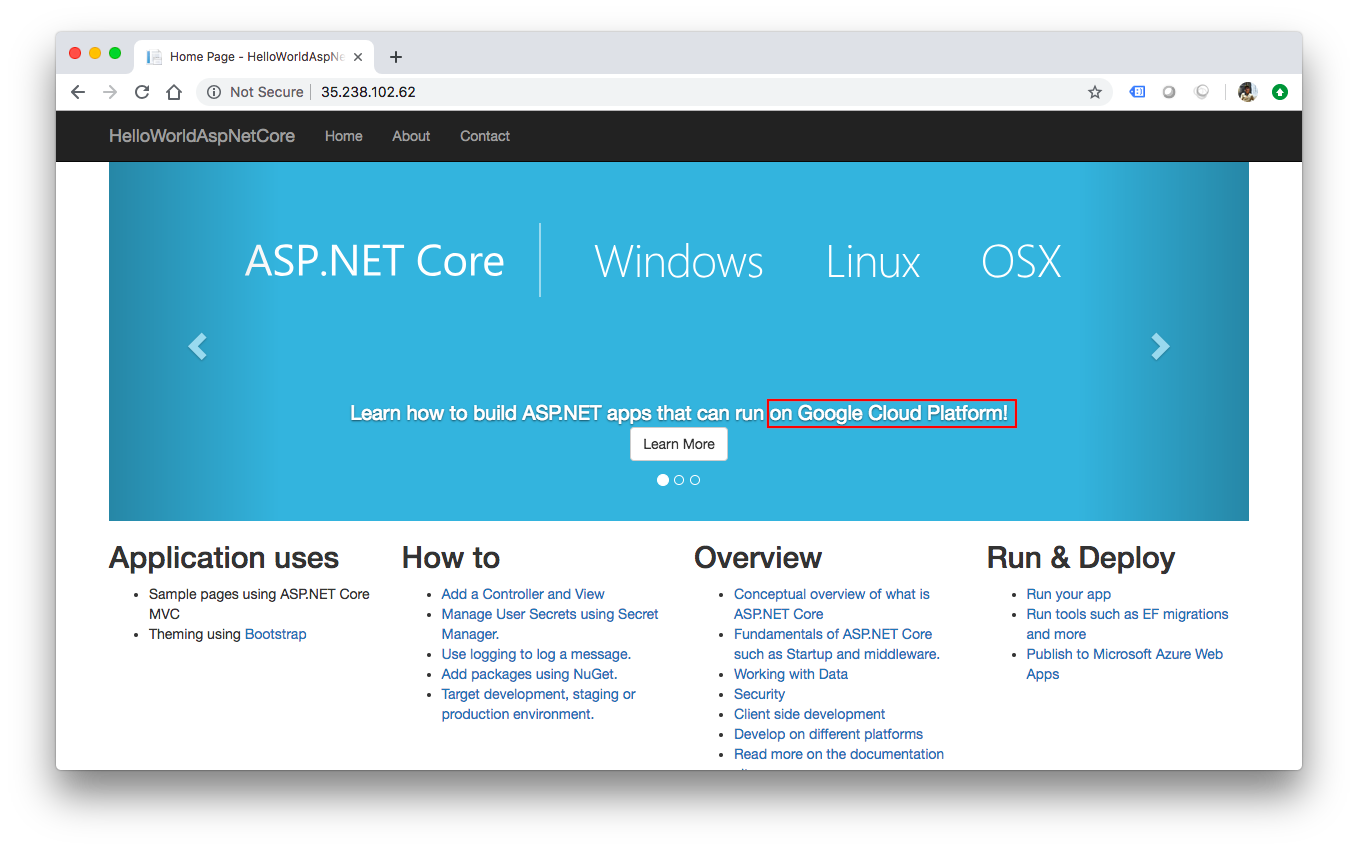
Open up our browser and visit http://<replace-with-external-ip>. Even after multiple refreshes, we should see the message "Learn how to build ASP.NET apps that can run on Google Cloud Platform!".
Sometimes, we might want to split traffic between versions for testing. For example, we might want to send 75% of the traffic to the v1 and 25% of the traffic to the v2 version of the service. We can easily achieve this with Istio.
Let's create a new aspnetcore-virtualservice-weights.yaml file to refer to the two subsets with different weights:
apiVersion: networking.istio.io/v1alpha3
kind: VirtualService
metadata:
  name: aspnetcore-virtualservice
spec:
  hosts:
  - "*"
  gateways:
  - aspnetcore-gateway
  http:
  - route:
    - destination:
        host: aspnetcore-service
        subset: v1
      weight: 75
    - destination:
        host: aspnetcore-service
        subset: v2
      weight: 25
Update the VirtualService:
$ kubectl apply -f aspnetcore-virtualservice-weights.yaml
virtualservice.networking.istio.io/aspnetcore-virtualservice configured
Now, when we refresh the browser, we should see the v1 vs. v2 versions served with roughly a 3:1 ratio.
Another useful development task to do for testing is to inject faults or delays into the traffic and see how services behave in response.
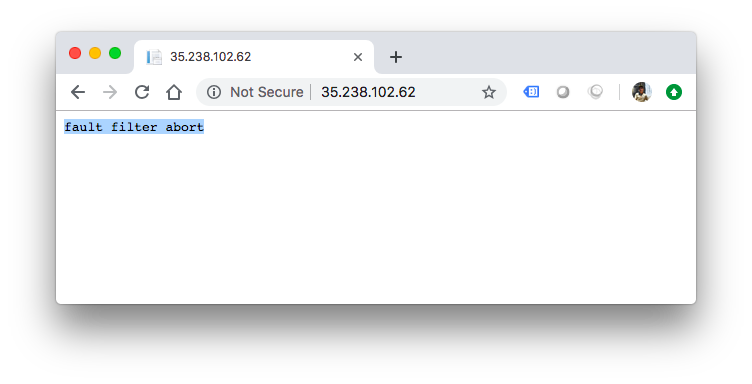
For example, we might want to return a bad request (HTTP 400) response for 50% of the traffic to the v1 version. Create aspnetcore-virtualservice-fault-abort.yaml file to match the following:
apiVersion: networking.istio.io/v1alpha3
kind: VirtualService
metadata:
  name: aspnetcore-virtualservice
spec:
  hosts:
  - "*"
  gateways:
  - aspnetcore-gateway
  http:
  - fault:
      abort:
        percent: 50
        httpStatus: 400
    route:
    - destination:
        host: aspnetcore-service
        subset: v1
Update the VirtualService:
$ kubectl apply -f aspnetcore-virtualservice-fault-abort.yaml
virtualservice.networking.istio.io/aspnetcore-virtualservice configured
Now, when we refresh the browser, we should see that half of the time, the v1 service returns a HTTP 400s response code.
Suppose we want to add 5 seconds delay to the requests. To do that, we need to create aspnetcore-virtualservice-fault-delay.yaml file with the following:
apiVersion: networking.istio.io/v1alpha3
kind: VirtualService
metadata:
  name: aspnetcore-virtualservice
spec:
  hosts:
  - "*"
  gateways:
  - aspnetcore-gateway
  http:
  - fault:
      delay:
        fixedDelay: 5s
        percent: 100
    route:
    - destination:
        host: aspnetcore-service
        subset: v1
Update the VirtualService:
$ kubectl apply -f aspnetcore-virtualservice-fault-delay.yaml
virtualservice.networking.istio.io/aspnetcore-virtualservice configured
Now, when we refresh the browser, we should see that requests are delayed by 5 seconds.
To delete the app:
$ kubectl delete -f aspnetcore-gateway.yaml
gateway.networking.istio.io "aspnetcore-gateway" deleted

$ kubectl delete -f aspnetcore-virtualservice.yaml
virtualservice.networking.istio.io "aspnetcore-virtualservice" deleted

$ kubectl delete -f aspnetcore-destinationrule.yaml
destinationrule.networking.istio.io "aspnetcore-destinationrule" deleted

$ kubectl delete -f aspnetcore.yaml
service "aspnetcore-service" deleted
deployment.extensions "aspnetcore-v1" deleted
deployment.extensions "aspnetcore-v2" deleted
To confirm that the app is gone:
$ kubectl get gateway
No resources found.

$ kubectl get virtualservices
No resources found.

$ kubectl get destinationrule
No resources found.

$ kubectl get pods
No resources found.
The simplest way to remove the Istio on GKE add-on is to delete the cluster. However, if the cluster has an existing application that must be preserved, disabling Istio requires the following steps listed here.
Delete the Kubernetes cluster, hello-istio:
$ gcloud container clusters delete hello-istio --region us-central1
he following clusters will be deleted.
 - [hello-istio] in [us-central1]
Do you want to continue (Y/n)?  y
Deleting cluster hello-istio...done.
Deleted [https://container.googleapis.com/v1/projects/hello-node-231518/zones/us-central1/clusters/hello-istio].
Docker & K8s
- Docker install on Amazon Linux AMI
- Docker install on EC2 Ubuntu 14.04
- Docker container vs Virtual Machine
- Docker install on Ubuntu 14.04
- Docker Hello World Application
- Nginx image - share/copy files, Dockerfile
- Working with Docker images : brief introduction
- Docker image and container via docker commands (search, pull, run, ps, restart, attach, and rm)
- More on docker run command (docker run -it, docker run --rm, etc.)
- Docker Networks - Bridge Driver Network
- Docker Persistent Storage
- File sharing between host and container (docker run -d -p -v)
- Linking containers and volume for datastore
- Dockerfile - Build Docker images automatically I - FROM, MAINTAINER, and build context
- Dockerfile - Build Docker images automatically II - revisiting FROM, MAINTAINER, build context, and caching
- Dockerfile - Build Docker images automatically III - RUN
- Dockerfile - Build Docker images automatically IV - CMD
- Dockerfile - Build Docker images automatically V - WORKDIR, ENV, ADD, and ENTRYPOINT
- Docker - Apache Tomcat
- Docker - NodeJS
- Docker - NodeJS with hostname
- Docker Compose - NodeJS with MongoDB
- Docker - Prometheus and Grafana with Docker-compose
- Docker - StatsD/Graphite/Grafana
- Docker - Deploying a Java EE JBoss/WildFly Application on AWS Elastic Beanstalk Using Docker Containers
- Docker : NodeJS with GCP Kubernetes Engine
- Docker : Jenkins Multibranch Pipeline with Jenkinsfile and Github
- Docker : Jenkins Master and Slave
- Docker - ELK : ElasticSearch, Logstash, and Kibana
- Docker - ELK 7.6 : Elasticsearch on Centos 7
- Docker - ELK 7.6 : Filebeat on Centos 7
- Docker - ELK 7.6 : Logstash on Centos 7
- Docker - ELK 7.6 : Kibana on Centos 7
- Docker - ELK 7.6 : Elastic Stack with Docker Compose
- Docker - Deploy Elastic Cloud on Kubernetes (ECK) via Elasticsearch operator on minikube
- Docker - Deploy Elastic Stack via Helm on minikube
- Docker Compose - A gentle introduction with WordPress
- Docker Compose - MySQL
- MEAN Stack app on Docker containers : micro services
- MEAN Stack app on Docker containers : micro services via docker-compose
- Docker Compose - Hashicorp's Vault and Consul Part A (install vault, unsealing, static secrets, and policies)
- Docker Compose - Hashicorp's Vault and Consul Part B (EaaS, dynamic secrets, leases, and revocation)
- Docker Compose - Hashicorp's Vault and Consul Part C (Consul)
- Docker Compose with two containers - Flask REST API service container and an Apache server container
- Docker compose : Nginx reverse proxy with multiple containers
- Docker & Kubernetes : Envoy - Getting started
- Docker & Kubernetes : Envoy - Front Proxy
- Docker & Kubernetes : Ambassador - Envoy API Gateway on Kubernetes
- Docker Packer
- Docker Cheat Sheet
- Docker Q & A #1
- Kubernetes Q & A - Part I
- Kubernetes Q & A - Part II
- Docker - Run a React app in a docker
- Docker - Run a React app in a docker II (snapshot app with nginx)
- Docker - NodeJS and MySQL app with React in a docker
- Docker - Step by Step NodeJS and MySQL app with React - I
- Installing LAMP via puppet on Docker
- Docker install via Puppet
- Nginx Docker install via Ansible
- Apache Hadoop CDH 5.8 Install with QuickStarts Docker
- Docker - Deploying Flask app to ECS
- Docker Compose - Deploying WordPress to AWS
- Docker - WordPress Deploy to ECS with Docker-Compose (ECS-CLI EC2 type)
- Docker - WordPress Deploy to ECS with Docker-Compose (ECS-CLI Fargate type)
- Docker - ECS Fargate
- Docker - AWS ECS service discovery with Flask and Redis
- Docker & Kubernetes : minikube
- Docker & Kubernetes 2 : minikube Django with Postgres - persistent volume
- Docker & Kubernetes 3 : minikube Django with Redis and Celery
- Docker & Kubernetes 4 : Django with RDS via AWS Kops
- Docker & Kubernetes : Kops on AWS
- Docker & Kubernetes : Ingress controller on AWS with Kops
- Docker & Kubernetes : HashiCorp's Vault and Consul on minikube
- Docker & Kubernetes : HashiCorp's Vault and Consul - Auto-unseal using Transit Secrets Engine
- Docker & Kubernetes : Persistent Volumes & Persistent Volumes Claims - hostPath and annotations
- Docker & Kubernetes : Persistent Volumes - Dynamic volume provisioning
- Docker & Kubernetes : DaemonSet
- Docker & Kubernetes : Secrets
- Docker & Kubernetes : kubectl command
- Docker & Kubernetes : Assign a Kubernetes Pod to a particular node in a Kubernetes cluster
- Docker & Kubernetes : Configure a Pod to Use a ConfigMap
- AWS : EKS (Elastic Container Service for Kubernetes)
- Docker & Kubernetes : Run a React app in a minikube
- Docker & Kubernetes : Minikube install on AWS EC2
- Docker & Kubernetes : Cassandra with a StatefulSet
- Docker & Kubernetes : Terraform and AWS EKS
- Docker & Kubernetes : Pods and Service definitions
- Docker & Kubernetes : Service IP and the Service Type
- Docker & Kubernetes : Kubernetes DNS with Pods and Services
- Docker & Kubernetes : Headless service and discovering pods
- Docker & Kubernetes : Scaling and Updating application
- Docker & Kubernetes : Horizontal pod autoscaler on minikubes
- Docker & Kubernetes : From a monolithic app to micro services on GCP Kubernetes
- Docker & Kubernetes : Rolling updates
- Docker & Kubernetes : Deployments to GKE (Rolling update, Canary and Blue-green deployments)
- Docker & Kubernetes : Slack Chat Bot with NodeJS on GCP Kubernetes
- Docker & Kubernetes : Continuous Delivery with Jenkins Multibranch Pipeline for Dev, Canary, and Production Environments on GCP Kubernetes
- Docker & Kubernetes : NodePort vs LoadBalancer vs Ingress
- Docker & Kubernetes : MongoDB / MongoExpress on Minikube
- Docker & Kubernetes : Load Testing with Locust on GCP Kubernetes
- Docker & Kubernetes : MongoDB with StatefulSets on GCP Kubernetes Engine
- Docker & Kubernetes : Nginx Ingress Controller on Minikube
- Docker & Kubernetes : Setting up Ingress with NGINX Controller on Minikube (Mac)
- Docker & Kubernetes : Nginx Ingress Controller for Dashboard service on Minikube
- Docker & Kubernetes : Nginx Ingress Controller on GCP Kubernetes
- Docker & Kubernetes : Kubernetes Ingress with AWS ALB Ingress Controller in EKS
- Docker & Kubernetes : Setting up a private cluster on GCP Kubernetes
- Docker & Kubernetes : Kubernetes Namespaces (default, kube-public, kube-system) and switching namespaces (kubens)
- Docker & Kubernetes : StatefulSets on minikube
- Docker & Kubernetes : RBAC
- Docker & Kubernetes Service Account, RBAC, and IAM
- Docker & Kubernetes - Kubernetes Service Account, RBAC, IAM with EKS ALB, Part 1
- Docker & Kubernetes : Helm Chart
- Docker & Kubernetes : My first Helm deploy
- Docker & Kubernetes : Readiness and Liveness Probes
- Docker & Kubernetes : Helm chart repository with Github pages
- Docker & Kubernetes : Deploying WordPress and MariaDB with Ingress to Minikube using Helm Chart
- Docker & Kubernetes : Deploying WordPress and MariaDB to AWS using Helm 2 Chart
- Docker & Kubernetes : Deploying WordPress and MariaDB to AWS using Helm 3 Chart
- Docker & Kubernetes : Helm Chart for Node/Express and MySQL with Ingress
- Docker & Kubernetes : Deploy Prometheus and Grafana using Helm and Prometheus Operator - Monitoring Kubernetes node resources out of the box
- Docker & Kubernetes : Deploy Prometheus and Grafana using kube-prometheus-stack Helm Chart
- Docker & Kubernetes : Istio (service mesh) sidecar proxy on GCP Kubernetes
- Docker & Kubernetes : Istio on EKS
- Docker & Kubernetes : Istio on Minikube with AWS EC2 for Bookinfo Application
- Docker & Kubernetes : Deploying .NET Core app to Kubernetes Engine and configuring its traffic managed by Istio (Part I)
- Docker & Kubernetes : Deploying .NET Core app to Kubernetes Engine and configuring its traffic managed by Istio (Part II - Prometheus, Grafana, pin a service, split traffic, and inject faults)
- Docker & Kubernetes : Helm Package Manager with MySQL on GCP Kubernetes Engine
- Docker & Kubernetes : Deploying Memcached on Kubernetes Engine
- Docker & Kubernetes : EKS Control Plane (API server) Metrics with Prometheus
- Docker & Kubernetes : Spinnaker on EKS with Halyard
- Docker & Kubernetes : Continuous Delivery Pipelines with Spinnaker and Kubernetes Engine
- Docker & Kubernetes : Multi-node Local Kubernetes cluster : Kubeadm-dind (docker-in-docker)
- Docker & Kubernetes : Multi-node Local Kubernetes cluster : Kubeadm-kind (k8s-in-docker)
- Docker & Kubernetes : nodeSelector, nodeAffinity, taints/tolerations, pod affinity and anti-affinity - Assigning Pods to Nodes
- Docker & Kubernetes : Jenkins-X on EKS
- Docker & Kubernetes : ArgoCD App of Apps with Heml on Kubernetes
- Docker & Kubernetes : ArgoCD on Kubernetes cluster
- Docker & Kubernetes : GitOps with ArgoCD for Continuous Delivery to Kubernetes clusters (minikube) - guestbook
Ph.D. / Golden Gate Ave, San Francisco / Seoul National Univ / Carnegie Mellon / UC Berkeley / DevOps / Deep Learning / Visualization